How to: Install new Upstream O2 Sensors | Ford Explorer Forums - Serious Explorations

  • Register Today It's free!

How to: Install new Upstream O2 Sensors

barenfang

Active Member
Joined
January 2, 2009
Messages
50
Reaction score
3
City, State
Muncie, Indiana
Year, Model & Trim Level
2000 Explorer XLS
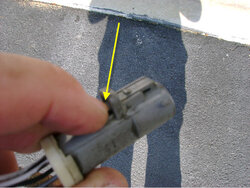
I decided to write this thread because I could not find any posts in the forum about changing the upstream O2 sensors with pictures.

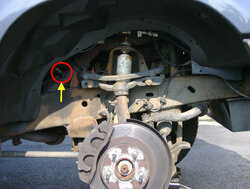
Stats- I have a 2000 Explorer XLS 4WD with the 4.0 OHV. The truck has 138,000 on it and this is the first time the O2 sensors were changed.


Step 1

Tools – I used a jack, jack stand, lug wrench, 7/8” box wrench, PB Blaster, and the O2 sensor kit from Harbor Freight. Look in the latest issues of any four wheel drive magazine for a 20% off coupon for Harbor Freight. Another tool I used not pictured was a breaker bar.
 

Attachments

  • Step 1 Tools.JPG
    Step 1 Tools.JPG
    32.4 KB · Views: 17,429


Join the Elite Explorers for $20 each year.
Elite Explorer members see no advertisements, no banner ads, no double underlined links,.
Add an avatar, upload photo attachments, and more!
.


How to" Install New Upstream O2 Sensors

Step 2

Jack up the car and make sure to place a jack stand underneath as well for safety. Remove the driver’s side tire and the splash shield. Now spray the base of the O2 sensor liberally with PB Blaster. Now start the car and let it run for about 5-10 minutes. Shut off the car, disconnect the negative battery cable, and spray the sensor base again with more PB Blaster.
 

Attachments

  • Step 2 Driver side Tire Removal.JPG
    Step 2 Driver side Tire Removal.JPG
    62.4 KB · Views: 19,311


Step 3

Make sure you are wearing some leather or mechanics gloves because the exhaust and sensors will be hot. I found the best tool to use on the driver’s side is the 7/8” box wrench. However, before that go to step 4
 

Attachments

  • Step 3 Driver O2 Location.JPG
    Step 3 Driver O2 Location.JPG
    67.3 KB · Views: 19,410


Step 4

Before removing the sensor unplug the sensor from the connector. It is hard to see in the picture, but the connector is located right behind the EGR tube that connects to the header.
 

Attachments

  • Step 4 O2 Driver Connector.JPG
    Step 4 O2 Driver Connector.JPG
    67.4 KB · Views: 17,882


Step 5

This picture shows you the tab you need to push down to unhook the sensor.
 

Attachments

  • Step 5 Connector example.JPG
    Step 5 Connector example.JPG
    72.8 KB · Views: 17,689


Step 6

I tried using the O2 sensor tool and the 7/8” box wrench from the driver’s side, but there is not enough room. So I went under the vehicle and had room to use the box wrench. The room was tight, but good enough. Now the sensor is on pretty tight and you will have to give it some umph. If it still will not budge then go back to step 2 and spray more PB Blaster, reconnect the battery cable, run the car for a few minutes, disconnect the battery cable, and spray PB Blaster again. You may have to repeat this step several times.
 

Attachments

  • Step 6 Driver Under side.JPG
    Step 6 Driver Under side.JPG
    53.9 KB · Views: 17,312


Step 7

Here is what the old sensor looked like. Not bad, but a little corroded. The process to put the new sensor on is basically putting some anti-seize on the threads of the new sensor, screwing it on from underneath the car, and then hooking up the connector. Put the wheel back on and you are finished with the driver’s side.
 

Attachments

  • Step 7 Old O2 Sensor.JPG
    Step 7 Old O2 Sensor.JPG
    50.4 KB · Views: 17,347


Step 8

Passenger side. Again you will need to repeat step 2.
 

Attachments

  • Step 8 Passenger side tire removal.JPG
    Step 8 Passenger side tire removal.JPG
    56.5 KB · Views: 39,762


Step 9

Here is the location of the passenger side O2 sensor. It is a little easier to get to.
 

Attachments

  • Step 9 Passerger O2 Sensor.JPG
    Step 9 Passerger O2 Sensor.JPG
    62.9 KB · Views: 64,457


Step 10

The location of the connector is straight up from the O2 sensor. It disconnects the same way as the driver’s side.
 

Attachments

  • Step 10 Passenger O2 Connector.JPG
    Step 10 Passenger O2 Connector.JPG
    53.5 KB · Views: 55,123


Step 11

Here I was able to use the O2 Sensor tool and a breaker bar. If the sensor is stubborn go back to step 2 and repeat the PB Blaster and heating parts. The process to put the new sensor on is to put anti-seize on the threads, screw it on, and then connect.
 

Attachments

  • Step 11 O2 Sensor tool.JPG
    Step 11 O2 Sensor tool.JPG
    42.2 KB · Views: 17,301


Step 12

Thought while I was here I would clean up the wheel well, paint it with undercoating, and put on a new splash shield. Put the wheel back on, lower the vehicle, and you are good to go.
 

Attachments

  • Step 12 Repaint wheel well.JPG
    Step 12 Repaint wheel well.JPG
    47 KB · Views: 16,854


How is this not a sticky yet? Why hasn't anyone replied at least?! It's the only thread I could find on this site that actually shows where the sensors are located.


Thank you! I am trying to replace my O2 sensors and this is a very helpful thread! The other thread about that involve removing the center console to get access to the sensors connectors. That console is NOT easy to remove. At least mine is not budging.


I pulled with all I got, I hit the bracket... that thing is not moving. Maybe you had the short console, I have the EB long one, with cooling vents on rear.


On my 5.0L V8 I did take a look thru my passanger side wheel well and the sensor is not like on the 4.0L V6. It is further "down" towards left, not visible from the opening. I am more concerned about the stupid connector - that's the one I cannot get without removing the center console and cutting the floor mat. Mmmm... Next I will try to remove completelly the wheel shield.


How many o2 sensors does it have? The parts store keeps telling me 4, but I can only locate 3.


Of course there are 4. One very visible and three hidden :)
One before and one after the each catalythic converter (you got two of those).


Join the Elite Explorers for $20 each year.
Elite Explorer members see no advertisements, no banner ads, no double underlined links,.
Add an avatar, upload photo attachments, and more!
.


Great writeup Great pics!! Cant say enough about that O2 sensor tool. Picked mine up at Harbor Freight, replace post cat on my other SUV. Dealer only wanted $410.00. I was able to do it for $51.99 (bloody knuckles and arms and 4 hours as well). Not much room on other SUV.


Back
Top