My new 347 | Page 3 | Ford Explorer Forums - Serious Explorations

  • Register Today It's free!

My new 347

Teaser pic. Should ship today.
More to come when I get my hands on it.

Where's that hard-on Smilie? :eek:

Professionally built stock bottom end by Ford Strokers 28oz imbalance crank
Wiseco pistons, shooting for around 9.6 to 1 comp.
gt40p heads ported (by Thumper) with 1.94/1.54 SS undercut valves and upgraded springs. Intake ports measured 140cc
Custom cam designed with my rear mount turbo in mind

28oz Damper DamperDudes.net (Americas Largest supplier of harmonic balancers)
28oz flex Plate 1830201 - Small Block Ford 289-351W 1963-1982, 28 oz Ext-bal, 164 Teeth
TCS Torque converter shooting for 2400 (1800 stock) stall. Single over-sized clutch for lockup to try to get that turbo spooling, and weight moving.
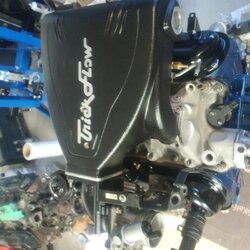
Trick Flow Track Heat intake
Scorpion Endurance Series Rocker Arms SCC-SCP3021BL
Rocker Arm Channel Kit M-6588-A50
Rocker Arm Pedestal Shim Kit M-6529-A302
Head Dowels TFS-51400420
Comp Cams Hydraulic Roller Lifters 851-16
Pushrod Length Checker TFS-9000
Rocker Arm Pedestal Shim Kits M-6529-A302
water pump reverse rotation GMB-125-1960
Oil Pump Melling M68
ARP Head Studs @ 80lbs w moly
ARP Oil Pump Driveshaft Kits 1 54-7904
ARP High Flexplate Bolt Kits 100-2901
PCV Valve EV127A
push rods: Chromoly, 5/16 in. Diameter, 6.250 in. Length, Ball/Ball Ends Comp Cams CCA-8400-16

gaskets:
header gasket remflex 3028 or Earls Pressure Master 29D03AERL
oil pan gasket Fel-Pro OS34508R
Head Gaskets Fel-Pro 9333PT1
lower intake: Fel-Pro FEL-1250s3
Oil Pan Gasket FEL-OS13260T
Bolt O ring oil filter adapter FOTZ6749B
Block O ring oil filter adapter F6TZ6L621AA edit: it was for too large of a circle. I had to cut it back and use ultrablack to ensure a seal.

Crank bearings....Very sad story on my new motor
695-MS590HX x 1 MAIN BEARING SET Standard Size
695-CB634P20 x 8 CONNECTING ROD BEARING 20 thou undersized for cut crank :(
edit...New cam synchro gear needed. Shaft size .531 Use a steel gear

edit:
moved to Twisted Wedge fac 170 heads
Pushrods: 5/16" with a length of 6.7"
Comp Ultra gold 1.6 rockers
Custom FTI cam
Morel link bar lifters
rollmaster timing set
Fel-Pro 1133SD4 MLS head gaskets

Strategy is REAC4A2 for Tuning

Siemens Deka 63lbs/hr EV6 Injector Part #108191
Aeromotive 340 Fuel Pump, part #11542

347 at Ford Strokers.jpg


Join the Elite Explorers for $20 each year.
Elite Explorer members see no advertisements, no banner ads, no double underlined links,.
Add an avatar, upload photo attachments, and more!
.


Looking good can't wait to see and hear more


Join the Elite Explorers for $20 each year.
Elite Explorer members see no advertisements, no banner ads, no double underlined links,.
Add an avatar, upload photo attachments, and more!
.


Fuel line and rail

Thanks again 4pointslow!!
I only stabbed myself once, and not even that badly.
What worked for me was:
1. Wrap electrical tape on both sides of where I'm about to cut.
2. Cut around the braid without staying in any one spot too long (melts the electrical tape).
3. unwrap the electrical tape, and re-wrap the end the fitting is going on using a very slight overlap on the end, and stretching the tape really tight. This compresses the hose really well, and doesn't leave any steel braid sticking out to catch on the end when installing and create misery. Also, only use about one and a half wraps to keep the outside diameter from increasing un-necessarily.
4. add some assembly lube to the outside of the electrical tape and push the fitting on. It was super easy.

I might have over complicated this, but my hands are still sore from the first attempt and didn't want to get stabbed by the braid ends again. After installing the ends, I did run around the end of the fitting with a knife to pull off the exposed electrical tape for a cleaner look.

edit: Here's the link where I replaced my fuel filter with a high flow unit and ran an6 from tank to fuel filter
http://www.explorerforum.com/forums/showthread.php?t=393262&highlight=filter
 

Attachments

  • 5 an6 fitting installed.jpg
    5 an6 fitting installed.jpg
    63.3 KB · Views: 370
  • 6 fuel rail adapter fitting.jpg
    6 fuel rail adapter fitting.jpg
    53 KB · Views: 366
  • 7 Fuel rail.jpg
    7 Fuel rail.jpg
    57.6 KB · Views: 359


Pressure Test

Once you get the whole fuel system done pressure test it, before putting everything else back together. Better to find any leaks before it is all back together.


wow don, you have been busy. motor bay looks a million times better then before


Just watching with a jealous grin:popcorn:


wow don, you have been busy. motor bay looks a million times better then before

My wife is starting to throw comments at me about being absent. I did warn her I would be pretty much unavailable thru this process. I don't think it really helped. Last night was just going so much better than the night before, I didn't want to stop the progress.

I'm bar-tending tonight, so nothing will happen. This weekend I'll dump a couple of litres of mercon 5 synthetic in the new torque converter and install it. I'll also install the lower intake.

I'm really wrestling with changing out the rest of the atf fluid. I do have a drain plug in the bottom of my trans pan. Even if I didn't change the filter, I could easily change the fluid (Its just kinda cost prohibitive). Then, If I'm changing the fluid, I should really drop the trans pan and change the filter. It just doesn't stop.

edit: my engine dipstick was welded yesterday. The welder did a great job. He said he used tungsten steel to make the welded area even stronger. He did a great job. One less oil leak.


egr tube fitment

in my best Flintstones imitation....

boooo brother Quartz, boooooo

****, its about 3/8" too long with the trickflow intake. Modding has its challenges.
 

Attachments

  • IMG_20150608_202254.jpg
    IMG_20150608_202254.jpg
    60.9 KB · Views: 329
  • IMG_20150608_204354.jpg
    IMG_20150608_204354.jpg
    82.8 KB · Views: 342


It's those little thing like that-


I removed the amount I needed and used a tube just large enough to go over the cut area, like a sleeve. Once it fit good, I marked it with a sharpie and took it to an exhaust shop to have it welded. It did create 2 welded areas, however butt welding that thin tube together would have been too tricky.


Do you know what kind of metal the tube is?

I like the idea of a sleeve (Great idea), but getting the right sized (and metal type) of tubing concerns me.

Your comment also reminds me I should go out and do the cut and fit myself using the motor as a template so the welder isn't guessing.


I'm pretty sure it's stainless. You might get lucky and find a slightly larger chunk of egr tubing off another vehicle. In my case a chunk off a 1984 dodge truck worked


Ah, recycling. Love it.
I just cut my egr tube to a but joint exactly where I need it.

I have another welder/fabricator I can take this to and see what he says. I have no doubt he will do a superb job, its just going to cost me. That and he's super busy, I took a couple of aluminum bungs to get welded up and he says it will be a few days. I can hardly wait to hear what he's going to say tomorrow morning :D
Good thing we get along well.


Arrrrg!!!!!! :banghead::banghead::banghead:

you know what i JUST thought of now??? i have a few templates of the egr made from steel from when i was going to make those m112 mounts, and intake tubes!!!! we could have just put them in between the valve and intake elbow and used it as a spacer with longer bolts!!!!!!!!

man, im a bone head....


oh yea, [MENTION=17822]Turdle[/MENTION], nice job on that elbow BTW. it looks like a pretty close match for guessing!


No biggie Tim, this is going to get done one way or another.

And Yes, Thanks Jon!
My apologies, I really wanted to show it off with a completed motor. Id say the elbow is perfect.


pushrods and cam sync

The good news is I measured pushrod length correctly and the rockers installed perfectly.

Bad news, calve covers are (were) not wide enough to clear the roller rockers. Some massaging, and I am good to go.

Too bad for the powder coating. I'll give that area a good sand and paint. It will be far from perfect, but its not like there's much visible with the engine dress installed.

If all goes well, Tim will help me get the block back in this weekend. Once its bolted to the trans, I'll be able to work away at the top and front dress myself.

I sure hope that egr tube fits when it comes back from the welder.
 

Attachments

  • IMG_20150609_220219_hdr.jpg
    IMG_20150609_220219_hdr.jpg
    87.1 KB · Views: 340


Tim came over for a bit tonight.

first two pics are from yesterday with the motor mocked up on a stand to make sure my egr issue was taken care of.

3rd pic was tonight's progress.

even the front diff is in!

My oil return location in the valve cover is spot on. We have motor front dress, top dress, and radiator left. Not bad for an evenings work.

Tim's the brains here.
 

Attachments

  • mocked up motor on stand.jpg
    mocked up motor on stand.jpg
    76.2 KB · Views: 340
  • intake and elbow.jpg
    intake and elbow.jpg
    73.4 KB · Views: 320
  • motor bolted in.jpg
    motor bolted in.jpg
    65.2 KB · Views: 340


Progress

Congratulations on the progress!


Wheels

I like the look of those wheels!
Can we get another photo of the whole side of the truck?
What size tires are on them?


Join the Elite Explorers for $20 each year.
Elite Explorer members see no advertisements, no banner ads, no double underlined links,.
Add an avatar, upload photo attachments, and more!
.


Very nice Don, I just found this. Great work there on everything.


BTW, did you find out what size the block oil filter adapter is? Those are sized for the given filter, most 302 blocks have the FL-1A adapter in it. That's how some 4.0's use the FL-1A, and the later 4.0 engines take the FL-820S like your 302.

My 302 block still has it too, I haven't hunted that special large Allen bit yet, it's around 5/8" or so.


Back
Top