How to: - Parking Brake Removal and Installation (with pictures) | Page 4 | Ford Explorer Forums - Serious Explorations

  • Register Today It's free!

How to: Parking Brake Removal and Installation (with pictures)

Prefix for threads which are instructional.
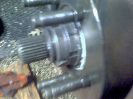
RBLAIS: did you get the actuating lever out without removing the axles? If so, what's the trick? I had my system torn down last fall and the actuating levers were seized. I managed to get one kind-of moving with penetrating oil and some heat with the lever still installed, but I really need to pull them and put them to the wire wheel on my bench. I'd like to do it without pulling the axles though if there is a way.


Join the Elite Explorers for $20 each year.
Elite Explorer members see no advertisements, no banner ads, no double underlined links,.
Add an avatar, upload photo attachments, and more!
.


Great Info!


...Does anyone else see no pictures in the first post?


...Does anyone else see no pictures in the first post?

I can't see them either. You can click on the "X"'s or the pic box and it will route you to the pic. But yeah, not to long ago you could see the pics


...Thanks for letting me know...Wonder if the pics could be fixed so other users could see it...


Upper outside spring

I used the coat hanger method on one side to install the upper outside spring, but didn't have a helper for the other side, so I used a long 45 degree needle nose pliers. Placed a small block of wood on the pads to avoid damage. Worked better than the coat hanger method. I was easily able to twist spring on.

Thanks for this great thread.


I found that a pair of "needle nose" vise grips worked best. You have to clamp them onto a straight part of the spring really hard, and at just the correct angle, but it gave me enough gripping surface to get the last spring in place. It is MUCH easier to do these with the axles out, of course, so anyone changing axle seals, or even differential fluid, should consider doing these parking brake shoes at the same time.


Adjuster screw direction ?

Every picture I've seen shows the adjuster screw *star* facing the front of vehicle and away from the caliper. I installed in the opposite direction as the adjusting slot in the dust shield better lines up in this direction.

Is this a major no-no or it doesn't matter.

Note: '97 XLT 5.0L AWD. The adjuster screw & slot is located at the bottom.

IIRC, isn't there some self-adjusting capability that requires a small arm to engage that wheel?? Or am I thinking of another vehicle??


IIRC, isn't there some self-adjusting capability that requires a small arm to engage that wheel?? Or am I thinking of another vehicle??

No, just the retaining spring that is parallel to adjuster.


No, just the retaining spring that is parallel to adjuster.

Then don't see why it would make a difference which way it pointed - so do whatever gives better access. I have never been able to adjust the things without pulling the rotor so I could see what I was doing.:(


no pics on my end

I do not see the pictures that should have appeared for this article. Is it just me?


Who sells the actuating lever for the parking brake?? For '01 explorer... I looked everywhere and can't seem to find anything. Mine was seized, i managed to get it out and pb blast the crap out of it but it looks like it had its days. It would be stupid to go to a junk yard and get one..


ttt


From this picture you can see all the parts. Here you can see there are two top springs, one inner and one outer. I only have the inner in mine.

parts9ak.jpg


I had to grind on these little nubs for clerance

holddown4pp.jpg


and grind down the little piece that sticks out here too. Remember I removed this spring seen here.

retractingspring4ao.jpg


Parking brake has seem to work perfecly fine now for the last 2 years like this;)

Sorry to revive this thread but I need some advise. I just replaced the rear axle seals and bearings of my 97 Explorer. I am having a tough time getting my rear rotor back on over the brakes shoes.

The adjuster is already at its minimum setting and the rotor can barely get in. The problem seems to be at the top side of the shoes where it mounts to at what is referred to as the Parking Brake Lever (Actuating Lever) on post #20.

In reading the post above, I'm not sure what Stic-o is referring to to grind down. Is it the bottom "finger" sticking out on the top side of the shoes? The old shoes that I removed did not have this finger but the new one I got from Autozone had it. Will grainding this down help move the shoes closer together?

Also is the actuating lever suppose to have an open/close motion? If so, mine does not move at all. Does that mean its seized? It was pretty rusty when I got in there. Could this be what is causing the shoes not to come close to each other?

Update:

I sprayed the lever with PB Blaster and heated it with a torch and sprayed it again. Then I got my vise grip and pressed together the upper and lower pieces and got it to loosen. I continued pressing them together and sprayed them with grease.

This made the brake shoes come together closer allowing the rotors to slide in easily.


Sorry to revive this thread but I need some advise. I just replaced the rear axle seals and bearings of my 97 Explorer. I am having a tough time getting my rear rotor back on over the brakes shoes.

The adjuster is already at its minimum setting and the rotor can barely get in. The problem seems to be at the top side of the shoes where it mounts to at what is referred to as the Parking Brake Lever (Actuating Lever) on post #20.

In reading the post above, I'm not sure what Stic-o is referring to to grind down. Is it the bottom "finger" sticking out on the top side of the shoes? The old shoes that I removed did not have this finger but the new one I got from Autozone had it. Will grainding this down help move the shoes closer together?

Also is the actuating lever suppose to have an open/close motion? If so, mine does not move at all. Does that mean its seized? It was pretty rust when I got in there. Could this be what is causing the shoes not to come close to each other?

Update:

I sprayed the lever with PB Blaster and heated it with a torch and sprayed it again. Then I got my vise grip and pressed together the upper and lower pieces and got it to loosen. I continued pressing them together and sprayed them with grease.

This made the brake shoes come together closer allowing the rotors to slide in easily.

I just unseized my lever as well last week. I had to take mine completely out and beat the **** out of it with a hammer and soak it in PB blaster. The good news is that I passed an inspection today!


About to tackle this job tonight with a vise grip and prayers. Question: If all I want to do is replace the shoes (Not the actuating parts), do I have to remove anything other than the springs? I apologize if this question comes in as ignorant, but I can no longer see the pictures in the OP. Thank you!


Welcome to the nightmare. I've been fighting with mine for three days now. Up here where there's snow 5 months a year, things get quite rusty. If your levers aren't seized, then you can leave them be. Mine were shot. $101.98 at the dealership got me three new ones. I figured half a chance was better than none with inspection time coming up. Just shoes and a hardware kit might do.


Join the Elite Explorers for $20 each year.
Elite Explorer members see no advertisements, no banner ads, no double underlined links,.
Add an avatar, upload photo attachments, and more!
.


About to tackle this job tonight with a vise grip and prayers. Question: If all I want to do is replace the shoes (Not the actuating parts), do I have to remove anything other than the springs? I apologize if this question comes in as ignorant, but I can no longer see the pictures in the OP. Thank you!

All the hardware, springs, adjuster, etc, all come loose anyways so no way around it. But most recommend replacing all hardware. It's cheap at the auto store and well worth replacing whether it's rusty or not.


Back
Top