I have a 96 Explorer XLT with 470K on the motor. Hoping to hit a half million. OBDII code shows a camshaft position sensor failure.
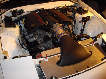
Does anyone have a photo of the camshaft position sensor AND location in the vehicle ? All other posts in the forum with this subject matter have broken image links.
Thanks
@pmonahan
Here's a link to 2 write ups with working pics.
If you're lucky, only the "cap and rotor" will need to be replaced.
But with 470K on the engine, I think there's a good chance you might be going a bit deeper, possibly having to change the entire assembly.
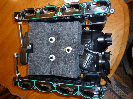
In short, the assembly body is made of aluminum, and the shaft that goes through it is steel.
Due to heat collecting at the back of the engine compartment, over the years, the oil tends to "coke" within the "heated" assembly body. As the "coke" increases, lubrication decreases to the point where eventually you'll hear a "chirping noise" under the hood, followed by catastrophic failure. The chirping noise is the sound of the steel shaft sticking within the assembly body due to the heavy "coking", and then breaking free.
Here's the kicker; If the assembly needs to be replaced, they can be VERY HARD to remove...
I recommend the hood be removed (4 bolts) and a slide hammer type tool to get 'em out.
@410Fortune might chime in on this - he made a tool - but it can STILL BE AN EXERCISE even with the tool and the experience...
The topic used to be quite common, when these beasts were going through their second and third owner.
In closing, ChiCom replacement assemblies are NOT recommended due to sizing issues. You'd be better off finding a rebuilt FORD assembly which will require some work on Google...
Hope this info helps - let us know how it works out!
Link 1: 1996 Explorer Sport 4.0L OHV Camshaft syncronizer positioning
Link 2: Camshaft Position Sensor replacement--a bit of discussion