The Black Hole | Page 87 | Ford Explorer Forums - Serious Explorations

  • Register Today It's free!

Post number 3327 has been selected as best answered.

Whats In A Name?

It was hot humid august night. The winds have all but vanished. I was doing my best to keep the sweat out of my eyes. The A/C was dying in my 94 Explorer, lovingly named "Pugly", and there was no relief in sight. I decided it was time to stop throwing good money into bad. I was gonna do the unthinkable,.......I was going to commit the most heinous crime of them all! I was going to trade Pugly in for a newer model! Oh the heart break! The insanity of it all! I couldn't believe the thoughts were even going through my head.

I managed to get the old girl back home, to her resting place. She seemed at ease in her familiar surroundings. I had to come up with an explanation to let her know of my evil plan. So i just gave her that old wink and grin that she likes to see from me as we made it back home from another day of adventure in the treacherous Midwestern terrain. I did my best in hiding my cynical thoughts, as I walked around to her rear flank and gave her that little pat on her bumper, as I always have when we part for the night.

The next morning I gave her a real good bath, cleaned behind her mirrors, and brushed her grill. She still looked pretty good for her age. Oh sure she had the tell tale signs, gravity has got its firm grip on her, and I am not the best cosmetics guy in the world. she didn't seem to mind too much, she still kept her nose up and drove with pride.

After looking at many vehicles I just could not find anything that had the same feel as my old girl. Then it happened! Was I seeing a mirage? Was I so desperate to find another rig that I was blinded by insanity? I found my replacement! I quickly made a sale with the owner, and brought it home.

When I pulled in the driveway, my heart sunk as I looked into the yard to see my 94 looking at me in disbelief. She was sunning herself in the grass looking all shiny and then, she just looked away from me. My heart was tearing in two. I parked the new rig, and walked up to her and gave her a soft spoken "Hello". No reply. I tried to tickle her mirrors, no response. The tension was so great, you could have cut it with a 32 count fine tooth hacksaw. I had to explain to her that she gave me great satisfaction for many years, and we made a terrific team together, but the time has come for her to just relax and enjoy her final days. She finally revved up, and understood, her days as my work horse has ended (so we thought).

I introduced her to her daily driver replacement. The shiny new(er) next generation of her kind. The 95 Explorer XLT. She warmed right up to it. Before you know it they were swapping stories. Now I had to ask her for help. I needed a name for the new ride,
so I went to find her, and what did I see? Those two were grill to grill in the driveway. rubbing chrome! I had to get the water hose out and break them up! Sheesh, she was acting like a girl at the prom dance! I let the name thing drop for awhile.

The new(er) Ex needed to get its shots, and a physical. When I got the word on it's health, I about had a coronary. "What do you mean Doc"! I yelled. "Your kidding right"? I asked. The Doc just shook his head and gathered his tools. As he walked away, He said it had a 50/50 chance of survival. My stomach knotted up, my teeth ground, my heart raced, and I could feel the energy build up as I let it all out, "Why! Why! Why did this have to happen"! I screamed.

The prognostic exam from the doc was as such. It had a blown steering rack, the shocks were gone, the brakes were non existent, front sway bar was cracked in half, the 3rd brake light was out, none of the windows or the moon roof would work, the door locks were broke, the rear end LS clutch pack was burned up, the tires were all in need of replacement, the spare was a Firestone recall and flat, the engine had a nasty tick to it, the TPS was shot, the MAF was corroded, the battery had a dead cell in it, the hood shocks were not working, the rear hatch lock was jammed up and you couldn't open it with out a key in the lock, The carpet was stained to no repair, the rear window wiper didn't want to work, and we could not tell what year its engine swap came from. it was a mess, to say the least.

I went in the house to get my gun. I was gonna just put it out of its misery right there and then. I suddenly realized I was out of ammo, from shooting at the jeep that was in my field. I went to the computer to find a place to buy some cheap ammo, and I stumbled across this website, explorerforum.com that said it could heal any ford Explorer no matter what the problems were! I jumped for joy, I could not believe the things I was reading! I wore out the search button, asked a bunch of questions. I quickly broke out my pen and paper, feverishly writing down things as I was learning! I had found a cure for everything that was wrong with my new transport. It was a Godsend, an angel from the SUV heavens!

I sprung into action. I worked day and night, Pugly was right by my side the entire time, helping me in any way she could. I never seen this side of her, and was really amazed at how well she handled the pressure. She gently squeegeed the sweat out off my fore head with her soft wiper blades as I worked away. After an entire weekend of work, I collapsed. I needed some rest, and so did the 95. The sun crested over the hills, and awoke me to a new day. I shuffled my feet to the window facing the driveway, peeled the drapes gently back, and peered out at the 95. WOW!
It had a its color back, and was looking great! Now as the time went on, (and most of my paychecks), and the selling of almost everything I own, for funds to get the 95 to its former glory.

After some time to reflect on this name thing, I strolled up and whispered into Pugly's passenger side mirror, and she giggled with delight.

I climbed up onto the front bumper in my pajamas and robe half opened, with a cup of coffee in one hand and the daily newspaper in the other, I raised my arms with out stretched hands and proclaimed the new name of the 95.

BEHOLD...........THE BLACK HOLE!!!!!!!! (Then the neighbor yelled at me to close my robe)


The End................(or is it just the beginning?)


Actually, only some of this really happened. :D


View attachment 324381


Join the Elite Explorers for $20 each year.
Elite Explorer members see no advertisements, no banner ads, no double underlined links,.
Add an avatar, upload photo attachments, and more!
.


So a while back, I was working under the rig, and noticed the Dixon Bros stabilizer bar needed to be painted again. Then I realized how much work was involved to remove it just to paint it. :eek:

As I put that idea on the back burner, I had light bulb turn on. Yes, it happens sometimes! :D

I thought what if I had a stronger bar made like the stabilizer bar, to go in front of the cross member to protect it from rocks. So I thought my idea out, put it to paper, and decided to see if I could have it made for me. I first thought of Dixon Bros, so I went to their website to discover that Dezert Fab in LV has taken over all production from them.

I attempted to get a hold of them a few times by emails. They wouldn't even respond to me. :( They probably seen Explorer, and laughed. Ok fine, forget you guys.

So here comes Brian1 to the rescue! Brian is a long time well respected member here, and I have wheeled with him a few times in the best places in the country. Great guy, with tons of well thought out fabrication projects under his belt. He took this on without hesitating, and made it a reality.

This went from light bulb idea, to paper, to brainstorming, to reality. Using a cut off 2nd gen cross member after someone did a SAS, he was able to use it to make a perfect fit like a glove solid functional piece of frame armor. :thumbsup:

I have witnessed two 2nd gens meet their demise after taking the death blow to the cross member corners. There is no fix for this, and both of these rigs ended up being stripped of parts, and sent to the crusher. I really have been scared of this happening to me one day, and wanted something to prevent it from ever happening.
:banghead:

So, after it was made, and shipped, I went at it Gmanpaint style and ground the .250" x1.75 crossbar, and the 2" mount DOM tubes clean. Cleaned / degrease, Acid etched, and 2 coats of Black POR15 coating system. I love this stuff. Hard as nails, closed pore, and gloss surface. Super tough and easy to clean. Garden hose is all it takes most of the time.

After sourcing the new longer bolts at my local CAT dealer/service center, I spent the afternoon installing it. Came out exactly as I expected, and I think it is going to be a strong mod that will pay off.

For my personal application, I needed the .250" wall x 2" DOM end tubes a little longer to push the bar out far enough to clear my thick skidplate. I used M16-2.0x140mm 10.9 zinc bolts. The ends of these tubes that mate to the cross member are tapered to fit snugly against the indents of the cross member. The inside of the tubes have a 1/2" solid end drilled out for a perfect no slop fit of the M16 bolts. For those that don't have anything (like my skid) in the way, a 130mm long bolt works. You just need it aprox 1/2" longer then stock. To keep the tubes clean and free of debris, I capped the ends with a set of spring type push in caps, after I painted them to match. Simple tap with a rubber mallet, and they go right in.

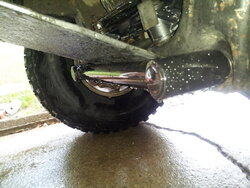
So here it is installed. I sprayed it down with the hose to clean up my mess, and when I seen the water just bead up on it, I decided to show how cool this POR15 is.

Brian & I have been calling it a "Bash Bar"

1) The front view
2) Pass side view
3) Dr side view.
4) The full Monty

The ground was wet, and I didn't feel like laying on it to take a pick from under it. lol I will reserve that pic after it has been tested on the trails. :D

If anybody is interested in this potentially rig saving piece of armor, contact Brian1 here on the forum. :thumbsup:
 

Attachments

  • BB front.jpg
    BB front.jpg
    59.8 KB · Views: 314
  • BB Pass side.jpg
    BB Pass side.jpg
    78.8 KB · Views: 314
  • BB Dr side.jpg
    BB Dr side.jpg
    75.5 KB · Views: 700
  • BH front profile.jpg
    BH front profile.jpg
    62.6 KB · Views: 346


Join the Elite Explorers for $20 each year.
Elite Explorer members see no advertisements, no banner ads, no double underlined links,.
Add an avatar, upload photo attachments, and more!
.


Just dropped the rig off at a local shop for the alignment. This job is always hit or miss getting it right with this rig. I hope they get it dialed in, as I just don't have the time to mess with them today. :shifty_ey

Crosses fingers!! :eek:


It drives straight, doesn't pull to either side, but..... It has a bit of bump steer.

Rack seemed nice & tight with no gear play. Everything checked out when I looked, and the shop couldn't see anything wrong with any suspension parts either. Hope not, I just about replaced everything. lol

All I can think of is how they set the castor, or didn't set the castor. I got a lifetime alignment, so it's no big deal to have them mess with it again.

When I installed the rack, I just counted the turns on the Outer TRE's, and put them back on the same amount of turns. It was way off. Steering Wheel was crooked, and I could feel the toe being out as I took it to the shop. I only went 4 miles and low speeds, I figured it wouldn't harm the tires that much. :dunno:

I'm no alignment guru, so maybe someone that knows how to decipher this printout can chime in and tell me if it looks alright, or if I need to bring it back to have them dial it in better. To me, it looks as if all they did was set the toe. :scratch:
 

Attachments

  • 95 alignment specs 9_15.jpg
    95 alignment specs 9_15.jpg
    47.1 KB · Views: 294


I like the look of the "bash bar". The only criticism I have for it would be to incorporate it into a skid plate design. I know your truck already had a skidplate, and my skid plate wraps beneath the cross member. I don't think both would fit on mine, however this would make a great fix for attaching the bottom of a skid plate, if it was hidden behind the plate and welded to it somehow. I like the added structural support it provides.


I like the look of the "bash bar". The only criticism I have for it would be to incorporate it into a skid plate design. I know your truck already had a skidplate, and my skid plate wraps beneath the cross member. I don't think both would fit on mine, however this would make a great fix for attaching the bottom of a skid plate, if it was hidden behind the plate and welded to it somehow. I like the added structural support it provides.

I hear you there. I appreciate the critique. It's nice to have some feedback after spending the time posting & sharing these things with everybody. :thumbsup:

Brian & I discussed this topic, but we decided to tackle it one step at a time.

This version is 1.0 & 2.0 is to weld a skid to it that goes under the cross member. I need to get to the metal shopping place, and pick up a variety of sheet & tube stock for this & other projects. Once I have the materials, I will get stuff cut to fit, and get it welded up.

1.0 still does what it is intended for, by taking the initial hit, and forcing the rock under the cross member to a degree. The additional skid will help it slide over much easier for sure.

Baby steps, more R&D, more fab work, and eventually I will call it good enough. :D


So I finally decided to get the E-brake working properly. The slider mounting brackets block the stock cable mount. It was ran over the slider tubes to the frame, but the tubes themselves were in the way of a straight bar mount added to the body mount tab. This never worked right because there was nothing holding the end of the front cable end, allowing the cable to move when the pedal was depressed. Make sense? lol!

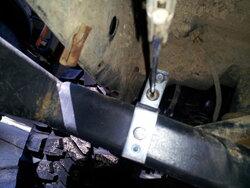
I ended up making a mount out of two thick L brackets, and shaped them to snug up against the slider frame tube. Placed back to back, and bolted together on top, then bolted to the sides of the slider tubes. After threading the cable thru the holes I made in the bracket, I was able to pry the prongs outward a little to ensure they stayed locked in place.

Now the slider tubes are only 3/16" thick. Great for rocks, but not so great for threading. The answer was threaded nut inserts. Drill a hole, slide these in, crush them like a rivet, and BAM! You have a perfect strong threaded hole to bolt to. These things are meant for a blind spot where you can't get to the backside of your material. Invented for use on aircraft panels. They come in many sizes, and types of materials. Metric sizes are the most popular. They are super strong, and are water tight if done correctly. Perfect for body panels, such as mounting items to the rooftop of cargo door. Just get the hole drilled as close to the size of the insert your using so it is a snug fit.

So the smaller size Rivnuts can be installed with a handheld rivet tool, but the larger ones need a pneumatic tool. I do not own such a tool, time to improvise. Cheaply of course! :D

I used a 1/4" insert, and that is the max you can use with the handheld squeeze tool, but... The thickness of the metal your using it on matters as well. 3/16" steel and a 1/4" insert with a hand tool does not work well. 1/8" thick metal is about as thick as you can use the tool with.

So as mentioned...I improvised using hardware and wrenches. Using a 3" bolt, a couple nuts, a spanner, and two box wrenches, I was able to successfully install the nuts to the thick tubes. Looking at the picture below of the set up, you can see how everything goes together. You hold the top of the bolt still as you tighten the bottom nut, crushing the backside of the nut tight to the metal. Note the end of the spanner wrench location. This is important. You must have something between the lip of the insert and the nut your turning. If not, the nut will spin the insert, and won't crush tight.

After the install, I am able to fully push the pedal down, and the cable sheath now stays put, allowing the cable itself to move back & forth as intended. Woot! :bounce:

Pics:
1) 1/4" threaded nuts & hand tool
2) My setup for crushing the nuts without the hand tool
3) Installed on top of slider tube front view
4) Rear view
5) Side view peeking under the rocker pinch fold
 

Attachments

  • mount installed side view.jpg
    mount installed side view.jpg
    53.2 KB · Views: 270
  • brake mount install rear view.jpg
    brake mount install rear view.jpg
    60.7 KB · Views: 253
  • brake mount install front view.jpg
    brake mount install front view.jpg
    45.5 KB · Views: 273
  • EB setup overhead.jpg
    EB setup overhead.jpg
    63.6 KB · Views: 269
  • rivnuts and tool.jpg
    rivnuts and tool.jpg
    101.3 KB · Views: 258


So the Plastidip hood has never grown on me, and I decided to remove it and just paint the hood myself.

My thinking is that it is a trail rig, and the paint job doesn't have to be perfect, so I chose a cheaper 3 step acrylic lacquer system. A quart of primer, base coat, and gloss clear coat was only $70. Sandpaper, thinners, spot filler etc... was another $30. So for $100 I can do it cheaper then all the shop estimates I got for three times as much. I made a make shift spray booth in the garage, and waited for the right climate conditions. Today was the day. :thumbsup:

Sanded all the clear off, and most of the paint to the factory primer. Filled all the imperfections with filler, and got it as flat as I desired. 2 coats of primer, 2 coats of filler primer, wet sand slick, and 3 coats of base color so far.

I must not of had the air pressure high enough at the gun tip, as I got a bit of orange peel. I was hoping to have it clear coated by the end of the day, but I have some color sanding to do. I will let it sit overnight to cure out before I attempt that.

After I get it sanded, and clear coated, I will post up some pics of the steps to remind myself what I actually did later on in life. LOL!
 

Attachments

  • hood primer coat.jpg
    hood primer coat.jpg
    32.9 KB · Views: 143
  • hood first basecoat.jpg
    hood first basecoat.jpg
    50.1 KB · Views: 150


Good to hear. I was real close to plastidipping my hood for a temporary fix. I guess I'll just wait. Looking forward to the pictures.


Good to hear. I was real close to plastidipping my hood for a temporary fix. I guess I'll just wait. Looking forward to the pictures.
When done right, it looks good, but it is just a temporary application that has to be stripped and done over & over. Too much effort in all that for me. What I didn't like about it is that everything sticks to it, kind of like tree pollen to caulking around a window does on the house. If you rub it, it leaves a mark, at least on the black it did.

i think you want about 40 psi at the gun for pressure.

Yeah, I had the regulator at the gun set at 22 psi (trigger pulled), thinking I was getting 10 psi at the tip. I'm sure it wasn't getting 10 psi, I had the air intake all the way up on the gun. When I finish the color sanding, and if I need to shoot another base coat, or when it's time to clear, I will kick up the pressure to compensate.

I only have a 1.4mm tip for this HVLP, which works fine for base, but I wish I had a 1.3mm for the clear. That larger tip might not atomize enough for a nice fine finish, and I will be wet sanding again before I buff. :banghead:


I flipped to last page to start reading, but I'm digging the MTRs..


I flipped to last page to start reading, but I'm digging the MTRs..

Thanks, I dig em too! :D

So Mother Nature has not been notified I need to spray this hood some more. Mid 50's & 70% humidity is not ideal for garage painting. Looks like Tue/Wed is supposed to reach 80* & 50% humidity, so I'm playing the waiting game again. Hopefully that pesky job thing doesn't get in the way! LOL!

In the meantime, I wet sanded (2000g) the orange peel off the base coat, and have decided to lay down a 4th color coat to make sure the sanding marks are covered. My fear is the clear will magnify them, and black shows everything.

I will reduce the paint a bit more, raise the gun pressure, and change my tip distance on the last coat. Hopefully this gives me a nice even flat, smooth finish. Acrylic Lacquer is nothing like a Urethane paint, and is a bit tricky to work with under less then optimal conditions. Wish I didn't go the cheapskate route now, but it is what it is. :rolleyes:


Hood repaint complete

Well, It's painted and back on. It's not the best paint job in the world, but it is much better then it was.

The good:
1) It is slick as snot, no dry spray, no drips, no runs, excellent coverage, and nice depth with the clear.
2) Its back on!

The bad:
1) The 2 coats of filler primer I sprayed from a can. This left spray lines that I did not see after wet sanding, or base coating. It wasn't until the clear coats dried and brought outside into the sunlight, to see them. Nice little high build lines from front to back.
2) I ended up with a nice eggshell on the clear. It's reflections are blurry because of this. I thinned it down the max of 10%, so it must be the amount I applied on each pass. This I believe I can fix with some wet sanding, and buffing liquids. Heck, I just might leave it alone and just wax it and call it good enough. :dunno:

I am going to let it sit for a week or so before I touch it again, if I decide to mess with it more. Thanks to [MENTION=38275]Benjamin[/MENTION] for the help installing it today! :thumbsup:
 

Attachments

  • BH hood fresh paint.jpg
    BH hood fresh paint.jpg
    39.5 KB · Views: 194
  • BH Hood on 1.jpg
    BH Hood on 1.jpg
    72.8 KB · Views: 198
  • BH hood on 2.jpg
    BH hood on 2.jpg
    80.2 KB · Views: 188
  • hood last base coat.jpg
    hood last base coat.jpg
    31.1 KB · Views: 131
  • hood water bead.jpg
    hood water bead.jpg
    119.7 KB · Views: 141


Swapped out the 100w halogens on the roof, for a set of 36w spot Led's. Completely changes the look of the rig to me. These are way brighter them the old set, but not sure about how far they actually throw the light yet. The 100w cans did throw the light pretty far, I hope these come close.

A pic of them with the larger light bar on. This was during the day with a bit of cloud cover, and they still like to blind me looking into them.
 

Attachments

  • Front Led's.jpg
    Front Led's.jpg
    83.6 KB · Views: 285


Sweet as Gregg!!!

'Bout the only bad thing with LED'S is they wont cook food or warm a pot of coffee ay :D


Hood is still untouched after the clear coat. I was told not to mess with it for 30-90 days because Acrylics take longer to fully cure. I really want to get it cut & Buffed, then waxed asap. I can cut and buff now, but to me there is no sense doing that until I can wax it since it is stored outdoors.

It's almost finished with the LED changeover. Finally removed the 12" fluro's under the center body cavities, and installed some Low Volt Led bars. These give off a better light, and are wired inline with the rest of the low volt under carriage Led's. Also gave me a chance to redo the wiring to everything else. New grounds to everything, and changed the routing for better placement. Looks much cleaner now.

All that's left is the 4 corner Rock lights. Still deciding on what I want to use for those as they do get rocks thrown at them. So a light that is protected, has a min of IP67 rating, and cheap enough to replace if broken. :scratch:

I was hoping to get away this weekend to camp, and trail ride, but "Life" got in the way again. :(


Edit: Think I found a led rock light worthy for what I'm after.
https://www.superbrightleds.com/mor...oof-off-road-led-rock-light-replacement/3030/


The Back up camera stopped working for some reason. :scratch:

I have power to both the camera & monitor, but the screen won't work. It flickers when turned on, but stays the black screen of death. Not sure which part croaked. :dunno:

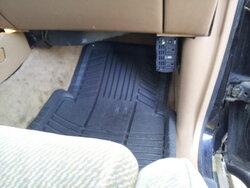
So after being out of ideas with that, I decided to mount the 800w inverter some place. Best place I could think of was on the pass side kick panel. I ran some 8ga wire with nice ring connectors, installed an inline fuse, and bolted it up tight. There is 3 good fuses to this unit, so I am not worried about it where it is for electrical concerns. A passenger will have to be aware of it, but where it sits, it doesn't touch my legs at all.
 

Attachments

  • 800w Inverter 2.jpg
    800w Inverter 2.jpg
    49 KB · Views: 225
  • 800w Inverter.jpg
    800w Inverter.jpg
    52.4 KB · Views: 244


Join the Elite Explorers for $20 each year.
Elite Explorer members see no advertisements, no banner ads, no double underlined links,.
Add an avatar, upload photo attachments, and more!
.


Got my hands on a Swagging tool, so I redid the limb riser cables. New crimps and stops on both ends, and lowered the upper mount since the new LED lights were kinda in the way.
 

Attachments

  • limb riser close up.jpg
    limb riser close up.jpg
    95.2 KB · Views: 226
  • limb risers.jpg
    limb risers.jpg
    107.9 KB · Views: 220


Back
Top