Well finally i got off my butt and decided to do two things, type out a resume and do a writeup at last of how i undercoated the truck.
Well this would be my first writeup so bear with me.
First things first, whatever i do here, if you wish to do the same, you do not need to do everything i do the way i do it, which my way is often the worst. You can do this any way you like, this is just how i did it.
*I WILL NOT TAKE ANY RESPONSIBILITY FOR ANYTHING THAT GOES WRONG, THIS IS SIMPLY A WRITEUP OF HOW I DID THIS, EVERYONE HAS THEIR OWN WAY*
Here are the materials I for sure used.
So here it goes
Step 1
First thing to do is to sand the rust off the truck, if you want to. Then wash the whole truck, underbody and all, with hot hot water if possible, cold water will do, but hot water is better.
Then you should find a location your comfortable to have your truck in for a few days, depending on the quality of your painting/ perhaps other work.
Here is a picture of were i set up, all the tools, etc, are shown. (note, this was taken after i painted it.)

And here is the pic of all the tools / materials

Step 2
Now its time to lift the truck, youl probably want to loosen the wheel nuts before you lift it up, considering the wheels will need to be removed. Lifting the truck up onto jacks, blocks, or whatever you use, will also allow you to easily paint directly underneath.
*on this note, make sure that its lifted high enough to take the tires off, you can take the tires off the front tires first, then jack up the back to remove the back tires. *
Now the placement of the jack should be at were the radius arms connect to the frame, for you 2nd gen and up people, youl have to find an equivelant.
For the back, you put the jack at were the leaf springs connect to the frame, not the shackles but the other end, which i have no clue what its called.
Also you may want to paint were the supports will be first, so you dont have to later, just give the paint enough time to dry first before you lift it.

**my method of jackstands is highly unreccomended, and please ive heard it already, i know its unsafe, i dont want to hear it again") .**
.**
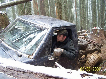
Heres what it looked like for the front lifted, the concrete blocks are about 50lbs each. You can see were i positioned them, which is whats important for this.

Step 3
Tires, spoken easily, remove the tires. Also remove the disk brake shield thingers (some Explorers might not have them) i painted these seperately. They also get in the way, depending on how detailed with colours you get.
Heres what it looked like setup with no tires on

And the wheel well on the front left

Step 4
This step will involve getting the front ready for the painting.
First you want to remove the from grill (and the other plastic things) then the bumper, and any other plastic or stuff that is easy to take off the front.
It should look like this when youve done these steps except the plastic thing around the rad, that can also be easily removed, though painting the black on it would probably make it look nicer then before. (2nd gen+ might look different, but the idea is there)

Step 5
Now we get on to painting the front.
First thing to do is use masking tape and newspaper to block off areas that you dont want the paint on, like over the lights, the fenders and stuff.
Heres how i had mine setup, some newspaper is probably removed.

Once your done that part, we move on to the bottom part of the front, you can paint the rad at the top part if you want, i did, and it looks great and still works well.
So the first thing i did was paint the front suspension on both sides, with the colour i wanted, aluminum (silver). This way i could cover up the suspension and paint the black around it. As well you can paint the brake calipers, i recommend using newspaper to cover the brake disks, but either way, the paint will wear off but smell bad in the process.

I also painted the disk brake shield things too

So once your done with the silver, or whatever colour, (if its all the same colour, you can skip steps before). Now we get to painting the rest, now i recommend you use rubberized undercoating paint, whatever brand you trust most, but most other paints will do too. This is the easiest yet most messy part, and watch it, if nature calls, wipe the rubber paint off your hands before hand, or else youl be doing alot of washing to get the paint off.


Now that that is done, we can move on to the other part for painting the front, the fine touches. I reccomend you use a small paintbrush (like 3/4" wide) and for me i painted small components (steering rods, sway bar, stuff smaller then them. If there is rubber paint on the parts you wish to brush paint on to, give a generous amount of the paint onto it, this way the brush doesnt stick and you also dont need many coats after. Also use the rubber paint and paint under the middle if you have enough of it.


Heres what mine looked like after

Step 6
Yes at last its time for the back, i recommend that you have read the previous paragraphs about painting the front, if you are just doing the back as this part wont be as descriptive.
The back is much harder then the front, well for me at least. I went through at least 5 cans of the rubberized paint doing the back. First we start with the suspension componenets once again, i painted them aluminum (silver) first and then once they were somewhat dry, i started with the black paint.
Aluminum (silver) done first, some black paint on too.

Starting to paint on the black paint (rubber paint)

Painting the rubber paint in the fenders.

Once your done there, you can also if your like me, paint the inside seam of the fenders, you should use newspaper and masking tape to form a straight edge of paint, after you paint it, the inside seam should look something like this.

Now its time for the fine stuff again, using the same way as for the front, paint the stuff like the sway bar, brake lines, etc.
Heres the finished product.


Well thats it, hope yall enjoyed that, and didnt fall asleep too fast, i tried to provide lots of pics. If ya got any questions, or want more pics, or anything just say, il try to answer them.
Well this would be my first writeup so bear with me.
First things first, whatever i do here, if you wish to do the same, you do not need to do everything i do the way i do it, which my way is often the worst. You can do this any way you like, this is just how i did it.
*I WILL NOT TAKE ANY RESPONSIBILITY FOR ANYTHING THAT GOES WRONG, THIS IS SIMPLY A WRITEUP OF HOW I DID THIS, EVERYONE HAS THEIR OWN WAY*
Here are the materials I for sure used.
- Rubberized undercoating paint (really inexpensive if bought from Wal-Mart). x 10 or more
- Aluminum (Silver) Spray paint. x2
- Paint brush paint,
Colours
- Aluminum (silver) x1
- New Holland Yellow x1
- Gloss Black x1
- Paint brush, small size preferably. x1
- Paint thinner, for the mishaps, and for clearcoat people, it will work on some stains on the paint (ie: it removes some of the rubber stain under the mirrors).
- Engine Degreaser (this stuff is not good for the rubber paint at all, so if ya overspray the hell out of the vehicle and manage to get the sides of it, this stuff can be applied to a rag, then use the rag to wipe away any accidents.
- Cups for paint thinner.
- Lots of newspaper, and cardboard or any other mat to lay/sit on.
- Masking Tape x3
- Favorite music, trust me, it helps
- Extra lighting (of course to see what your painting)
- Misc. sand papers, wire brushes, grinders, etc.
- Tools to dissasemble parts off the vehicle
- Tools to lift the vehicle up on jackstands, etc.
- And most importantly an indoor location to do this
So here it goes
Step 1
First thing to do is to sand the rust off the truck, if you want to. Then wash the whole truck, underbody and all, with hot hot water if possible, cold water will do, but hot water is better.
Then you should find a location your comfortable to have your truck in for a few days, depending on the quality of your painting/ perhaps other work.
Here is a picture of were i set up, all the tools, etc, are shown. (note, this was taken after i painted it.)
And here is the pic of all the tools / materials
Step 2
Now its time to lift the truck, youl probably want to loosen the wheel nuts before you lift it up, considering the wheels will need to be removed. Lifting the truck up onto jacks, blocks, or whatever you use, will also allow you to easily paint directly underneath.
*on this note, make sure that its lifted high enough to take the tires off, you can take the tires off the front tires first, then jack up the back to remove the back tires. *
Now the placement of the jack should be at were the radius arms connect to the frame, for you 2nd gen and up people, youl have to find an equivelant.
For the back, you put the jack at were the leaf springs connect to the frame, not the shackles but the other end, which i have no clue what its called.
Also you may want to paint were the supports will be first, so you dont have to later, just give the paint enough time to dry first before you lift it.
**my method of jackstands is highly unreccomended, and please ive heard it already, i know its unsafe, i dont want to hear it again
.**Heres what it looked like for the front lifted, the concrete blocks are about 50lbs each. You can see were i positioned them, which is whats important for this.
Step 3
Tires, spoken easily, remove the tires. Also remove the disk brake shield thingers (some Explorers might not have them) i painted these seperately. They also get in the way, depending on how detailed with colours you get.
Heres what it looked like setup with no tires on
And the wheel well on the front left
Step 4
This step will involve getting the front ready for the painting.
First you want to remove the from grill (and the other plastic things) then the bumper, and any other plastic or stuff that is easy to take off the front.
It should look like this when youve done these steps except the plastic thing around the rad, that can also be easily removed, though painting the black on it would probably make it look nicer then before. (2nd gen+ might look different, but the idea is there)
Step 5
Now we get on to painting the front.
First thing to do is use masking tape and newspaper to block off areas that you dont want the paint on, like over the lights, the fenders and stuff.
Heres how i had mine setup, some newspaper is probably removed.
Once your done that part, we move on to the bottom part of the front, you can paint the rad at the top part if you want, i did, and it looks great and still works well.
So the first thing i did was paint the front suspension on both sides, with the colour i wanted, aluminum (silver). This way i could cover up the suspension and paint the black around it. As well you can paint the brake calipers, i recommend using newspaper to cover the brake disks, but either way, the paint will wear off but smell bad in the process.
I also painted the disk brake shield things too
So once your done with the silver, or whatever colour, (if its all the same colour, you can skip steps before). Now we get to painting the rest, now i recommend you use rubberized undercoating paint, whatever brand you trust most, but most other paints will do too. This is the easiest yet most messy part, and watch it, if nature calls, wipe the rubber paint off your hands before hand, or else youl be doing alot of washing to get the paint off.
Now that that is done, we can move on to the other part for painting the front, the fine touches. I reccomend you use a small paintbrush (like 3/4" wide) and for me i painted small components (steering rods, sway bar, stuff smaller then them. If there is rubber paint on the parts you wish to brush paint on to, give a generous amount of the paint onto it, this way the brush doesnt stick and you also dont need many coats after. Also use the rubber paint and paint under the middle if you have enough of it.
Heres what mine looked like after
Step 6
Yes at last its time for the back, i recommend that you have read the previous paragraphs about painting the front, if you are just doing the back as this part wont be as descriptive.
The back is much harder then the front, well for me at least. I went through at least 5 cans of the rubberized paint doing the back. First we start with the suspension componenets once again, i painted them aluminum (silver) first and then once they were somewhat dry, i started with the black paint.
Aluminum (silver) done first, some black paint on too.
Starting to paint on the black paint (rubber paint)
Painting the rubber paint in the fenders.
Once your done there, you can also if your like me, paint the inside seam of the fenders, you should use newspaper and masking tape to form a straight edge of paint, after you paint it, the inside seam should look something like this.
Now its time for the fine stuff again, using the same way as for the front, paint the stuff like the sway bar, brake lines, etc.
Heres the finished product
.
Well thats it, hope yall enjoyed that, and didnt fall asleep too fast, i tried to provide lots of pics. If ya got any questions, or want more pics, or anything just say, il try to answer them.