CV Axle Replacement How To (Pictures) | Page 3 | Ford Explorer Forums - Serious Explorations

  • Register Today It's free!

CV Axle Replacement How To (Pictures)

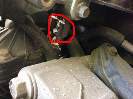
FYI, those "dust seals" in post #1/#33 are about $20 each from Ford, more than they used to cost. New axles should come with those, mine were toast when I was rebuilding my suspension. I'd like to find out how far they can be installed on the axle and still contact the spindle. They are supposed to set up next to the spindle, outside of the hub bearings. Heat killed mine, they were full of cracks(mail delivery). Regards,


Join the Elite Explorers for $20 each year.
Elite Explorer members see no advertisements, no banner ads, no double underlined links,.
Add an avatar, upload photo attachments, and more!
.


thanks man, this is exactly what i've been looking for.


BUMP!

i just blew a cv axle on the trail. truck is up there still going to fix it tomorrow. i need to print this off, great info!


The last thing holding the knuckle is the tie rod end. Remove the cotter pin and castle nut from the ball joint. The nut is 21mm, but a crescent wrench or pliers can work. After you remove the nut, a swift whack upwards should break it free. Please ignore the crappy boot on my tie rod end.

doing this i bent some of the threads on the tie rod end (bolt that comes through the knuckle). truck is still stuck up on the mountain, and there is rain/snow :(

probably have to leave it up there for the next week or so. good writeup


You can usually take a file to straighten out a few messed up threads. A triangle file works best. They also make thread repair files, or someone there (jtsmith) ought to have a TRE in his spare parts.

I usually put the castle nut on upside down to protect the threads when hitting the TRE. Alternatively, you can hit the part next to the knuckle, not the very end.

Edited first post.

Premier said:
good writeup


also seems like the caliper has moved (brake pads closer together) and it doesnt want to fit on the rotor.. is there a simple way to depress them?


I have "wiggled" the caliper back on the rotor- If your rotor doesn't have a lip on the edge, it shouldn't be a problem. If nobody has touched your brake pedal, you should be able to do that.

The other options are using a big C clamp to press the piston back in the caliper, and the best way is to crack your bleeder valve, press the piston in, close the valve, then bleed your brakes once it's all back together.


There is a location on the spindle where you should hit it to make the tie rod fall out. It's like the bottom of the spindle that you hit to release the lower ball joint. Those holes are tapered, smacking the side of the spindle just right will release the part.

For the caliper, keep anything from touching the brake pad for sure. It's easiest to use a screwdriver to open up some space between the pads and rotor before removing the caliper.


Don't take the caliper off of the bracket, leave the tiny bolts(with grease in the boots) in place untouched. Those greased sliding bolts will degrade fast if you open that seal and expose it. Only remove the two large caliper bracket bolts, lay the whole assembly on the UCA or the torsion bar. Be sure to tighten those big bolts just like a lugnut, over 80ft.lbs.


I have "wiggled" the caliper back on the rotor- If your rotor doesn't have a lip on the edge, it shouldn't be a problem. If nobody has touched your brake pedal, you should be able to do that.

The other options are using a big C clamp to press the piston back in the caliper, and the best way is to crack your bleeder valve, press the piston in, close the valve, then bleed your brakes once it's all back together.

yea, there is no lip on the rotor, so its flush.. the problem is someone did push on the brake pedal. the truck is on the trail and where the axle broke is downhill.. so its really a pain in the ass.

so yea, the brake pedal was depressed, and now the pads are too close to one another to slide back on the rotor. so i guess i will take a big c clamp and try that way first, and if that fails, i will have to bleed the brakes (freakin hate that)

thanks so much for the help. wish there was someone around here (slc) that could help me haha


If the caliper pistons didn't come out(fluid spilling) then you are fortunate and that can be fixed fast. Do you have a 2nd person, can you open the bleed screw and work on the pistons at the same time?

Have one person deal with the bleed screw. The person working on the caliper(pads/pistons) is leading, tell the other person when to open and close the bleed screw. Keep the bleed screw up as the highest point. With the screw opened, the pads/pistons are much easier to pry apart. Be sure to push on both pistons equally, you don't want one to come out while the other goes in. Take it slow until you get the pistons back in, then close the bleed screw while still pressing on the pads/pistons. That should result in no air getting past the bleed screw. Good luck,


that is perfect, thanks don! what kind of tool will i need to open the bleed screw?


About a 3/8" wrench, they are all near that size, some are 8mm(5/16").


and i should be able to do that with my hands correct? or will i need c clamps?


With the bleed screw open(keep the other caliper on the rotor or something), you should be able to press them in. The hard part will be having enough leverage or applying pressure evenly to the pistons. I would try a prying bar like a screwdriver between them. If you can find anything to fit between the pads to take up the space, that would help.

When the calipers are still on the rotor, you can pry between the pads/rotors with a little difficulty. Once you do get between them it becomes easy to pry them apart. So if you can find another object to place in there to give you just a small gap, that would make it easier to pry with.

First try it with bare hands, you may have no trouble doing it without prying objects etc. Take it easy, keeping the pistons in is the key.


i used c clamps and did it fine, replaced the tie rod end as well and finally off the mountain. this is a great site, thanks for the help


If you are looking at doing a wheel bearing replacement as well as CV axle replacement, is there enough clearance to pull the CV axle through the steering Knuckle once the hub bearing assembly is removed? I don't want to have to separate the UCA from the knuckle and possibly have to get a wheel alignment.


You shouldn't need an alignment- the ball joint has a groove in it where the pinch bolt fits through- there is no adjustment there- put it back like it was and all is good. The wheel bearing is a real PITA to remove without removing the CV axle, but it can be done though.


Join the Elite Explorers for $20 each year.
Elite Explorer members see no advertisements, no banner ads, no double underlined links,.
Add an avatar, upload photo attachments, and more!
.


I should have read this whole forum yesterday, BEFORE replacing the Axle. But let's not go into that now.

I do have an SAQ - What's the difference between the "front axle", which takes 80W-90 lubricant, and the "transfer case", which takes MERCON ATF? This is according to the owner's manual on my 2001 5.0 AWD.

When replacing the CV Axle, I saw the ... box it fit into was dry. I'm hoping that's the transfer case, because it took a whole quart of Mercon ATF. The ticking noise is gone, but it's got a vibration when accelerating.

Thanks in advance - great site!


Back
Top