First thing we gotta do here is remove the Shaker sub, trunk wall liners to get at the top shock nuts
You may have to use the special Shelby removal tool, CS-V15E GR1P5-AB to hold the dampeners from turning while you loosen the top nut
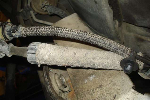
Then remove the sway bar, dampeners, and then loosen but don't remove the convertible uni-body support braces, and pop the coil springs out
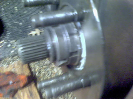
Once the old coils are out, take the new coil, adjustable coil spring seat and the factory coil spring insulator and reinstall, I installed it at maximum height, because the customer has a sloped driveway to contend with.
Now when installing the sway bar be sure to lube all the poly bushings really good so you don't get any squeaking noise as the suspension cycles through its range.
Used the supplied blue Loctite to secure the cap screws in the sway bar mounts
ONLY attach the sway bar at the bar to body locations first, then install the dampeners, along with the sway bar to axle mounting points, if you don't do this, you will be doing this again
Now on to the front of the vehicle, now to mention the rear is a little more work involved, but the front takes a couple of things into perspective, one is, it's easier,
EXCEPT is can be quite a bit more dangerous, you are dealing with a Macphersion Strut that is under 500+lbs pressure, this can mame, injure, or worse
death.
If you have not done these before, or are unsure, remove the strut assemblies and take them to a shop with a proper spring compressor for removal and re-installation, as you will have to use the original upper portion of the strut assembly for the new ones.
Remove the four nuts on the top of the strut tower and set them aside, and lift and remove the strut tower brace
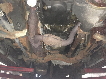
Then remove 18mm nut that secures the sway bar end link to the strut assembly, then the 10mm bolt holding the brake line and the fuzzy button securing the ABS wire, with a 18mm socket remove the two strut to splindle bolts and the strut assembly is free
With the struts out you and remove the four 15mm nuts securing the sway bar to the radiator core support and slip the sway bar out, note the orientation of the end links so you can transfer then over to the new sway bar.
Just like we did for the rear sway bar, use the supplied lube for the bushings and reinstall the new sway bar with end links back into the vehicle.
At this point the strut assemblies should be built and are ready for re-installation back into the vehicle, easiest way is to stab them up through the tower and finger tighten the two outer tower nuts, then add the tower brace w/nuts allowing them to hang there
Locate the spindle in the strut mounting location and slip the two 18mm bolts through with nuts.
Tighten the 13mm strut tower nuts and torque to spec, and then the 18mm spindle bolts, re-attach the brake lines, ABS wires, and sway bar end link.
You may have to raise and lower the car a few time to adjust the ride height to where you want it, making sure you understand that after a few hundred miles
IT WILL SETTLE and become lower.