Hello all...
To celebrate the final payment of my beast, I thought I should finally make a registry for it, with pictures and all!!!
When I was in college, I really wanted a 2door SUV that was relatively new and looked cool as well... Obviously that led me to the Explorer, as Jeeps are cool and all, but not all that practical as my daily driver. Sooo, the search was on! I wanted a black one, the newest year I could get for the Sport, with the fewest miles, with leather and a sunroof!
Eventually my searches pulled up my exact specs, but in South Dakota. I lived in Iowa at the time, so no big deal. I bothered the people at the dealership with my excessive questions to make sure it was worth the drive there to look at it. And luckily, it was! Mom and I drove out to look at it, and I ended up buying it. My first (nice) purchased car. It had 16,x.. on the clock, was a certified pre-owned from some old man so it was pretty nice, other than that saggy rear end.
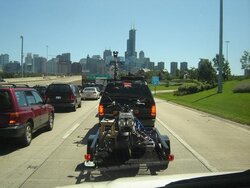
First thing I did was swap out the stereo, and figured out how to wire it to the factory sub thanks to the forum! Then, add a leafs were next. I had the next several years mapped out for it when the tires would wear out and I was outta college and could finally have some money!!! I took off the step bars and added a Yakima rack and drove it like that until I moved to CO. That's when the magic started to happen,.
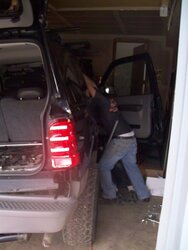
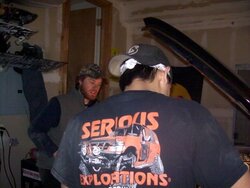
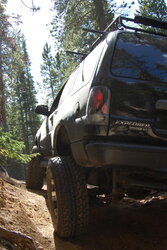
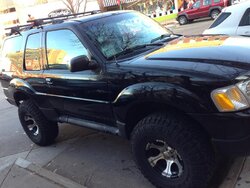
I knew I wanted to lift it from the day I bought it. When I started my big kid job out here in CO, I was able to buy new wheels, tires, shackles, and body lift to get it started! Thanks to the awesome boys from this forum (hokie, nssj2, sparkyXplorer) they got it on for me. I was of no use as I had just had shoulder surgery, but they made sure to get my on the right track
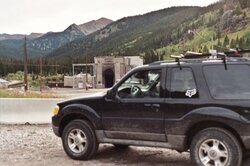
Awesome! Now I'm good to go. Cranked up the torsion bars a lil, time to hit the trails!!! Got my feet wet in Ouray with the group. And by feet wet, I mean I almost peed myself on Black Bear pass, haha
Since then, I've upgraded my exhaust to 2.5 pipes from the cats back, Flowmaster 50 muffler (kinda quiet) and a MAC intake. Changed out the plugs and wires at the same time, put on Motorcraft plugs and JBA cables...I also added a Yakima load warrior basket that is pretty quick to take off that holds my snowboard racks and my spare.
Mods to come ---- upgrading gears to 4.56, adding an Aussie locker (or something of that sort depending on my $$), removed gray plastic body panels to paint black, thus discovering rust on my doors GRRRRRR, need rock sliders, skid plates, and on and on.
To celebrate the final payment of my beast, I thought I should finally make a registry for it, with pictures and all!!!
When I was in college, I really wanted a 2door SUV that was relatively new and looked cool as well... Obviously that led me to the Explorer, as Jeeps are cool and all, but not all that practical as my daily driver. Sooo, the search was on! I wanted a black one, the newest year I could get for the Sport, with the fewest miles, with leather and a sunroof!
Eventually my searches pulled up my exact specs, but in South Dakota. I lived in Iowa at the time, so no big deal. I bothered the people at the dealership with my excessive questions to make sure it was worth the drive there to look at it. And luckily, it was! Mom and I drove out to look at it, and I ended up buying it. My first (nice) purchased car. It had 16,x.. on the clock, was a certified pre-owned from some old man so it was pretty nice, other than that saggy rear end.
First thing I did was swap out the stereo, and figured out how to wire it to the factory sub thanks to the forum! Then, add a leafs were next. I had the next several years mapped out for it when the tires would wear out and I was outta college and could finally have some money!!! I took off the step bars and added a Yakima rack and drove it like that until I moved to CO. That's when the magic started to happen,
.I knew I wanted to lift it from the day I bought it. When I started my big kid job out here in CO, I was able to buy new wheels, tires, shackles, and body lift to get it started! Thanks to the awesome boys from this forum (hokie, nssj2, sparkyXplorer) they got it on for me. I was of no use as I had just had shoulder surgery, but they made sure to get my on the right track
Awesome! Now I'm good to go. Cranked up the torsion bars a lil, time to hit the trails!!! Got my feet wet in Ouray with the group. And by feet wet, I mean I almost peed myself on Black Bear pass, haha
Since then, I've upgraded my exhaust to 2.5 pipes from the cats back, Flowmaster 50 muffler (kinda quiet
) and a MAC intake. Changed out the plugs and wires at the same time, put on Motorcraft plugs and JBA cables...I also added a Yakima load warrior basket that is pretty quick to take off that holds my snowboard racks and my spare. Mods to come ---- upgrading gears to 4.56, adding an Aussie locker (or something of that sort depending on my $$), removed gray plastic body panels to paint black, thus discovering rust on my doors GRRRRRR, need rock sliders, skid plates, and on and on.