Ryan's F250/Explorer hybrid | Page 6 | Ford Explorer Forums - Serious Explorations

  • Register Today It's free!

Ryan's F250/Explorer hybrid

I guess this is what happens when you take someone like me, add someone like Kevin (DWD), and throw in some beer!
Here's the plan. This weekend I'm looking at buying a '79 F250 longbed. It has a 300 straight 6, leaf sprung dana44 front, dana 60 rear. Basically, I'm going to put my Explorer body on the F250 frame.
First things first. I need to rebuild the 6banger, trans and axles. Then, I cut some of the frame out of the F250, bring the dana60 forward a bit. Fab up some body mounts, get creative with the engine compartment and steering linkage coming out of the Explorer firewall. Then I spend 200 or so manhours rewiring, fabbing fuel and brake lines. Then I slap on some new tires (38s?) with 8lug rims and bingo....I go 4wheelin'.
This project doesnt have a 100% green light yet. I have a lot of messurments to take on the F250. If I'm satisfied with my tape messure, then its a go.
This project will obviously take time. My inital calculations for money are around $5000, although thats surely going to climb 20-30% (much like building a house). That cost includes the cost of the vehicle, but does not include tires/rims.


Join the Elite Explorers for $20 each year.
Elite Explorer members see no advertisements, no banner ads, no double underlined links,.
Add an avatar, upload photo attachments, and more!
.


clutch slave
 

Attachments

  • mvc-819s.jpg
    mvc-819s.jpg
    39.3 KB · Views: 1,076


Join the Elite Explorers for $20 each year.
Elite Explorer members see no advertisements, no banner ads, no double underlined links,.
Add an avatar, upload photo attachments, and more!
.


Awesome!! More photos! Get under there and shoot the suspension and body mounts and stuff. Iquiring minds want to know :D

As far as putting his project on the main page. I already talked to Ryan about that and it will be coming up.

Ya know Ryan, I thought you were crazy for leaving Arizona... now I can see why you did!


My dads "hobby room" (which turned into a 1500 square foot shop) was a minor part of my moving up here. I knew what tools he had, and I knew about the shop since I helped build it along with the house. All that, and Washington is a beautiful state, with some amazing scenry and 4xing.
I've got Kevins camera, so I'll get some pics up of just about everything thats custom.
Oh, I'm elite now, so I can get pics on the web without having to use that crappy geocities!!!


If those are the 37's.... I got a few things to say...
Either waaaaaaaay drop that suspension, or sell em, and get some 42's... truck is definately too high, or tires are too small
Pete


The front suspension is shrunk, as low as it can go (unless I go spring under axle). The blocks were removed, as were an inch worth of leaves.
I think it will stay where it is ford now. After I finish getting some flex out of the suspension, the tires wont rub. And that is something I have a pet peave for, I hate tires that rub fender.
As for the tires, I just spent 2 grand on 5 tires and 5 rims, so I think I'll get my monies worth out of them.


Good Lord... ! Amazing man... You need to get a 4x4 magazine all over that...


yup, 17x8s.
the offroad mags usually require a fancy paint job or something. this is not a show truck, it gets used, and will be used...hard. thats why i did this. when i thought of tough, reliable trucks, i thought of f250s from the 70s.


Wwll, Rick's gets used hard... and with a nice coat of wax, you can get that green shining! :D


I didnt mean it like it came out. Lets try this again.
I know rick uses his rig, and his paint job is really kewl. I just cant justify the expense when its just going to get shredded. Especially in the pacific northwest. tree's and branches scatch at every turn. function over form i say.

Aparently, some smart person came up with a law that says your tires can't stick out more than 1.5 inches from the fenders. I can use an aftermarket fender flare in the rear with some mudflaps, and I'll get licensed and I wont have to worry about being pulled over. The problem lies with the front. The front axle is a little wider than the rear. I'm going to have to fab my own fender flares. This is going to be tricky.


You have to understand, I painted my truck with the sole intenton of getting a cover shot. I spent some bucks on it and got what I wanted. Now I'm using the truck for what I intended, but I have to admit, it's hard to bang up the nice paint job:D

I was told by a couple editors that if I wanted a cover shot I would have to paint it orange, yellow, red or something like that... They were right. The day after I got my truck out of the paint shop I took it to the Arizona Nationals where a magazine photographer spotted it and asked me to do a feature article shoot with him He didn't have to ask twice!

I think Arsoul's truck has a great chance at a inside feature article the way it is, but most likely not a cover. I would REALLY like to see several Explorers in one article, like Ryan's, Cory's and Paul Bs they all are set up hard core yet are very different in the execution. It would be a great article!!


Rick, how far out do the front fiberglass fenders flare? Are we talking 6inches? Because thats what I need on the front to completly cover my tires.


They don't cover mine completely and I don't have full width axles... Not sure exactly how far they flare.


Here come the photos.

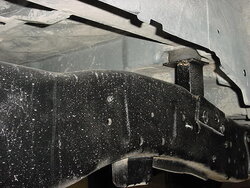
Rear body mount. Used the rubber from the F250 body mount.
 

Attachments

  • bodymount1.jpg
    bodymount1.jpg
    38.8 KB · Views: 969


Second to rear body mount, used the rubber from an explorer body mount.
 

Attachments

  • bodymount2.jpg
    bodymount2.jpg
    37.4 KB · Views: 926


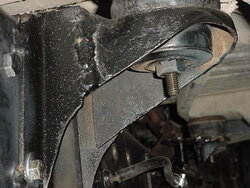
Front body mount. Its 8 inches tall. Why? Because the F-250 frame is a different shape than the explorers. We got the body as low to the frame as we could, there is about 1/4inch towards the rear between the body and frame.
Note the radiator and power steering cooler. The P/S cooler is the Explorer's old tranny cooler. The radiator is a chrylsler I picked out of the ReadyRad book. Its a 2core. The F-250 was a 3core, but this radiator has much more surface area, around 40 square inches. Haven't had a problem over heating yet.
The gap between the body and bumper is going to be filled in with diamond plate. The rear bumper (just finished building it, I'll mount it tomorrow) will also have diamond plate on top.
 

Attachments

  • bodymount3.jpg
    bodymount3.jpg
    37.1 KB · Views: 926


These are the two middle body mounts (picture was taken from the rear). The mount in the forefront is the one under the rear door, and the one in the background is under the passenger's feet.
 

Attachments

  • bodymount4.jpg
    bodymount4.jpg
    37.6 KB · Views: 929


The front bumper is mounted. Like I said, diamond plate has yet to come. I used the same bumper I had built for the Explorer previously. Its attached to the frame using 1/4 plate and six grade 5, 1/2 inch bolts.
I still have to mount 2 hella 500's on the bumper, just above the winch.
 

Attachments

  • bumper.jpg
    bumper.jpg
    37.3 KB · Views: 927


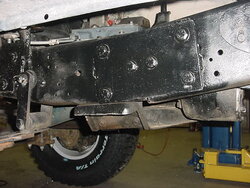
Here's a shot of the frame, where we made the big cut. 21.5 inches came out of here. Thats 1/4inch plate sandwhiching the frame together. Holding the plates and frame together are six grade 8 bolts, 9/16ths in diameter. I also tack welded the tops and bottems of the plates to the frame. I just dont like welding frames, the welds tend to pull carbon from the steel, weakening the frame at the weld.
As you can see, the cut was made just behind the tranny mount. The t-case mount had to be 'remanufactured', and sits just on the other side of the cut.
 

Attachments

  • framecut.jpg
    framecut.jpg
    39.2 KB · Views: 920


Join the Elite Explorers for $20 each year.
Elite Explorer members see no advertisements, no banner ads, no double underlined links,.
Add an avatar, upload photo attachments, and more!
.


A shot of the inside. Lots of work still to be done here. The shift handles had to be bent so I wouldn't have to move the center consoul back. The throw between 1st and Reverse is like 20 inches at the shifter nob (which i painted green). Do you have any idea how hard it is to paint the little numbers and letters on shift nobs!
I still have to finish the dash. All thats left there is wiring the ARB switches into where the t-case buttons used to be. I also still have to rhino line the interior.
 

Attachments

  • interior.jpg
    interior.jpg
    39.3 KB · Views: 907


Back
Top