- Joined
- May 3, 2003
- Messages
- 9,375
- Reaction score
- 54
- City, State
- Smithville/Austin, Tx
- Year, Model & Trim Level
- 08' Suzuki SX4
Take the battery out of the tray, and remove the tray from the vehicle.

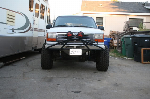
Get an idea where you want the battery and make sure you have the room for mounting

Next after marking and drilling the hols for the battery hold down/box studs, mark and drill the holes in the floor on the trunk area

Assemble the box as it would be in the car, and mount in the trunk through the hole you previously drilled

Then move to the front, and clip off the original battery terminals, and strip the casing back for the new lugs

The reason I used lugs instead of a union is it can be easily returned to somewhat stock if need be, now crimp on your new lugs for this conversion


Make sure they are good and secure fitting


Obviously I'm doing this for both positive and negitive


Be sure to heat shrink any area that may be exposed


Next I went and got 18 feet (each cable) of 2/0 cable to run from the trunk to where the battery used to be, and crimped again lugs at one end and the correct positive and negative terminals to these new cables, AFTER PRE-MEASURING THE RIGHT LENGTH, positive was longer than the negative.

The customer was also said he wanted the new cables color coded so he knew which was which, so I used colored heat shrink


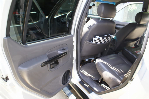
Now that I have run the cables and made all the connections, I took some more split core casing and covered them, and wrapped everything with electrical tape, for this customer, I ran the battery cables through the passenger side interior of the vehicle, some may prefer to run them under the vehicle, just be sure you secure the cables to the vehicle very well if your going to run them under the outside, in this case the owner spends more time off the road than on the road, so inside was a better choice (FORD = For Off Road Driving)


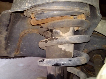
Remove the space saver tab that slide out of the battery tray and cut down the ramps at the far end for the larger intercooler tank

Locate and mark where you need to cut the tray for the drain petcock on the tank

And remove this insult for a cooling tank and pitch it in the trash!!!!!!!!!!!

Before you discard that worthless piece of junk, take the fittings out of it and clean the threads and put new teflon tape on them

CAREFULLY thread them into the new tank and tighten them up


You will have to extend one of the hoses (top intercooler hose) and then besure to refill with your systems favorite beverage")

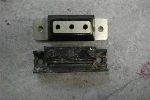
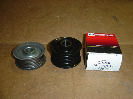
Here's the battery, with the lid off

Get an idea where you want the battery and make sure you have the room for mounting
Next after marking and drilling the hols for the battery hold down/box studs, mark and drill the holes in the floor on the trunk area
Assemble the box as it would be in the car, and mount in the trunk through the hole you previously drilled
Then move to the front, and clip off the original battery terminals, and strip the casing back for the new lugs
The reason I used lugs instead of a union is it can be easily returned to somewhat stock if need be, now crimp on your new lugs for this conversion
Make sure they are good and secure fitting
Obviously I'm doing this for both positive and negitive
Be sure to heat shrink any area that may be exposed
Next I went and got 18 feet (each cable) of 2/0 cable to run from the trunk to where the battery used to be, and crimped again lugs at one end and the correct positive and negative terminals to these new cables, AFTER PRE-MEASURING THE RIGHT LENGTH, positive was longer than the negative.
The customer was also said he wanted the new cables color coded so he knew which was which, so I used colored heat shrink
Now that I have run the cables and made all the connections, I took some more split core casing and covered them, and wrapped everything with electrical tape, for this customer, I ran the battery cables through the passenger side interior of the vehicle, some may prefer to run them under the vehicle, just be sure you secure the cables to the vehicle very well if your going to run them under the outside, in this case the owner spends more time off the road than on the road, so inside was a better choice (FORD = For Off Road Driving)
Remove the space saver tab that slide out of the battery tray and cut down the ramps at the far end for the larger intercooler tank
Locate and mark where you need to cut the tray for the drain petcock on the tank
And remove this insult for a cooling tank and pitch it in the trash!!!!!!!!!!!
Before you discard that worthless piece of junk, take the fittings out of it and clean the threads and put new teflon tape on them
CAREFULLY thread them into the new tank and tighten them up
You will have to extend one of the hoses (top intercooler hose) and then besure to refill with your systems favorite beverage
Here's the battery, with the lid off