BajaBlaster
New Member
- Joined
- September 24, 2018
- Messages
- 6
- Reaction score
- 4
- Location
- Minnesota
- City, State
- Minnesota
- Year, Model & Trim Level
- 2000 Explorer XLT 5.0
Hello fellow Explorers,
I have a 2000 Ford Explorer XLT 5.0 AWD. To make a long story short I wrecked the original viscous coupler and needed to replace it. I ordered a brand new Viscous Coupler on automatictransmissionparts.com for $200 which was about $100 cheaper than everywhere else. I also ordered a new chain and transmission/transfer case gasket along with a new seal kit. The shipping was free but it took me about 2 weeks to receive all the parts.
Now that I had the parts I went to removing the transfer case and taking it apart. I broke 5 bolts off in the back half of the case and a couple of weeks later I had the broken bolts removed and the threads fixed. May god be with anyone who has to take one of these apart! In the process of removing the snapped off bolts the guy used a torch and heated the main bearing up too much and wrecked it.
I have deleted my original question and posted my new question at the bottom of this thread along with pics. I am trying to find out if the seal I got in my seal kit will work for the bushing side. It looks different than the original seal I removed.
Thanks for any input!

The front half of BW4404 transfer case with all internal components.

"carrier assembly" with thrust washer on top, not sure what purpose the white plastic insert has in end of shaft.

"carrier assembly" removed. Gear with larger thrust washer on top.

gear and viscous coupler removed.

All internal components removed without the need of tools. Just slides apart.

Internal components that were removed laid out.

Another view of the transfer case with the chain guides removed. (note the center drilled broken bolts stuck in case)

Same view with the broken bolts removed and new bolts installed in those holes.

Close up view of the bearing with the snap-ring around the splined shaft.

New Seal kit I bought for the BW4404

For those of you who need to remove your transfer case, You must remove the center console to gain access to transmission access panel on the floor. It comes out as one large piece and there are only 5 bolts total that need to be removed that hold the center console in along with 2 metal clips that slide into mating slots in the bottom rear of the console. After removing the bolts you must pound the console back towards the rear of the vehicle to get the clips to slide out. This step was a pain! It helped to stick a flathead screwdriver under the console to try to bend the clips up slightly.

Here is the front of the console mounting location where you remove 2 bolts plus the one bolt holding the electrical connection together.

Here is the 2 rear bolts holding the rear of console to floor. (bolts are threaded into the holes they belong to)

Directly between the 2 seat belts are the slots in the floor that the clips mate to from the bottom and rear of center console.

Here is the transmission access panel removed. There is one small bolt in each corner. This step was very simple and straightforward and absolutely necessary to gain access to the top 2 bolts that hold the transfer case to the rear of the transmission. The carpet was sliced up the middle to gain access to panel. This cut will be covered by the center console once re-installed.

View inside access panel looking rearward to the 2 top bolts that hold transfer case to rear of transmission.

The Baja Blaster! Got it for $900 with 150,000 miles on it! Very Clean except for some minor rust on bottoms of rear doors. Possibly the best vehicle ever made for the snowy frozen lakes of Minnesota. Does better in the snow than my buddies fancy 2015 Chevy 1500 4x4!
There you go! I wish I had found a post like this with pictures when I started this project! If you need to remove your transfer case this information is Vital!
Thanks again for any help!
UPDATE 4/9/21 @11:30pm
I answered my own original question and was able to remove the bearing and bushing plus both seals with a hammer and punch and a large piece of metal that matched the diameter perfectly. It was far easier than I thought. Now I have a new question along with new pictures so you can see what I'm asking here. I have a new seal for the bearing side but the other new larger seal I have for the bushing side looks slightly different but seems like it would fit in fine. I am wondering if anyone knows if this is a newer upgraded design on the old seal or if this new one (with the brass/copper and extra lip) is for a different part of the transfer case?

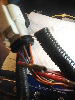
Here is the seal in question. This is the side with the bushing. This is the original seal still in place.

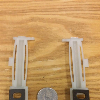
On the left is the new seal I have which has the same diameter in the mating area as the old seal (on the right) but also has a brass inner brace plus and extra lip. Does anyone know if this is for a different area or if this is a new upgraded design? The seal kit I ordered from transmissionpartsdistributor.com said this is for my BW4404 and all the other included seals are exactly like the old ones in looks and size.

The new seal in question is on top and you can see the added lip which looks like it would just help it seal against the outside of the case. Any help is greatly appreciated!
I have a 2000 Ford Explorer XLT 5.0 AWD. To make a long story short I wrecked the original viscous coupler and needed to replace it. I ordered a brand new Viscous Coupler on automatictransmissionparts.com for $200 which was about $100 cheaper than everywhere else. I also ordered a new chain and transmission/transfer case gasket along with a new seal kit. The shipping was free but it took me about 2 weeks to receive all the parts.
Now that I had the parts I went to removing the transfer case and taking it apart. I broke 5 bolts off in the back half of the case and a couple of weeks later I had the broken bolts removed and the threads fixed. May god be with anyone who has to take one of these apart! In the process of removing the snapped off bolts the guy used a torch and heated the main bearing up too much and wrecked it.
I have deleted my original question and posted my new question at the bottom of this thread along with pics. I am trying to find out if the seal I got in my seal kit will work for the bushing side. It looks different than the original seal I removed.
Thanks for any input!
The front half of BW4404 transfer case with all internal components.
"carrier assembly" with thrust washer on top, not sure what purpose the white plastic insert has in end of shaft.
"carrier assembly" removed. Gear with larger thrust washer on top.
gear and viscous coupler removed.
All internal components removed without the need of tools. Just slides apart.
Internal components that were removed laid out.
Another view of the transfer case with the chain guides removed. (note the center drilled broken bolts stuck in case)
Same view with the broken bolts removed and new bolts installed in those holes.
Close up view of the bearing with the snap-ring around the splined shaft.
New Seal kit I bought for the BW4404
For those of you who need to remove your transfer case, You must remove the center console to gain access to transmission access panel on the floor. It comes out as one large piece and there are only 5 bolts total that need to be removed that hold the center console in along with 2 metal clips that slide into mating slots in the bottom rear of the console. After removing the bolts you must pound the console back towards the rear of the vehicle to get the clips to slide out. This step was a pain! It helped to stick a flathead screwdriver under the console to try to bend the clips up slightly.
Here is the front of the console mounting location where you remove 2 bolts plus the one bolt holding the electrical connection together.
Here is the 2 rear bolts holding the rear of console to floor. (bolts are threaded into the holes they belong to)
Directly between the 2 seat belts are the slots in the floor that the clips mate to from the bottom and rear of center console.
Here is the transmission access panel removed. There is one small bolt in each corner. This step was very simple and straightforward and absolutely necessary to gain access to the top 2 bolts that hold the transfer case to the rear of the transmission. The carpet was sliced up the middle to gain access to panel. This cut will be covered by the center console once re-installed.
View inside access panel looking rearward to the 2 top bolts that hold transfer case to rear of transmission.
The Baja Blaster! Got it for $900 with 150,000 miles on it! Very Clean except for some minor rust on bottoms of rear doors. Possibly the best vehicle ever made for the snowy frozen lakes of Minnesota. Does better in the snow than my buddies fancy 2015 Chevy 1500 4x4!
There you go! I wish I had found a post like this with pictures when I started this project! If you need to remove your transfer case this information is Vital!
Thanks again for any help!
UPDATE 4/9/21 @11:30pm
I answered my own original question and was able to remove the bearing and bushing plus both seals with a hammer and punch and a large piece of metal that matched the diameter perfectly. It was far easier than I thought. Now I have a new question along with new pictures so you can see what I'm asking here. I have a new seal for the bearing side but the other new larger seal I have for the bushing side looks slightly different but seems like it would fit in fine. I am wondering if anyone knows if this is a newer upgraded design on the old seal or if this new one (with the brass/copper and extra lip) is for a different part of the transfer case?
Here is the seal in question. This is the side with the bushing. This is the original seal still in place.
On the left is the new seal I have which has the same diameter in the mating area as the old seal (on the right) but also has a brass inner brace plus and extra lip. Does anyone know if this is for a different area or if this is a new upgraded design? The seal kit I ordered from transmissionpartsdistributor.com said this is for my BW4404 and all the other included seals are exactly like the old ones in looks and size.
The new seal in question is on top and you can see the added lip which looks like it would just help it seal against the outside of the case. Any help is greatly appreciated!