K80's A4LD Rebuild Diary 2.0 part 2. | Ford Explorer Forums - Serious Explorations

  • Register Today It's free!

K80's A4LD Rebuild Diary 2.0 part 2.

K80

Well-Known Member
Joined
March 18, 2007
Messages
118
Reaction score
0
City, State
Oklahoma City, Ok
Year, Model & Trim Level
1989 Aerostar
This is part 2.

Part One is Here.

And Part Three is Here.
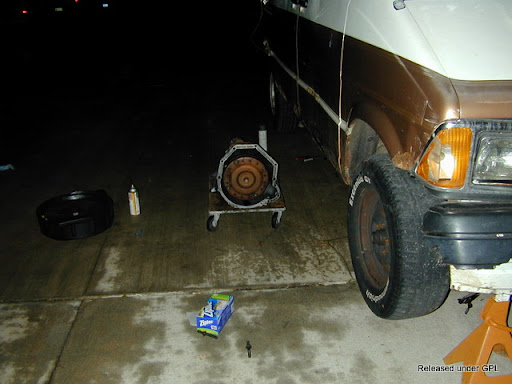

The tranny is out!

Tranny%20Out%202.JPG


Dirty%20Pan.JPG


Nasty-looking oil huh? Well that's less than 50 miles worth since I changed the fluid, filter and gasket. I did not flush the TC, so only about half of the fluid in the tranny stayed put.
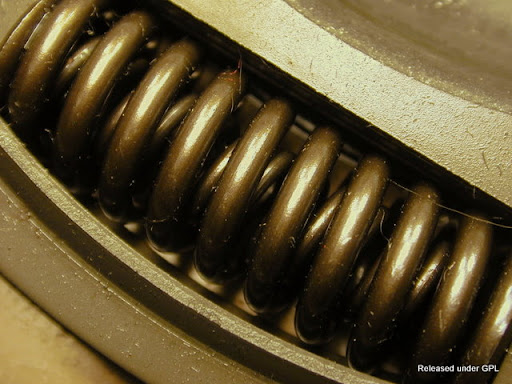
Dirty%20Pan%20with%20ATF.JPG

More pretty colors!
Dirty%20Pan%20with%20ATF%20and%20Crap.JPG

Look how deep this crap got after less than 50 miles! I cleaned all this out like it is below when I changed the fluid and stuff.
Dirty%20Pan%20in%20the%20Shower%202.JPG

The tranny bath!
Magnet%20with%20Shavings%201.JPG

Shavings on the magnet. Ordinarily, I would be pleased if this was the largest crap I pulled out of the tranny. Unfortunately, it is just the little stuff....see below.
Magnet%20with%20Shavings%202.JPG

Neodymium%20Magnet.JPG


I just don't like how cruddy that magnet got, so I am adding a neodymium magnet from the armature of a hard drive to assist in collecting this crap.

Neodymium%20Magnet%20with%20Ruler.JPG

Clean%20Pan%20with%20New%20Magnet%20and%20Gasket.JPG

The cleaned pan.
A4LD%20Stare-down.JPG

The tranny ready to go....
Uh-oh.JPG

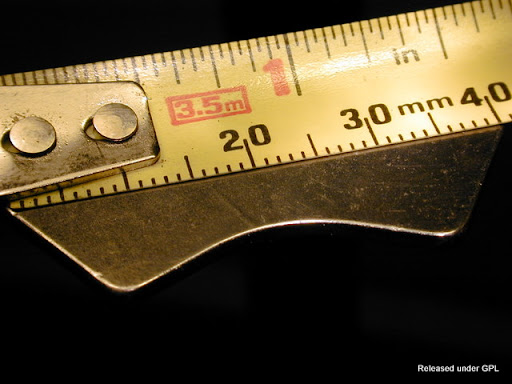
But what's THIS damn thing in the bellhousing? Closer look....
http://lh5.ggpht.com/_sm3FdBpsKcw/S1kMgsg50iI/AAAAAAAAAdM/zET5rYgaz5g/*******%201.JPG
Well this sucks. Haven't even cracked it opened yet and I find this ******* hanging out in the bellhousing. Wonder what it's from? Could be my starter, but I'm not convinced the starter would work while missing a piece this large....:rolleyes:
TC%20Snout%201.JPG

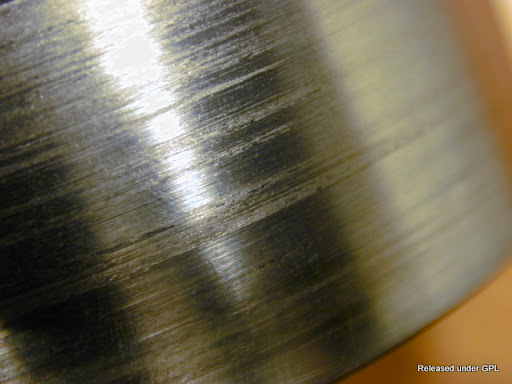
The TC snout looks questionable to me. I used the fingernail trick that Glacier mentions in his re-build, and there are definitely score marks here. As well as some funny-looking damage near the lip of the snout.

What do you think, people....new TC?
TC%20Snout%203.JPG

Input%20Shaft.JPG

The input shaft....Anyone think this scoring and pitting is a big deal? It passes the fingernail test....
Input%20Shaft%20Scoring%202.JPG

The%20Transmission%20Chair.JPG

This is an official ATSG Transmission Chair. Sure, okay, that's a lie. But the first time I rebuilt this tranny, this chair was involved thusly. I still have no engine stand.:(
Using%20a%20Breaker%20Bar%20on%20the%20Bellhousing%20Bolts.JPG

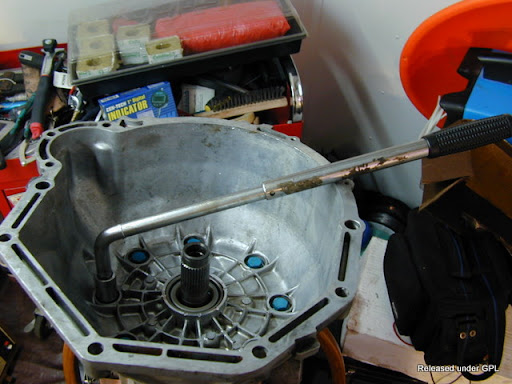
Using a breaker bar on the bellhousing bolts....

Part three is right around the corner.
Any advice welcomed warmly. :)

BTW, I am still BROKE, so the $25-dollar tires will be headed your way if you say "$100-this and $250-that! LoL.


Join the Elite Explorers for $20 each year.
Elite Explorer members see no advertisements, no banner ads, no double underlined links,.
Add an avatar, upload photo attachments, and more!
.


The torque converter should always be replaced in a rebuild as well as flushing the cooler & lines of any debris. The damage in those pictures makes be believe that the front pump gears were either misaligned or not aligned at all from a previous rebuild. Was a front pump alignment tool used on the front pump? Use a very fine grade of sandpaper or an abrasive pad to smooth out the input shaft.


The torque converter should always be replaced in a rebuild as well as flushing the cooler & lines of any debris. The damage in those pictures makes be believe that the front pump gears were either misaligned or not aligned at all from a previous rebuild. Was a front pump alignment tool used on the front pump?


Well, this is the original TC from when I bought Gulliver for $1. The first time I rebuilt the tranny, Glacier was kind enough to loan me his tool (shut up :nono:), and while I did determine that the bellhousing bolts will perfectly center the pump body, I used the tool anyway.
When I rebuilt the tranny the second time, I did not disassemble the pump body at all because the second re-build was more of a re-strengthening of some points I neglected to take care of on the first rebuild, such as all of the end-play measurements and selective thrust washer choices.
I cannot recall whether the TC always looked this bad, but I will be sure to replace it this time.
Also, I fully intend to do the pump body again, so I will get some pics of the gears up. The really cool part is I have some penatrant dye that aviation mechanics use to check props for hairline cracks, so I will be able to make DAMN sure the gears are solid.
I plan to use my little BH bolt trick to center the pump this time, because I feel it is important to see if this trick legitimately works.
Not to mention, there was never any gear noise associated with this damage, so I feel this must have been from the re-build the tranny shop did for the previous owner.

Any Ideas about that 5/8ths half-ring debris?


I suspect that the piece might have broken off from the inside of the torque converter. Don't take any shortcuts on aligning a rebuilt torque converter. You will need to use the proper alignment tool to prevent future damage to the torque converter, shaft, pump, and bell housing. Unfortunately, Glacier stopped loaning tools a while ago, so you might have to see if you could borrow one from a local source. It might be worth it for you to purchase one for future use.


Well then that does it. I will disassemble the TC to see what's up with it.

As for the align tool, unless I can find one for $20 or so, I will just have to do without. If the TC or pump gears break on me, oh well.

Hey, will THIS work?


Or this?


The torque converter is welded, so you can't disassemble it without cutting it open. You will have to give it into a rebuilding shop in order to avoid paying a core charge. The tool in the first link should work fine. WWW.TransmissionPartsUSA.Com has tools as well as parts, so you could save on shipping if you get everything in the same place.


I do intend to cut the TC open. I have some nice cutting wheels that will go through the seam weld like butter. I will rig a jig to keep the disk from cutting too deeply.
As for the core, that won't matter because I'm going to get a used one for about 15 bucks. It has to be better than the one I'm using now and if it does crap out on me, so what....15 bucks down the tubes...

I will go ahead and order that align tool in the first link. And hey! It's 20 Bucks! Beats the hell out of $122!

Thanks


A used one might have fragments from the transmission that it came from. You don't know if a used one came from a working transmission or how many miles it already has on it. They wear out just like any other part.


You are absolutely correct, of course. However, the fact remains that I must get Gulliver up and running as soon as possible. I cannot afford a TC rebuilt, core refund and all.
I can afford to judge the condition of the used one by examining the TC snout, then take it in to be flushed out. That's just the best I can do right now.


I suspect that the piece might have broken off from the inside of the torque converter. Don't take any shortcuts on aligning a rebuilt torque converter. You will need to use the proper alignment tool to prevent future damage to the torque converter, shaft, pump, and bell housing. Unfortunately, Glacier stopped loaning tools a while ago, so you might have to see if you could borrow one from a local source. It might be worth it for you to purchase one for future use.


Well, it did not come from the Torque Converter....Here's the pictures:

TC%20Top%20Cover%20TD%20with%20Scored%20Thrust%20Surface.JPG

TD%20into%20TC%201.JPG

TD%20into%20TC%202.JPG

TD%20into%20TC%203.JPG

TD%20into%20TC%204.JPG

TD%20into%20TC%205.JPG

TD%20into%20TC%206.JPG

TC%20Lockup%20Clutch.JPG

Stator%20Sprag%20Front%20with%20Loose%20Pins.JPG

Stator.JPG

Stator%20Sprag%20Race%20CU%20with%20Scoring.JPG

TC%20Lockup%20Clutch%20Thrust%20Washer.JPG


I am glad I disassembled it however; the wear on the clutch plate lining would not have been visible otherwise....

TC%20Lockup%20Clutch%20Plate%20Lining.JPG

TC%20Lockup%20Clutch%20Plate%20Lining%20CU.JPG


And, just for the mechanical beauty of it, here is a closeup of the spring assembly:

TC%20Lockup%20Clutch%20Damper%20Spring%20Assembly%20CU.JPG

All of the spring assemblies are likewise intact. But after seeing the inside of a TC for myself, it's clear why you get a core on them....The re-builders must have a horizontal spindle they can put the TC onto by the snout, rotate it under a plasma cutter and break it down in about 20 seconds... I want one!


I used an angle grinder with a bad-ass cutoff wheel. My air tool would have been too wimpy for the 10-or-so gauge iron of the housing. Only went through one blade making two circumferential cuts roughly 0.3" apart. Got some REALLY kick-ass shavings from it I spent a little time playing with on magnets in various conditions(ever watched 1g of Fe shavings dancing around between counter-rotating magnets at ~15K RPM?)and arrangements. I might post pics if I figure out my ISO and stuff....lol


Thanks, Brooklyn.....maybe the world needs a good CG demo of a tranny....you know, one that's color-coded, dynamic, and most importantly; TOTALLY free of words, that way it is intelligible to anyone who watches it. Hmmm....Oh yeah, that's what I've been busy with for the last week....not quite done yet, though.

The Canadian guy's video is better, I think. Had I not already disassembled my own TC and done mock-ups in AutoCAD Mechanical based on the photos I took, I would not be one bit closer to understanding why all the parts in the TC are there and exactly what they do and when after watching the "brain's" video. At least the Canadian guy has thought out what he's going to say.
But there is one question that really stuck with me....Okay I get why he is not cutting the damn thing opened inside....but am I supposed to believe that once he got it cut opened he could not then have taken it indoors somewhere for an hour to shoot, then edit the footage down to ten minutes on the computer he must have?:D
Okay, I'm being a biatch....but for real.....If it's worth doing, isn't it worth doing right?


Back
Top