Thermostat Replacement Help | Ford Explorer Forums

  • Register Today It's free!

Thermostat Replacement Help

slicky

Well-Known Member
Joined
November 25, 2015
Messages
123
Reaction score
6
Year, Model & Trim Level
2016 Explorer Sport
Guys, I feel like an idiot even asking this, but I can't have much downtime to sort this out and without a manual I feel like a blind kitten.
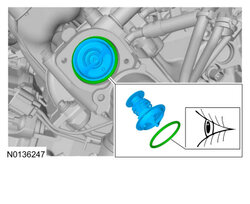
I am replacing the thermostat on my Sport with a 160 degree one and in my unsuccessful attempts to minimize coolant loose I did not quite note the way the original thermostat came out. I put the o-ring in first, then the thermostat, then the housing and tightened it all up (no idea what the torque should be). However, it is leaking quite profusely. How is the thermostat sealed against the housing as there is no o-ring between the two?
Thanks


Join the Elite Explorers for $20 each year or try it out for $5 a month.

Elite Explorer members see no advertisements, no banner ads, no double underlined links,.
Add an avatar, upload photo attachments, and more!
.


I think the thermostat goes in first and then the oring. Fordparts.com appears to show the opposite


is it a thick ring - like 3/8 thick or more

or is it a thin standard o-ring.


Its a standard thin o-ring. Per fordparts.com diagram, the o-ring goes in first and then the thermostat. This can not be correct. I did this and it leaked and ruined the o-ring. I will pick up a new o-ring and a gallon of dex-cool and will install the o-ring after the thermostat and contacting the removable housing.


Slicky,

I completely understand how it is not having a good reference.
According to this Shop manual diagram, it looks like the thermostat goes it first THEN the oring seal. Let me know if you have trouble viewing the image or if you want to see the whole instruction set.:thumbsup:

Diagram : Thermostat Diagram

EDIT: Forgot to add that diagram is for a 2012 3.5 VCT. But assume the assembly order would be the same for this thermostat configuration.


2016 Explorer Ecoboost Thermostat
 

Attachments

  • 2016 Ex Ecoboost Thermostat.jpg
    2016 Ex Ecoboost Thermostat.jpg
    56.6 KB · Views: 1,433


Thanks guys I put the new oring on the front of the stat last night and all is good....I will not touch the car again until I have a manual.


Thanks guys I put the new oring on the front of the stat last night and all is good....I will not touch the car again until I have a manual.

Glad to hear that fixed the issue!:thumbsup:


Bringing this back from the dead as I'm in the same spot. I replaced the t-stat on mine and never saw a rubber O-RING. I took the old tstat out and put the new in. Now, it's leaking. I went to Ford and got the seal - part number F1VY8255A. I see the confusion as, even at their parts counter, they show the tstat on the BACK of the unit - towards the engine. Not on the outside of the tstat near the housing.

I'm really stumped as to why I never saw the rubber o-ring, I just purchased, when I took it apart. Perhaps that rush of coolant coming out washed it away, and it's laying on the tranny somewhere? Not sure.

I plan to rip it apart tomorrow and put that seal in on the OUTSIDE of the tstat.

Shumax


Does the seal get stretched out and go over the edges of the thermostat? Or, does it simply lay on the front of the leading edge of the thermostat where there housing would hit the front edge of the t-stat? Does that make sense? I looked at my seal and I can't see how it would be stretched over the outer edges of the tstat, but I see a few photos on the web that look like that. I also see some where you appear to just lay it on top of the front edge of the tstat where the housing meets it. Thanks!


Does the seal get stretched out and go over the edges of the thermostat? Or, does it simply lay on the front of the leading edge of the thermostat where there housing would hit the front edge of the t-stat? Does that make sense? I looked at my seal and I can't see how it would be stretched over the outer edges of the tstat, but I see a few photos on the web that look like that. I also see some where you appear to just lay it on top of the front edge of the tstat where the housing meets it. Thanks!

Here´s the workshop manual, it´s for a 2013, should be about the same, you put the thermostat, jiggle valve at 12 o´clock if it has one, this part isn´t in the manual. Then after the thermostat the seal goes in. Make sure the thermostat and seal stay in place before tightening things up. Let me know if you need any other instructions.
 

Attachments


Thanks for the reply - truly appreciate it! So, by your post, you don't stretch that seal over the edges of the thermostat, correct? You simply put the thermostat into the housing. Push it back as far as you can. Then, put the seal in on top of the thermostat. From there, connect the housing and secure the two bolts. Correct? That's what I did this morning and I've driven it 60 miles and no problems. The "jiggle" valve is not something I contemplated - not even sure what that is? I just put the thermostat in and then the seal. I sure hope that "jiggle" valve orientation doesn't matter?

Thanks again!
Shumax

Yes, you don't stretch the seal, you put it after the thermostat. No leaks means you did fine. For the jiggle valve I've always been told to put it at 12 o clock, the Service manual don't even mention it. On the other hand if the service manual doesn't mention it you probably going to be ok placing it at any position. The jiggle valve is basically a purge valve within the thermostat, it will pass bubbles and coolant even when the thermostat is closed. It's not that big of a deal.


Thanks for the reply - truly appreciate it! So, by your post, you don't stretch that seal over the edges of the thermostat, correct? You simply put the thermostat into the housing. Push it back as far as you can. Then, put the seal in on top of the thermostat. From there, connect the housing and secure the two bolts. Correct? That's what I did this morning and I've driven it 60 miles and no problems. The "jiggle" valve is not something I contemplated - not even sure what that is? I just put the thermostat in and then the seal. I sure hope that "jiggle" valve orientation doesn't matter?

Thanks again!
Shumax

Sorry to hear you were having some difficulties but glad to hear the crew on here helped out before I saw the thread. Once you get it back together with the seal against the housing and do not see any leaks, it's usually good to go once you bleed the cooling system to eliminate any trapped air pockets. The older thermostats we sold years back were a different diameter on some models, so they would have come with an o-ring that stretched over the stat itself to make up for the size difference and seal.

With the Evenflo 160s that we used today they are the same size as the OEM and also manufactured for us by one of the OEM suppliers for the big 3 as well. No need to put the seal around the stat since they are direct fit now days. They usually just need to be swapped out for the old one and put back together thermostat first, o-ring seal, then housing as another member mentioned. Sounds like you were right that it probably fell when the coolant rushed out since it had to be there originally if it wasn't leaking before hand. I've also heard techs say to clock that jiggle valve at 12 oclock but like Explorer75 also mentioned it does not specify that in any of the repair guides I've seen and most guys I've spoken to that said they didn't clock it and had no issues. Only last thing I can think of is that iI usually keep an eye on the temp gauge, for puddles, and also the coolant level for the first few drives to ensure all is well


All good. Yes, I put that seal on the front of the tstat and it hasn't leaked since. I didn't really need to burp the system, either, which I was surprised by. So far, so good. I have a 650 mile trip coming up, next week, so that will be a good test. One thing I am really noticing, aside from the power is the mileage. It's up at least 1.5-2mpg so far...

Good stuff by you all!
Shumax
That is excellent news, glad to hear it's not leaking any more. We usually run them with a spill free funnel setup that lets you fill and bleed then seal off the hole to stop from drawing in air before putting the cap back on. DIY guys that don't have those type of tools available usually just let them run for a good 20 mins or so idling with the heat / ac on full blast with the overflow cap off letting the air pockets bubble up while filling the coolant until it stops and is filled.

That is great to hear your MPG is improving as well. I usually say when potential customers ask about fuel economy that our average customer's feedback wise we see 1 to 2 mpg especially on premium fuel and a few bolt ons. Some guys with full bolt ons such as the t-stat, 3 bar,CAI downpipes, exhaust have reported seeing another 1-2 mpg when they're taking it easy and burning higher octane as well. Unfortunately it's not something everyone will see the same results on since people drive differently, maintain their vehicles differently, different environments play a role as well. But glad to hear everything's worked out well for you and thanks for sharing!


Could someone please share the torque specs for the thermostat housing bolts? I’ve searched but can’t seem to find it. Thanks.


Could someone please share the torque specs for the thermostat housing bolts? I’ve searched but can’t seem to find it. Thanks.

The 2013 Workshop Manual calls for a thread sealant, I don´t know if that procedure has been updated.

Thermostat.JPG


The 2013 Workshop Manual calls for a thread sealant, I don´t know if that procedure has been updated.

View attachment 318061

Thank you very much! I didn’t see any sealant on the bolts when I took them out. Probably would hurt to put a little on them though.


Join the Elite Explorers for $20 each year or try it out for $5 a month.

Elite Explorer members see no advertisements, no banner ads, no double underlined links,.
Add an avatar, upload photo attachments, and more!
.


Thank you very much! I didn’t see any sealant on the bolts when I took them out. Probably would hurt to put a little on them though.
Welcome to the Forum. :wave:

Peter


Back
Top