1996 OHV 4.0 Explorer Head/Head Gasket Replacement Question(s) | Page 2 | Ford Explorer Forums - Serious Explorations

  • Register Today It's free!

1996 OHV 4.0 Explorer Head/Head Gasket Replacement Question(s)

60 grit is all bad. I've never actually used sand paper before. I don't think you will have great luck getting the old gasket off with sand paper.

If your going to try, use something in the 220 range. If anyone can correct me, or has first hand experience, please chime in. You don't want to take any material off the mating surface while your getting the gasket off.

You can be careful, and use an exacto blade, or the back side of it. Just be careful to use it with an extreme angle so that you don't score the mating surface. I use a blade to get most of the gasket off.

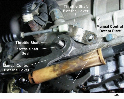
There's not a lot of room in front of the motor to get that water-pump surface cleaned up. I hope the gasket comes off easily for you.

While your cleaning up the blocks head mounting surface, fill the piston holes with rags of some kind to help stop more crud from falling in to the bores. Any of the fine grit that falls in between the piston and cylinder wall that you cant get out will scratch the cylinder bore. that's not good.


Join the Elite Explorers for $20 each year.
Elite Explorer members see no advertisements, no banner ads, no double underlined links,.
Add an avatar, upload photo attachments, and more!
.


Maybe some permatex and a putty knife? I have a Dremel, what attachment do you think would work? A polishing wheel?


a putty knife would help. If you go to a hardware store that handles polishing tools/gremmel type stuff you should be able to purchase surface prep pads.


Thanks Abbon, taking the heads to the shop tomorrow to see what the dealio is

Do the mating surfaces need to be completely clean, to metal? I was cleaning my lower intake and fuel rail earlier while replacing the fuel injector O-rings and there were some spots of carbon on the mating surfaces here and there that never seemed to wanna come off. Even with acetone and elbow grease. When I run my finger across the surfaces, they feel smooth. Not sure if its just stained, or if I should try harder or what. I bought a gasket scraper, been using that and a rag soaked with acetone


I'm a little worried about all the trash that was sitting on my pistons in anti-freeze. I vacuumed them out real well, but I can't imagine nothing made its way in-between the pistons and the cylinder walls. Guess I can't do much about that now though.

Dono mentioned "rotating the main assembly" does that mean I'm supposed to put it at TDC?

How do I take the lifters out? I guess I can manage to soak them in acetone for a couple days while I wait to see what the dealio is with my heads.

Should I have the machine shop replace the valve stem seals for an extra $100? or just get the heads checked and cleaned?

I got lots of carbon buildup in the air ports(or whatever) in the upper/lower intake, other then blowing out what I loosened while cleaning the mating surfaces, I can leave that carbon buildup in the ports?


I would think if you clean the surfaces thoroughly, and they feel smooth, that is an adequate surface for the gasket to mate the two surfaces.

I am going to clean the tops of the pistons and cylinder walls the best I can (after covering them while cleaning the block surface).

Not sure what the rotating the main assembly was, I was under the impression that the position of the pistons was not significant when replacing the heads, as nothing regarding timing was changing?

Can't give you any concrete advice on the seals, they are old heads, so it couldn't hurt...after it was pointed out that at least one of my heads had a crack, I am replacing both to be safe in an effort not to have to repeat the job.

Good luck man!

My heads arrive Friday, so I'll be putting it all together this weekend. My two main points of concern are:

1. Finding replacement bolts for the exhaust manifolds (plan to take the removed short and long ones around locally to see if they are readily available)

2. A couple of the plastic vacuum lines around the intake were brittle and snapped when I was disassembling, how should I go about patching or replacing them?


Thanks abbon!

If the heads aren't cracked/warped I guess I might as well have the machine shop do the valve seals. I've been driving the thing everyday for 2 years with a blow head gasket so I'll be surprised if the heads aren't screwed

I would think you won't have a problem finding the bolts for the exhaust manifolds, I plan on replacing mine as well since I put a torch on them

I'm gonna try stopping by autozone and see if they have the bolts, a parts store should have the hoses you need as well I would think. If its the smaller hoses, we might have to go to a dealer for both, no idea. Dono can prolly give some advise on it

Good luck to you as well bud, hopefully everything goes smoothly back together for us. Starting it up for the first time is going to be nerve-wracking


I had to go to the dealer for the exhaust-to-exhaust manifold bolts, they were $7.50 a piece, and I can't get them till tuesday

They must think a lot of those bolts for that price

Cleaned up the head gasket surface on the block, which took awhile. Tomorrow I'll start putting the crap back together


this is my current progress, new head gaskets, new heads on, new manifolds on, new water pump on....only hand-tightened the head bolts until I put the manifold on tomorrow so I can torque them both down together
hg.jpg

headsnpump.jpg


Looks good, did you get it running abbon?

I scratched a freakin head gasket while sitting one of the heads on it so I have to go get another gasket


Not running yet, I snapped a lower intake bolt (don't torque them past the specs!) and had to remove the intake and rebolt it.

I have most of it together, just trying figure out where a few vacuum hoses and electrical plugs go (should've really labeled better when dismantling.)

I will probably try to get her started today if the battery isn't dead.


Not sure what happened, but after getting everything back together, I started her up and she idled ok at first, with a tapping noise coming from the passenger side valve area, and then after about 30 seconds the idle starts to drop and then this severe 'tumbling can' can sound starts to happen, after which I scramble to shut it off.

***Turned out had the wires out of order, as per the posts that follow


Here is some pics before dis-assembly abbon, hope it helps if you didn't figure it out already

http://s1168.photobucket.com/albums/r489/travsbengals/before dis-assembly/


After scratching my head gasket and upon further reading I decided to chase the head threads so I just finished that up. Although one of the holes the chaser continuously gets held up for some reason 3/4 of the way down. I'm worried that's gonna throw off the torque when tightening. I don't know what to do now


I posted that last message late, looks like u got it goin

I got no idea that that noise is, the loud clicking at the end of the video just continues?


I posted that last message late, looks like u got it goin

I got no idea that that noise is, the loud clicking at the end of the video just continues?

Yes it stalls soon after that, the sound is almost like a beer can tumbling down the road, hopefully someone can point me in the right direction based on that sound...alot of time and $ went into trying to repair her.


turned out the sound is the tensioner pulley bearing was shot...replaced it and no more rattle at low idle in gear


I got a bunch of pictures when dis-assembling, maybe they will help

http://s1168.photobucket.com/albums/r489/travsbengals/vacuum electric/

I think those are mostly after taking the upper intake off, I'll try to upload some with the upper intake on if you think it will help

You TOTALLY helped me with those pictures dude! I was flipping through them, getting all sad, the I saw the picture of your coil with a big#5 on the one in the front left. I actually went to the next picture and then said WAIT A MINUTE...and realized I somehow thought they went 4,5,6 on that side of the coil.

Switched wires 5 and 6 and she runs MUCH better! Took her for a test run and she was doing 80mph np.

Still have the pushrod/rocker arm tapping sound, but let's see what happens after a I change the oil in a few miles to get the rest of the 'milkshake oil' residue out of there.

Thanks again man and hope your truck is back on the road soon!

~Jonny


Great to hear Jonny! Hopefully the other sound goes away after your oil change. Good eye to see that 5 on that plug wire, I didn't even have a great picture of it

I got my heads on, and called it a day. I'm hoping to get the rest back together tomorrow


Join the Elite Explorers for $20 each year.
Elite Explorer members see no advertisements, no banner ads, no double underlined links,.
Add an avatar, upload photo attachments, and more!
.


Great to hear Jonny! Hopefully the other sound goes away after your oil change. Good eye to see that 5 on that plug wire, I didn't even have a great picture of it

I got my heads on, and called it a day. I'm hoping to get the rest back together tomorrow

So how did you end up finishing up? My truck has been back on the road for a couple of weeks now, coolant level and temp steady....although I do have the tapping noise under the passenger side valve cover area which I guess is a troublesome lifter or pushrod/rocker combo....I will probably replace all of those parts in the fall if she proves reliable between now and then.

Hope things went ok for you.


Back
Top