snickstx
Well-Known Member
- Joined
- February 2, 2006
- Messages
- 127
- Reaction score
- 0
- City, State
- Fort Worth, TX
- Year, Model & Trim Level
- '03 EBX
The cd pack on my head unit jammed and threw a CD ERROR about 6 months ago. This is the second time I've had to replace this radio. Instead of trying to find an entire matching unit or paying to fix the cd pack in mine I decided to swap it with another working unit. My donor came from a Lincoln but it was effectively the same stereo. When buying the donor unit, make sure the seller guarantees the cd pack is functional and that the chassis matches your original.
This is for those that may be apprehensive about what is lurking behind the dash or inside the radio and don't want to pay the dealer rate for the repair or can't find a replacement exactly like their original radio.
Total time about 20 minutes while taking pictures.
Tools Used:
Ratchet & 9/32 socket
Flathead Screwdriver
TORX T15 driver
My hands

First step is to remove the center stack trim ring. There are several methods but I found that a firm grasp at the top will get mine off in no time. If yours hasn't ever been removed, you may need a tool to pry between the edge of the trim and the dash pad. Be very careful because it is easy to dent the dash pad or gouge the trim.

Once the trim ring is dislodged you can either move it to the side or disconnect your A/C, trip computer & 4X4 switches. I did this so I would have more room to work with.
Next, use your ratchet and 9/32 socket (or driver) and remove to 2 black bolts at the bottom of the radio.

Now you can gently slide the radio toward you and begin disconnecting it. The orange antenna wire just pulls out but the wiring harness connectors have a small button on the side you must press to release. Two of mine come out fine but I always have to use a flathead screwdriver to help the third one along. You MUST support the radio during this process or it could easily drop to the console causing more damage. DO NOT rest the weight of the radio on the wiring harness or try to remove the harness by pulling on the wires. Only pull/push/pry at the connector.


Before you begin the switch you want to make sure the replacement unit will work. If you only purchased the cd pack by itself, skip this step. Plug in the donor radio if you can and finger tighten one of the bolts on the bottom. Set your ignition to run and turn on the radio. It will take up to a minute for the radio to cycle through all the cd slots. When that is done, play one or more cds in each slot to verify operation. Turn your ignition off and open your door to kill the accessory circuit. Remove radio.


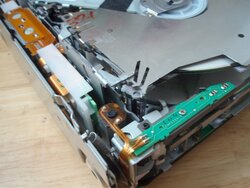
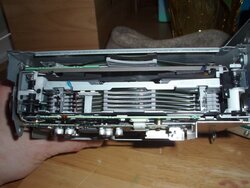
When you tear down the radios, make sure you keep the defective cd pack separate. It would be a pain to do all this again if you reinstall the bad unit. There are three TORX T15 (6 pointed star) screws on each side of the radio. You only need to remove the two that are holding the cd pack to the frame. The single T15 is for the radio chassis. When you have removed the two T15 screws, the cd pack will pivot up from the back. Do this carefully as there are wires attached.


The flat signal wire is held in its connector by a plastic retaining collar. Take a small flathead and dislodge the tabs at either end of the connector on the cd pack. The tabs will stay with the connector so do not try to remove them. Once the tabs are lowered, the flat cable will simply slide out. Next, disconnect the power lead from the cd pack. Once again, you might need the aid of a small flathead to pry the connectors apart. Lift off the cd pack and set aside. Repeat for the other radio. Install good cd pack on original radio chassis in reverse, connect power wire (blue wire on left), gently insert flat signal cable, close the retaining collar, make sure every thing lines back up and install the four TORX T15 screws you removed.


Reconnect the old (now fixed) radio back in the dash, turn ignition to run and verify operation of the cd player, radio, DVD player, AUX inputs, etc. Once everything it working, close up the dash and have a cold beer.
If you have stuck cds in your original cd pack you can recover them easily without damage. Use a small phillips head the remove the shroud from the defective unit. Unless there are obvious signs of damage, you can grasp the top cd by its center ring, lift to align with the roller slot and force it out through the gray plastic rollers. Repeat for all cds. Sorry, didn't take pics at this step.
Here's an interesting thread if you want to tackle fixing a defective cd pack, thanks to jrford.
A few caveats:
If you kill your radio, your truck, or yourself, it's not my fault.
Always practice safe electrostatic discharge procedures. I don't, but you should.
This may or may not work for the single chassis, phase II units 2004+. I haven't tried, yet.
Anybody want to buy a nice Lincoln Audiophile HU with a broken cd changer?
This is for those that may be apprehensive about what is lurking behind the dash or inside the radio and don't want to pay the dealer rate for the repair or can't find a replacement exactly like their original radio.
Total time about 20 minutes while taking pictures.
Tools Used:
Ratchet & 9/32 socket
Flathead Screwdriver
TORX T15 driver
My hands
First step is to remove the center stack trim ring. There are several methods but I found that a firm grasp at the top will get mine off in no time. If yours hasn't ever been removed, you may need a tool to pry between the edge of the trim and the dash pad. Be very careful because it is easy to dent the dash pad or gouge the trim.
Once the trim ring is dislodged you can either move it to the side or disconnect your A/C, trip computer & 4X4 switches. I did this so I would have more room to work with.
Next, use your ratchet and 9/32 socket (or driver) and remove to 2 black bolts at the bottom of the radio.
Now you can gently slide the radio toward you and begin disconnecting it. The orange antenna wire just pulls out but the wiring harness connectors have a small button on the side you must press to release. Two of mine come out fine but I always have to use a flathead screwdriver to help the third one along. You MUST support the radio during this process or it could easily drop to the console causing more damage. DO NOT rest the weight of the radio on the wiring harness or try to remove the harness by pulling on the wires. Only pull/push/pry at the connector.
Before you begin the switch you want to make sure the replacement unit will work. If you only purchased the cd pack by itself, skip this step. Plug in the donor radio if you can and finger tighten one of the bolts on the bottom. Set your ignition to run and turn on the radio. It will take up to a minute for the radio to cycle through all the cd slots. When that is done, play one or more cds in each slot to verify operation. Turn your ignition off and open your door to kill the accessory circuit. Remove radio.
When you tear down the radios, make sure you keep the defective cd pack separate. It would be a pain to do all this again if you reinstall the bad unit. There are three TORX T15 (6 pointed star) screws on each side of the radio. You only need to remove the two that are holding the cd pack to the frame. The single T15 is for the radio chassis. When you have removed the two T15 screws, the cd pack will pivot up from the back. Do this carefully as there are wires attached.
The flat signal wire is held in its connector by a plastic retaining collar. Take a small flathead and dislodge the tabs at either end of the connector on the cd pack. The tabs will stay with the connector so do not try to remove them. Once the tabs are lowered, the flat cable will simply slide out. Next, disconnect the power lead from the cd pack. Once again, you might need the aid of a small flathead to pry the connectors apart. Lift off the cd pack and set aside. Repeat for the other radio. Install good cd pack on original radio chassis in reverse, connect power wire (blue wire on left), gently insert flat signal cable, close the retaining collar, make sure every thing lines back up and install the four TORX T15 screws you removed.
Reconnect the old (now fixed) radio back in the dash, turn ignition to run and verify operation of the cd player, radio, DVD player, AUX inputs, etc. Once everything it working, close up the dash and have a cold beer.
If you have stuck cds in your original cd pack you can recover them easily without damage. Use a small phillips head the remove the shroud from the defective unit. Unless there are obvious signs of damage, you can grasp the top cd by its center ring, lift to align with the roller slot and force it out through the gray plastic rollers. Repeat for all cds. Sorry, didn't take pics at this step.
Here's an interesting thread if you want to tackle fixing a defective cd pack, thanks to jrford.
A few caveats:
If you kill your radio, your truck, or yourself, it's not my fault.
Always practice safe electrostatic discharge procedures. I don't, but you should.
This may or may not work for the single chassis, phase II units 2004+. I haven't tried, yet.
Anybody want to buy a nice Lincoln Audiophile HU with a broken cd changer?