Kenne Bell Explorer Phase 2 build begins!!! | Page 10 | Ford Explorer Forums - Serious Explorations

  • Register Today It's free!

Kenne Bell Explorer Phase 2 build begins!!!

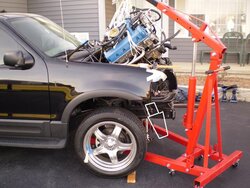
I finally got off of my lazy butt and started tearing KBX down for its phase 2 stage of mods I have planned for it. I took a vid but way too busy/lazy to post it. The whole front end and hood are pretty much torn off and I just dropped the radiator out. I should be pulling the engine tomorrow if my schedule allows. A lot of interesting things going on with this stage of mods. After this stage of mods are completed I should be able to lay down some pretty respectable power finally; along with some good ET's in the 1/4 mile.

So far the additional mods that are sitting in my garage are:

*VT built 4.6 Billet shortblock
*Kenne Bell 8 rib swap kit w/ 2.75" snout pulley
*KB 8.5" crank pulley (20psi boost)
*New adapted fenderwell CAI fabbed by yours truly (very custom)
*Steeda billet fuel rails w/ -8AN crossover
*JBA headers
*Meziere electric water pump WP347
*Meziere wiring kit
*SD 60 lb/hr injectors
*SCT BA2800 MAS (swapping from my existing BA2400)
*Art Carr 4R70W tranny w/ 3200 stall TC built to withstand 900 hp. I am sure the swap from the 5R to the standalone 4R will be fun.
*8 bolt flywheel
*SN-197 Tranny K-member adapter for 4R70W
*Dual Ford GT (supercar) fuel pumps
*Dual -8AN fuel lines
*Aeromotive A-1000 FPR
*-6AN return line
*Baumann TMU for 4R70W
*4R70W tranny wiring harness


*Custom driveshaft (after new tranny is in)


Anyways in the list of mods I am probably forgetting something in one of the lists. Should be fun. Hopefully I can get it to 600 within the next few months if things go well (money+time). I love doing all the work on my own truck and all, but I kind of wish I could snap my fingers and have it done. Along with the power mods I am also going to be going with a chrome accented Black and Ford blue theme under the hood. The valve covers will get the Ford blue along with the billet rails which already are blue along with the elec fan. Depending on price I might take my PA perf. alternator I been running and have it powdercoated blue also. Well I have yapped for long enough in here tonight. Good night.


Join the Elite Explorers for $20 each year.
Elite Explorer members see no advertisements, no banner ads, no double underlined links,.
Add an avatar, upload photo attachments, and more!
.


As you can see from the timestamp of this post I stayed up pretty late tonight doing some finishing work to the Explorer.

Tonight I finished wiring up and testing my new junction box for the Meziere water pump, electric fans, trans cooler fan, and fuel pumps. Things are running well and it is nice to hear the IC pump whirring along in harmony with the Meziere pump.

I also finished up some smaller fab work for the custom CAI and then installed that too. MAN was it a tight fit to get the MAS and 10" filter inside the fenderwell/bumper area but it is well worth it to pull that cold air. I really like how the powdercoated intake tube really tie things together that much more.

One other thing I did was finally finish wiring the Baumann standalone TCS within the engine bay. All that was left to do there was connect a few wires to my TPS so the controller will know what my throttle pitch is.

Also prepped the lower passenger bumper area for receiving the trans cooler. I have to fab custom mounting bracketry for the cooler due to the neccessity for its odd location. Once I fab the brackets then I can move onto mounting the cooler, hooking up the rest of the t.cooler lines from my stocker cooler to this one. After that it is a simple two wire hookup and its done.

I will stop with all the details because I know you really want pics of how the engine bay is looking. So here it is:
 

Attachments

  • KBX Update 27 JAN 07 002.JPG
    KBX Update 27 JAN 07 002.JPG
    76.7 KB · Views: 458
  • KBX Update 27 JAN 07 004.JPG
    KBX Update 27 JAN 07 004.JPG
    70.4 KB · Views: 459
  • KBX Update 27 JAN 07 008.JPG
    KBX Update 27 JAN 07 008.JPG
    61.8 KB · Views: 973


Join the Elite Explorers for $20 each year.
Elite Explorer members see no advertisements, no banner ads, no double underlined links,.
Add an avatar, upload photo attachments, and more!
.


Looks good! :thumbsup:

One of the bands isn't straight. :p:

Is there anyway to show where the filter is?


Looks good! :thumbsup:

One of the bands isn't straight. :p:

Is there anyway to show where the filter is?


Here ya go. I drew this in paint, though it probably looks like my 6 year old boy could do better. I had to cut a hole into the fenderwell metal and drop my intake tube down right behind my passenger headlight. The CAI is far enough forward where it goes into the fenderwell area but not into the fenderliner area. Then the whole MAS and filter assembly sit in vertical position right behind the bumper.

As for taking an actual pic of it? It would be pretty difficult to do so in such tight quarters under the vehicle and still have the picture show up without being drowned out by the flash.
 

Attachments

  • MAS.JPG
    MAS.JPG
    91.8 KB · Views: 460


Fabbed the tranny cooler mounts and mounted the tranny cooler, wired the T.cooler the rest of the way and ran the new tranny cooler lines to the primary and new auxiliary tranny coolers.

I tested the entire coolant, intercooler and trans cooler systems and everything works great and flows well. That little flex-a-lite fan sure pulls some air! My trans should stay nice and cold now. :thumbsup:


Awesome......you and Alex (awdrocks) need to get together for a run on the drag strip.....I would love to see that!


Awesome......you and Alex (awdrocks) need to get together for a run on the drag strip.....I would love to see that!

Alex's truck is running strong, but he might have some trouble keeping up with mine now. ;) But it's always fun to just have a blast at the track.


Got the fuel system more or less done tonight. That tank was a PITA to get in with the two -8AN fuel lines along with the -6AN return tucked up in there.

Here are some updated pics of the engine bay:
 

Attachments

  • KBX New Engine Bay 02FEB07 018.JPG
    KBX New Engine Bay 02FEB07 018.JPG
    71.2 KB · Views: 403
  • KBX New Engine Bay 02FEB07 019.JPG
    KBX New Engine Bay 02FEB07 019.JPG
    70.1 KB · Views: 924
  • KBX New Engine Bay 02FEB07 021.JPG
    KBX New Engine Bay 02FEB07 021.JPG
    76.2 KB · Views: 403


Coming along nicely! Did you paint the blower or was it already black? I just noticed you pulled the tape off so was wondering.

Did you make the two idlers below the main blower pully or is that something that you bought? That sucker shouldn't slip at all.


Coming along nicely! Did you paint the blower or was it already black? I just noticed you pulled the tape off so was wondering.

Did you make the two idlers below the main blower pully or is that something that you bought? That sucker shouldn't slip at all.


The blower was already black. I just had blue painters tape on it for the phase 2 build so when I layed tools on top of it the finish would not get scratched. I got used to seeing it blue also. :D

The two idlers that you see come with the Kenne Bell. However, they are relocated to give maximum belt wrap around the snout pulley to maximize boost and minimize high rpm boost dropoff. That piece is called (nicknamed) a G.I. Joe Gripper Plate. It is very popular with the high boost Mustang GT KB crowd.


I got a pretty big update tonight. NO, I didn't start the truck YET, but it is another milestone.

My buddy Jim and I got the fuel system 100% completed, tested, and fuel pressure set. I had 2 fuel leaks initially. One where the dual -8AN fuel feed lines connected to the dual billet fuel filters and then also at the back of the driver side fuel rear crossover going to the FPR. With a few he-man twists the leak from the fuel filters was gone. I tried the same thing with the fitting going into the FPR but it didn't work. I ended up having to take a decent amount of my vac lines off to access the fitting with my bigass wrenches in that tight space. It still leaked REAL BAD! I ended up taking the 90 degree fitting off and found that the female flared mating surface had chatter marks on it. Apparently it was messed up in the machining process and wasn't caught by QC. That serves as another warning for everyone out there to check ALL of your AN fittings before installing them. I luckily had another 90 bend sitting around so I swapped it out and he-man'ed it back on and no leaks. Adjusted the fuel pressure and that was that.

I turned the engine over for the first time tonight also just to build a little oil pressure to keep the timing chain tensioners extra tight. Tomorrow I will rewire my wideband A/F meter and hook up my logging stuff so I can tune this puppy. I will see if I can start it tomorrow and see how close my initial tune got me. Then I will work driveability from there.


VIDEO!!!!!!!!!!!!!!!!!!!!!!!!!!!!!!!!!!!!!!!!!!!!!!!!!!!!!!!!!!!!


Good to hear that the project is rolling along.

BTW, I had a leak at my 99 SOHC lower radiator hose(water pump). The Advance pump had casting seams along the outlet, both were not deburred well. I installed the hose again with Ultra Black, no leak.

Were those fuel fitting anything like the transmission connections? I made lines for a Crown Vic years ago, and three or four fittings leaked bad. After tightning not too much didn't fix them, I disassembled one and noticed a space that an o-ring could fit into. I installed o-rings down into the three or four joints that caused trouble. Those trans lines were Auto Shack fuel lines, uncut.

If your fuel lines could accomodate fuel quality o-rings, that would be a good trick in the future. I have a local business that sells that kind of specialty stuff. Regards,


No, they are AN flare fittings. They are a flared pressure fit connection. The only place where O-rings are used on this fuel system are where the -8AN fittings screw into the fronts and backs of the fuel rails. Those areas need o-rings around the fittings because of the nature of the connection.


Just curious, the fuel lines that I used had a nice pocket at their base, a volume intended to not contact anything. Thus that base of the fittings accepted an o-ring nicely. It took little effort to tighten with no leaking. Regards,


One thing I found with AN lines was not to overtighten. That is why the special wrenches are so short. Just a snug fit is all that is needed. Also, cleanlyness is godliness with these. MAKE SURE the mating surfaces are perfectly clean. A spec if grit and the seam is toast.

Also, Aeroquip makes maleable aluminum repair washers with the 37 degree angle that fit on the male end like a jimmy-cap and take up any reasonable surface damage. I used one or two of them in my system :)

Looks great!


what a perty engine bay....mine next!!!!....:p

very nice job guy, can't wait to hear it running...


One thing I found with AN lines was not to overtighten. That is why the special wrenches are so short. Just a snug fit is all that is needed. Also, cleanlyness is godliness with these. MAKE SURE the mating surfaces are perfectly clean. A spec if grit and the seam is toast.

Also, Aeroquip makes maleable aluminum repair washers with the 37 degree angle that fit on the male end like a jimmy-cap and take up any reasonable surface damage. I used one or two of them in my system :)

Looks great!

Yeah, the one that leaked was definately due to the chamfered edge being jacked up from the factory and must have slipped past me. I needed the right light to be able to see it when taking a closer look at it. I cleaned all mating surfaces with Q-tips and gasoline to ensure good fit. I am just glad I have so much -8 AN stuff laying around now from having to design my own fuel system. Shoot, I probably still have about 10' of -8AN steel braided hose along with more than a few extra fittings. Hmmmm, -8AN line from dual nitrous bottles running 500 shot of nitrous?....j/k... ;)


Join the Elite Explorers for $20 each year.
Elite Explorer members see no advertisements, no banner ads, no double underlined links,.
Add an avatar, upload photo attachments, and more!
.


It's Alive!!!

I started the truck today for the first time. I was surprised by how well it ran on the initial tune I made for it. I guess I did something right! With all the changes I had made I was thankful it even started, let alone idled so well. I also hooked up my new LM-1 wideband and logged A/F through my Xcal2 for the first time today. It looks like I am finally prepared to actually tune this thing!


Here is the video of the moment of truth.

KBX Phase 2 First Start


The starter is a little loud but no big deal. Listen to that fan pulling the air! BTW, that is just my trans cooler fan, not even the main ones.

Now I just have to work out some minor tune issues (throwing codes for nonexistant tranny). After I do that and tune my TCS then I should be able to take it for a spin and log A/F while under a little load. Tweak the MAS trans from there and then it it out to break it all in!


Back
Top