KaiserM715
Well-Known Member
- Joined
- October 13, 2005
- Messages
- 179
- Reaction score
- 3
- City, State
- Houston, Texas
- Year, Model & Trim Level
- '10 Ford Raptor
I needed to check my fuel pressure to help chase down possible causes for a trouble code that I had. I borrowed a fuel pressure gauge kit from a co-worker, but I have seen them new for $35 to $45 at the auto parts store.
Here is the one that I used:

The clear hose is connected to a relief valve to relieve the pressure in the line after testing. The brass connector on the end of the black hose connects to the fuel rail. For Fords, the small adapter shown is needed as the Schrader valve on the Ford fuel rail is smaller than other makes.
Based on advice from the Haynes manual, I disconnected the fuel pump relay (or the inertia relay), located below the glove box in the passenger foot well area. The grey connector was disconnected.

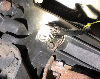
Then I cranked the engine over for 10-15 seconds to relieve the pressure. After the pressure is relieved, I removed the bright blue dust cap from the valve on the fuel rail. The valve is located in between the oil filler neck and the intake manifold and in front of the coil pack.

I threaded the adapter on first and tightened it until it was snug with a wrench. Then I threaded the gauge on to the adapter.

I reconnected the fuel pump relay and turn the key on, but I did not start the engine. The fuel pressure read to be about 62 psi (the acceptable range is from 56 psi to 72 psi).

Then I started the engine and read the pressure to be about 66 psi.

After I shut the engine off, I depressurized the line by depressing the black button on the relief valve. I placed the clear hose in a bucket beforehand to catch the gasoline. The pressure needs to be bled down to zero to safely disconnect the gauge.

I stuffed a shop towel under the fuel rail fitting to soak up any gasoline that leaked out when I disconnected the gauge and the adapter. I replaced the dust cap and that was it!!
Note: My vehicle is a '00 Ranger with the 4.0 OHV engine, so your fuel pressure specs and fuel rail valve location may differ.
Here is the one that I used:
The clear hose is connected to a relief valve to relieve the pressure in the line after testing. The brass connector on the end of the black hose connects to the fuel rail. For Fords, the small adapter shown is needed as the Schrader valve on the Ford fuel rail is smaller than other makes.
Based on advice from the Haynes manual, I disconnected the fuel pump relay (or the inertia relay), located below the glove box in the passenger foot well area. The grey connector was disconnected.
Then I cranked the engine over for 10-15 seconds to relieve the pressure. After the pressure is relieved, I removed the bright blue dust cap from the valve on the fuel rail. The valve is located in between the oil filler neck and the intake manifold and in front of the coil pack.
I threaded the adapter on first and tightened it until it was snug with a wrench. Then I threaded the gauge on to the adapter.
I reconnected the fuel pump relay and turn the key on, but I did not start the engine. The fuel pressure read to be about 62 psi (the acceptable range is from 56 psi to 72 psi).
Then I started the engine and read the pressure to be about 66 psi.
After I shut the engine off, I depressurized the line by depressing the black button on the relief valve. I placed the clear hose in a bucket beforehand to catch the gasoline. The pressure needs to be bled down to zero to safely disconnect the gauge.
I stuffed a shop towel under the fuel rail fitting to soak up any gasoline that leaked out when I disconnected the gauge and the adapter. I replaced the dust cap and that was it!!
Note: My vehicle is a '00 Ranger with the 4.0 OHV engine, so your fuel pressure specs and fuel rail valve location may differ.