Nomad767
Active Member
- Joined
- August 1, 2010
- Messages
- 60
- Reaction score
- 0
- City, State
- Lake Charles, La
- Year, Model & Trim Level
- 92 Explorer XLT 4x4
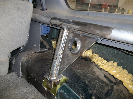
Ok....this is the first I have tried this, so I will do my best to set this up right. I have owned my X for about 4 years now and put on 115k on top of the 220k she had when I got her. The one thing that drove me nuts is my dang power window switch. It worked in the up and left directions on both mirrors but would not go down and right on either mirror. A couple of days ago I was cleaning her up the best I could and decided to dig into my power window switch and see how far I could go. First thing is to pull the switch out of the side panel. I had no prob just getting underneath it and pulling it straight up and out and disconnecting the plug without disassembling the panel. So now you should be sitting somewhere seeing this.

Now reach behind the outer shell at these points and pull out and up.

So....you should now have the top off and have a very nasty looking inside of a switch from 20 years of the grease in there just getting nasty...in this pic, I already have cleaned it out some....it should basically look like this now. (To keep it working, ensure you do not lose any of the metal jumpers in the top of the switch. I took them all out and cleaned them up some before finishing)

Selector switch removal.....pull the tabs on both sides of the selector out so the switch can be pulled out....(I recommend this step to be able to see all the traces on the whole circuit board. If you see a bad trace already...don't worry about this)

Now you should have this....

Mine has already been fixed, but I have have used paint to simulate what I had basically found on my circuit board....after close examination of all the traces after cleaning, I found one of the traces on the bottom right corner had basically flaked off, burnt off, who knows....(This orientation is how it sits in the panel when it is together and installed)

So....we now see that I have a bad trace keeping my down and right directions from working (very easy to deduce since this is the common contact for both of these directions). So I just so happen to have this from removing and replacing some Convergence Chips on my TV a few months ago. I got this pen for $10 from MCM electronics when I ordered my chips, have not checked around at Radio Shack, but they may have it also.

So....now with our pen ready to go....all we need to do is get our switch ready. The protecting cover that is sprayed over the traces needs to be removed so you can use your pen to reconnect these points. I just used a screwdriver and lightly scratched away at the green covering until I could see my silver trace underneath it. Try to ensure you make a large enough area...the larger the area you scratch away to the trace...the better your conductive connection. Once you do this...take your trace pen and re write the trace from where you scratched away, all the way to the contact point it broke away from. Clean away the excess from the other traces around it to ensure it does not short out, and it should look like this after it is cleaned and dries for a few minutes.

Now...after it dries....reassembly is the reverse order. Make sure you do not press on the top of the switch where your directional push-buttons are when reassembling, this may push out all of your contacts during the final assembly phase. Not really something that will hurt the switch...just a pain in the rear to put them all back in.
This worked for me as soon as I put it back in. It beat an $80 replacement switch, that is for sure. If you have any problems, or need clarifications...let me know, and I will try to address any issues you may have in this write up.
Thanks for reading.....I hope this helps some people out.
Just an after thought.....I also did a continuity check from each pin to every location that pin is connected to. Just follow the traces to each and every contact pad it is connected to and verify the trace is reaching each point. It may be a good idea to do this before reassembly to make sure it will work when it is reinstalled.
Now reach behind the outer shell at these points and pull out and up.
So....you should now have the top off and have a very nasty looking inside of a switch from 20 years of the grease in there just getting nasty...in this pic, I already have cleaned it out some....it should basically look like this now. (To keep it working, ensure you do not lose any of the metal jumpers in the top of the switch. I took them all out and cleaned them up some before finishing)
Selector switch removal.....pull the tabs on both sides of the selector out so the switch can be pulled out....(I recommend this step to be able to see all the traces on the whole circuit board. If you see a bad trace already...don't worry about this)
Now you should have this....
Mine has already been fixed, but I have have used paint to simulate what I had basically found on my circuit board....after close examination of all the traces after cleaning, I found one of the traces on the bottom right corner had basically flaked off, burnt off, who knows....(This orientation is how it sits in the panel when it is together and installed)
So....we now see that I have a bad trace keeping my down and right directions from working (very easy to deduce since this is the common contact for both of these directions). So I just so happen to have this from removing and replacing some Convergence Chips on my TV a few months ago. I got this pen for $10 from MCM electronics when I ordered my chips, have not checked around at Radio Shack, but they may have it also.
So....now with our pen ready to go....all we need to do is get our switch ready. The protecting cover that is sprayed over the traces needs to be removed so you can use your pen to reconnect these points. I just used a screwdriver and lightly scratched away at the green covering until I could see my silver trace underneath it. Try to ensure you make a large enough area...the larger the area you scratch away to the trace...the better your conductive connection. Once you do this...take your trace pen and re write the trace from where you scratched away, all the way to the contact point it broke away from. Clean away the excess from the other traces around it to ensure it does not short out, and it should look like this after it is cleaned and dries for a few minutes.
Now...after it dries....reassembly is the reverse order. Make sure you do not press on the top of the switch where your directional push-buttons are when reassembling, this may push out all of your contacts during the final assembly phase. Not really something that will hurt the switch...just a pain in the rear to put them all back in.
This worked for me as soon as I put it back in. It beat an $80 replacement switch, that is for sure. If you have any problems, or need clarifications...let me know, and I will try to address any issues you may have in this write up.
Thanks for reading.....I hope this helps some people out.
Just an after thought.....I also did a continuity check from each pin to every location that pin is connected to. Just follow the traces to each and every contact pad it is connected to and verify the trace is reaching each point. It may be a good idea to do this before reassembly to make sure it will work when it is reinstalled.
")