paWOLFck's '98 XLT | Ford Explorer Forums - Serious Explorations

  • Register Today It's free!

paWOLFck's '98 XLT

-1998 XLT V6 SOHC
= 3.73 Limited Slip Rear
= 32x11.5 BFG A/T's
= 15x8 Mickey Thompson Classic II
= 2" TT
= Pro-Comp EXP-13120 Add a Leaf
= Surco Roof Rack
= 2 Hella 500 Fog Lights
= 2 Hella 500 Driving Lights
= 2 Baja 55w Axillary Fog Lights
= x4 Alpine Type S In-door speakers
= Factory Skid Plates


So I just decided to make my registry. Let's see how this goes.

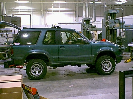
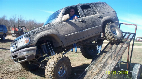
This is my X next to my brother's 2000 Blazer in my driveway.
blazervsx.jpg


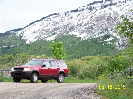
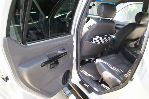
I guess I will start with the X itself. I purchased my X on April 3, 2009 and I have been working on it since. A lot of the upgrades were installed by the previous owner but I have a lot of work still to do. Balancing school, football, and working on my X is pretty difficult but I always seem to find time. I started with a full interior detail the first week I had it; the carpet was very dirty. Then came the MT Performance wheels...

They were looking pretty dull when i got 'em...
1001108q.jpg


Then I used some Mag Polish and cleaned 'em up with the help of the Mother's PowerBall.
1001137z.jpg


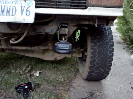
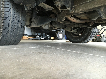
I was very happy to see that there were factory skid plates underneath.
1001084.jpg

1001085wsc.jpg


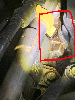
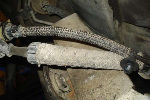
One of the rear helper springs.
1001086o.jpg


So, the lights were up there on the Surco Roof rack but they weren't actually wired up. So I headed over to 4 Wheel Parts and picked up an Explorer Dual Light Wiring Harness.

I ran the wire behind the rear driver side seat and up under the plastic back to the CPU and jack area.
dsc01009r.jpg


I then put an enclosure in that area with the ground and power coming in one side and the wires to the switches coming in the other. Then the various connections on the relays were connected and there you go.
dsc01019f.jpg


I ran the wires up out the back by the tail gate and then along the roof rack in the wire tubing all the way up to the lights.
dsc01029c.jpg

and then along the front, looping to each light along the way...
dsc01038l.jpg


I then happened to have a great idea for where to put the switches.
dsc01040t.jpg

....installed...
dsc01046s.jpg


That's all I have for now. Didn't get any pics of the driver's door lock. I am going to tackle the exterior handle on the driver's side and a small body fix on the tailgate this weekend.


Join the Elite Explorers for $20 each year.
Elite Explorer members see no advertisements, no banner ads, no double underlined links,.
Add an avatar, upload photo attachments, and more!
.


So I got all the lights wired up last night, but much to my dismay, one of the fog lights wasn't working. I also bought some new Sylvania 100W for the driving lights today; a very nice improvement. While swapping out the 100W's and fixing the fog that was not working I found that the end of the bulb had actually cracked and all of the gas had leaked out. So I just moved one of the 55W bulbs that were in the driving lights over to the fog and now I have an awesome 4-light setup.


The wheels came out siiick! Nice work so far! :cool:


nice x u got there paWOLF


Thanks guys.

.....I was surprised at how good the wheels came out too; the power ball was amazing.

.....Next I need to get some shackles. Look at that rear end sag! :(


Dropped the spare and changed the rear brake pads today.

And here is my next project.. Just got some on my brother's blazer today....

dsc01050c.jpg


dsc01051r.jpg


I am thinking about coating my Rims with some black. Don't even no if this would even be realistic but I am just pondering some things.

redx.jpg


Wow. It's been over two months since i posted an update. I guess taking an engine out get's you a little behind.


I recently finsihed replacing the timing chain and cassetesr and, well, we were kind of surprised.

Here are some pics from during the process.

Not pertaining to the timing chain, here's what we first saw upon removal of the valve covers.

1001197.jpg


1001199h.jpg


1001208t.jpg


I guess the previous owner forgot to change the oil? More than once. :mad:


And then the carnage that was the plastic guides.

Here's what use to be the rear chain guide.
1001214e.jpg


And more of the rear....
1001216.jpg


And here you can see the metal guide slowly eaten away by the chain itself.
1001217.jpg


Now to the front....
Not too much damage. I guess the front lower guide just broke in half. I'll show you where all the little pieces went to later.

1001237.jpg


Now get ready this is quite a 'disaster.' Are you ready?

The primary chain was a whole different deal. All of the guides, even the metal had moderate to severe damage.

Notice the lack of the metal guide on the left.
1001241.jpg


This is how the metal was when we opened her up initially. Notice the screw in the center of the picture with part of the metal bracket.
1001236v.jpg


Minor damage to the primary guide.
1001249.jpg


....and more guide damage.
1001251z.jpg


and where'd it all go?

.... Well some is visible from the top...
1001253p.jpg


The rest made it to the oil pan. :(
1001221g.jpg


All of this.....
1001231.jpg


Came from inside here...
1001225.jpg


And some more made it all the way down to the pan.
1001234.jpg


So all in all it was pretty bad. :thumbdwn:

====================================================================================================

Now to the new parts going in. YAY!

New front cassette....
1001275t.jpg


New rear cassette.....
1001278.jpg


This use to be that metal stub that was word half-way flat.
1001276.jpg


New sprocket in the front going in.
1001279k.jpg


Full front chain ready to go.
1001283.jpg


Front now fully reasembled.
1001288l.jpg


Bottom end off for sludge control and plastic clean up.
1001289r.jpg


And I don't believe I got any pics of the re-installation of the engine but believe it or not I was kind of busy on the underside. But we did get it all in and it cranked almost immediately.

However I somehow managed to snap a bolt while attaching the front driveshaft inside the front pinion flange. So on our way to a machine shop nearby and we start smelling a gas leak. :rolleyes: Turns out when we got to the shop that we had a pretty BAD fuel leak coming from the O-Ring on the Fuel lines to fuel rail connection. :mad: So I had to get that fixed in the parking lot of the shop. It was well, 'fun'! Especially in 90 degree heat. But while fixing that minor leak we found yet another leak on a house going into the thermostat housing. That was most definitely operator error, must have somehow missed that one clamp. But for only having two-leaks after disassembling and reassembling the entire engine I think that is pretty darn good.

After all that we just ended up getting a new front pinion flange and pinion seal because the seal was leaking. Today we got the flange swapped the seal changed and now have a fully-functioning 4 Wheel Drive Explorer. Not bad for $1500. :)


Now for some more stuff that I have done not pertaining to performance....

Got that ugly piece of plastic off in the front. And mounted some cheap Baja Fog Lights from AutoZone hooked up in the bumper to replace the factory fog lights. For $24.99 for the pair, these lights are definitely surpassing my expectations.
1001263y.jpg


I mounted them using some 1 inch corner scrap steel that I had lying around somewhere. It worked perfect because I was able to use two existing bolts and was also able to retain the use of the factory wiring harness.
1001268.jpg


1001270j.jpg


Also got my CB and PA system hooked up.

Mounted the 68" Whip from Radioshack on the roof-rack with the mount also from Radioshack.
1001246.jpg


And here's the 25W Powerhorn also from Radioshack :) , not hooked up yet along with the Midland CB that I got from my brother.
1001248w.jpg


I ended up mounting the PA speaker in the rear where the spare tire use to be. Just bolted straight in to the brace for the tire. I love how loud the PA is even though it is stuck in the very back.

I also ordered some Pro-Comp Add a Leafs from 4 Wheel Parts yesterday and I got a call today letting me know that they were in and ready to be picked up. So I will get those on the way home from Football practice tomorrow and get those on ASAP to help ease the darn rear end sag!

Woohoo! This is coming along nicely. Probably the greatest first car ever!


Very, nice man I bet those 32's are beggin for some 4.10s.


I'm only 16; so I don't have the money or the resources to re-gear but right now they turn fine with no problems. They do rub on the wheel skin just a tiny bit right now but that will be fixed later today. :D

....
Nice truck man. So i'm assuming you go to state?

I will be going to State when I finish High School but both my brothers go to State. Go WolfPack!


Leesville High.


Why did four of my images go away?


I was wondering the same thing... Oh well.


Hey paWOLFck I'd be interested to see where you mounted your CB. Got any pics of it?


Join the Elite Explorers for $20 each year.
Elite Explorer members see no advertisements, no banner ads, no double underlined links,.
Add an avatar, upload photo attachments, and more!
.


Sorry, just saw the post.

I mounted it in the lower pocket of the center console. I just cut out the back of the pocket and part of the top of the pocket and it just keeps itself in their. It does stick out a little bit, but not enough to bother me.

I can get some pics tomorrow when I get home from practice but I am studying for a Psych test right now so no can do.


Back
Top