ac replacement | Ford Explorer Forums - Serious Explorations

  • Register Today It's free!

ac replacement

joshtypesn

Active Member
Joined
March 11, 2008
Messages
97
Reaction score
0
City, State
Fort Myers, Florida
Year, Model & Trim Level
1995 Eddie Bauer 4x4
I am about to replace my accumulator/drier, compressor, and condensor on my 1995 EB. Just wanted to see if there was anything I should be looking out for, anything else that needs to be replaced if I am doing this? I will be replacing all o rings and the oraphis also and reoiling parts and having someone else evacuate and recharge. I am more than willing to take pics and do writeup but I want to make sure I am confident to do this first. So let me hear the advice and help!


Join the Elite Explorers for $20 each year.
Elite Explorer members see no advertisements, no banner ads, no double underlined links,.
Add an avatar, upload photo attachments, and more!
.


I have nothing much to add except to use the green HNBR o-rings.
refrigerant_tools.jpg


noted, thanks. I have seen a few different types of AC oil out there and also heard different things about oiling the o-rings. What is everyones opinion here? Also, is a line flush necessary? How should I go about this?


noted, thanks. I have seen a few different types of AC oil out there and also heard different things about oiling the o-rings. What is everyones opinion here? Also, is a line flush necessary? How should I go about this?

Flush........to get the old oil and guck out of the old parts. Don't flush any line with a muffler on it and don't flush a compressor.

AC oil and capacity will depend on the system on your vehicle. Consult the NAPA sticky for capacity. Can't remember if it also says what oil to use.

Distribute the oil among the major parts.

When you're putting things back together.......you should lube the O rings.......either with Nylog (I used blue with my PAG oil system http://www.refrigtech.com/nylog.html)......or use the AC oil.

It's only advice........so, feel free to ignore anything and everything.

Aloha, Mark

PS........IMHO..........recharge the system as soon as possible (Read it as: that day) after you install the new accumulator.


Thanks for the advice.
Just to clarify...What is a muffler on the line? What am I looking for?
Can I flush the lines with an air hose or do I need another type of tool for this? Also, you say to recharge the day I put in the accumulator...do I need to have the system evacuated first or can I just charge like I normally would through the low side port when I am all finished? I am still waiting on parts but I am taking the old ones out and can flush the lines now so I want to get all that done. Thanks for the help.


Update: Here are the steps I plan to follow to replace my ac components. Let me know if there is anything I missed. I will try and revise with pics when I am done.
Needed: socket set, line disconnect tools, bucket for coolant, o ring set, line flush (aerosol type), new parts, air compressor, new coolant (you can reuse the old if you want), AC oil Pag 46 for my model.
1. Remove intake pipe
2. Drain radiator and remove lines.
3. remove two retaining bolts at the top of the radiator and 2 for the fan shroud
4. Hang the fan shroud from the fan
5. You should be able to carefully lift the radiator out of the bracket that it sits in now
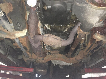
6. Now you should be able to see the condenser and lines, remove the lines with the line disconnect tool (same type of tool used for feul lines, there are a few sizes you may need).
7. The condenser will also lift right out and you can place the new one right back in. (on mine I added 3 oz of PAG 46 first) (NOTE: my new condenser did not have the mounting hardware so I installed with some wire to hold it in at the top as it sits in a brackit at the bottom.)
8. Replace your radiator and lines (flush first since its out, why not)
9. Re-attach fan shroud.
10. Fill radiator and all of the fun stuff to do with that.
11. Remove belt from around the Compressor pully
12. Disconnect lines from back of AC compressor (just one bold in between the two hoses)
13. Disconnect all wiring plugs from compressor
14. Unbold the 4 bolts on the compressor and lift it out.
15. Add about 2 or 2.5 ounces of oil to new compressor and prime it by turning the clutch.
16. Set new compressor in place and bold down with 4 bolts.
17. Re-attach the belt.
18. Flush the line and replace o rings on the line from the compressor to condenser with the aerosol flush (I use this method so that most do it yourself mechanics can do so also, a flush gun is something most of us dont have sitting around) I then dried the line with my air compressor.
19. Oil the o-rings and reseat the lines to the right side for the condenser and back of compressor
20. Remove accumulator/drier by seperating the lines both with the disconnect tool and other one with a wrench and backup wrench (do not break the lines). Looses the clamp at the bottom of the accumlator and lift it out.
21. Below the accumulator you will see another line and disconnect fitting, disconnect this and remove the oraphis from the line that goes toward the firewall.
22. you can flush this line before replacing oraphis and replace o rings and reconnect.
23. Flush remaining lines and reconnect the left line to the condensor and oraphis lines
24. Add the remaining oil to the new accumulator and install. Change o rings and oil to lines and reconnect.
25. Check all connections and shraeder valves.
26. Have system evacuated, tested for leaks, and recharged. (IMPORTANT: Do this the same day you install the new accumulator!!! do not let the accumulator sit for any long period of time.


I replaced the parts with the method above with no problems at all. I ended up having to replace the main line which runs from the compressor with both in and out ports. This line was $150 alone at NAPA. When I took it to get recharged there was another leak found in the evaporator so I had the evaporator done by my mechanic. Overall results...a brand new AC system with the exception of the line from evaporator to condensor. Other than this one small line everything else is new. ICE COLD air is not something I do have, never felt it get this cold before! Lesson learned, if you are going to change 3 AC components, you might as well replace them all. Hope this helps some others.


Josh,
good words, I will cut n paste your list and take with me when I tackle the job, I have an '02 and a condenser leak (dye visible in center) and will do the accumulator/drier as well. Compressor is not as old as yours.
I hope to not remove the radiator but am investigating that for now. Had it flushed and refilled in February so it doesn't need that.

If you have any other tips or had an "ah ha" moment or "oh sh*t" event please pass. I'm getting the parts delivered next week and will work Friday 11 June


Back
Top