Do the front and rear take the same shock absorber? | Page 2 | Ford Explorer Forums - Serious Explorations

  • Register Today It's free!

Do the front and rear take the same shock absorber?

Post number 3 has been selected as best answered.

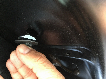
turns out it is not just rubber. after scraping away at the rubber, I find steel underneath.
pi2uy4.jpg


Join the Elite Explorers for $20 each year.
Elite Explorer members see no advertisements, no banner ads, no double underlined links,.
Add an avatar, upload photo attachments, and more!
.


How much space do you need? Get a cheap one and grind it to fit?
It looks like, even if I somehow got a socket connected, that there just would not be enough room to swing it. As the lady in the video says, "you are never going to get a torque wrench in there". The difference is, that her nuts were accessible, while mine are not (or one of mine is not).


Does anyone know if that rubber/steel obstruction even serves any useful function in the vehicle?


Other than just cutting it off, I think some sort of special tool is needed, not sure exactly what yet.
(I would have to cut one end off.)


I use a bolt extractor socket.

REXBETI Impact Bolt & Nut Remover Set ($25.97)

If you can't get a socket wrench in there you can put a box wrench on the socket as it has a hex outside (look at the third picture in the link). I think the outside of the sockets is something like 3/4". For nuts on a long bolt that is too long for even a deep socket you can slide the extractor over the bolt through the socket hole You can have some trouble getting enough pressure on the top of the socket to get it to bite since you really can't push down with the wrench you are using to try to turn the socket. Sometimes it helps to have someone else who can push down with a flat bar, etc.

Bolt extractors are the best because option as the nuts are usually rusted down to nothing anyway and after all the trouble to get your socket on, your 13mm just spins.

If that doesn't work you may end up cutting it off.

LMHmedchem


Just ordered this to try. If it doesn't work will return.
Amazon product ASIN B08KRPTYSQ
Well, I tried this tool, and so far I am not able to get it to press down far enough to grip onto the nut. It seems the walls of the tool are too thick and interfere with the hard rubber, and it's hard to get any leverage back up under there to "force" it down onto the nut... The tool needs to have skinny walls like a socket...


I ended up simply cutting the bumper-damper off with a saw; I do not plan to replace it with anything; after that removing the three strut nuts was cakewalk. Now, I have a NEW problem. At 2:27 of the below video, the toe-link end simply pulls outward for her;
I have gotten it to slide out about 3/8inch by pounding on a break-bar on one end with a hammer while
the other end was on the toe-link; but, I can't get it to move any more. I did try pounding a flathead
screwdriver into the slit/slot to try to open it up and maybe make it easier. At this juncture, I had to
skip that step and go on to removing the knuckle bolt/nut and control-arm bolt/nut and removal of sway-bar link. Pounding more
on the toe-link-rod is not making any more progress.
Any suggestions ?
edit: maybe I could pull on the toe-link-rod with a tow strap on my other vehicle, but I am afraid the Mercury will end
up falling off of its jack/jack-stands.... of course I do have the front wheels chalked.


Well, I tried jacking both rear wheels off the ground instead of just one. That didn't help. I still can't pound the toe-link-rod out of its socket.


My jack-stands are almost maxed out, and I still do not have enough room to push the control arm down far enough to get the bottom of the shock pulled out. I would need at least 4 more inches, bare minumum; and truthfully, I would like to be using a longer fulcrum than I already am using, which would mean I would need an even higher height off the ground (with the longer fulcrum).
aq7jjm.jpg


HOT DIGGITY. Using a long banana-shaped 2x4, running all the way out into my downward-sloping driveway, I was able to break things far enough apart to get the strut out. I don't know why the dimensions worked, but it did. Whew....
j35j3w.jpg


My nominal plan is just to slather the below toe-link with red-grease and pray that I can pound it back in. (I cleaned out the hole/socket). Or, does it need some additional prep before I should try to pound it back in ? (You can see it is fairly rust-pitted.)
vpwnx0.jpg


Is replacing the toe link an option? When I replaced the toe link I used anti seize rather than grease. I saw a youtube video that suggested applying anti seize on the stud. I can't find link or I would post it.

I recently replaced the toe link and reached out to tech support from the replacement toe link. They said that "these straight shank pinch-bolt style ball joints require the receiver hole bore to be expanded slightly prior to stud removal and installation. During installation, it’s good practise to torque the pinch bolt once to the vehicle manufacturer’s spec, back off the hardware, then re-torque a second time. This two-step torquing procedure helps to ‘reset’ the metal to ensure proper clamping load after the receiver hole bore was initially expanded during the stud removal and installation process."


The toe-link went back on like cakewalk, with just a lightweight hammer.
Now I am just waiting on the replacement sway-bar-links ($20-shipped from rockauto.com for a pair) and the
left-rear will be DONE. (I need those new sway-bark-links coz I broke the original left-rear one and will probably break the original right-rear also.)
Then just a repeat on the right rear, and then on to the front which should be a lot easier.
Boot was from Oreilly's, came with two, one was too big, totaling $8. Will need another for the right-rear I am sure.


Join the Elite Explorers for $20 each year.
Elite Explorer members see no advertisements, no banner ads, no double underlined links,.
Add an avatar, upload photo attachments, and more!
.


Back
Top