- Joined
- February 8, 2003
- Messages
- 9,814
- Reaction score
- 98
- City, State
- Sacramento, CA 95827
- Year, Model & Trim Level
- 1992 XLT
[Preamble: Ok.. I know it is no big deal, not much harder than changing a spark plug, but ya know, we all started someplace in our auto repair, and this one is a good "starter" job for a newbie mechanic.
So.... that said, here we go:
Ah, summer, the time when a young man's heart turns to.... heater cores? Usually this time of year is when the AC threads start up, but a heater core failure is no respecter of seasons.
If you have never had a heater core failure, they often show up in a way that scares the bejesus outta ya.... a puff of what looks like smoke appears at the vents! Whoa nellie, get out the fire extinguisher! Not. The leaks usually are so ssmall they atomize antifreeze and it shows up looking for all the world like smoke or steam. Relax, well sorta relax, you have a leaky heater core. Is all. No big deal for us 1st Gen Explorer owners, as you will see.
Now the heater core is a pretty simple device, a little radiator really.... and in summer you COULD just disconnect the two hoses going to it, and using a hose connector and clamps just hook em together and wait til fall - I know, been there done that. But I decided to just go ahead and replace mine, and do a photo thread of the process.
In the years I have been doing car stuff I have replaced a "few" heater cores (including this one! More on that later) and I gotta tell you... FORD hit it out of the park on the first generation Explorers in this department. It is a very easy job, 4 screws and 2 hose clamps - that's IT. No dropping the dashboard (81 Cougar, an ALL day job) or wierd contortions to get to it.
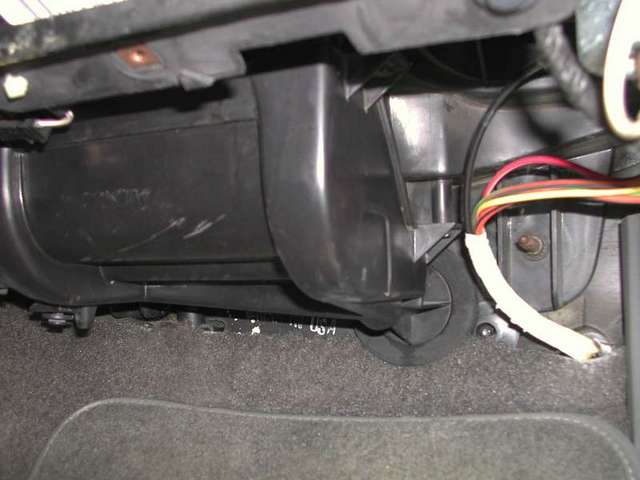
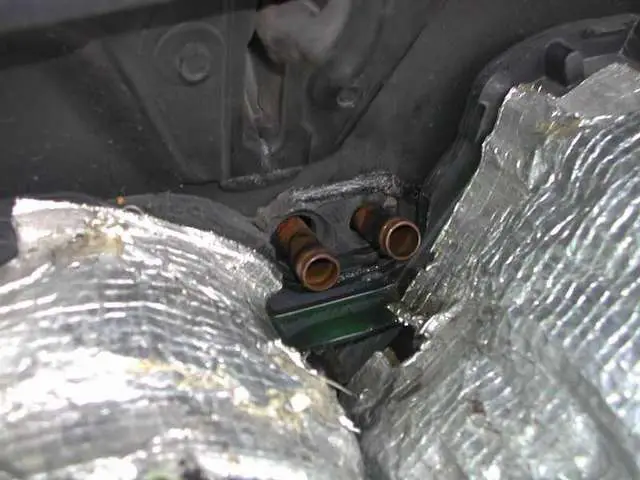
Ok let's get at this task. The heater core is in a little chamber under the glovebox, and the hoses connect on the firewall just behind the glovebox, here:

The "box" (if you like $5 words I think it might be properly called a plenum chamber) is in 2 "clamshell" halves.. it looks like this as it just sits there:
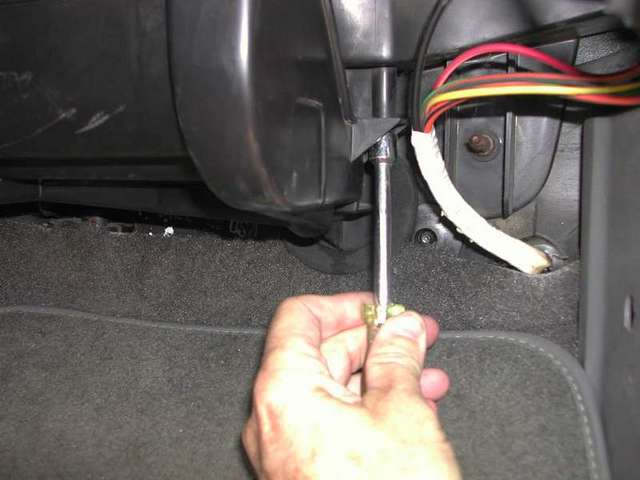
and 4 screws hold the box together... I'll show you the first 3, the 4th is just in the back on the center hump side.. here is 1
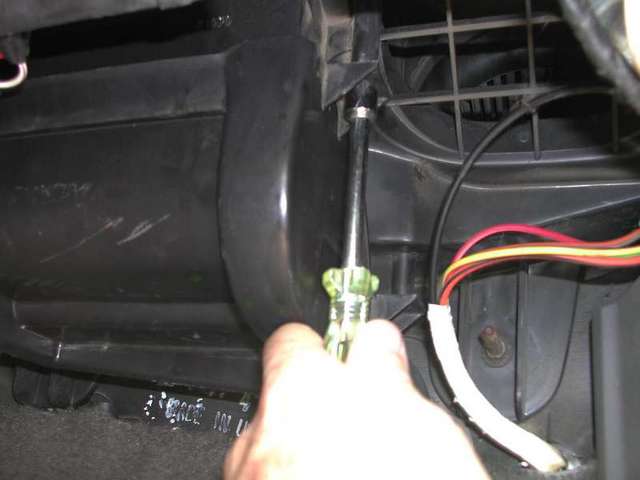
and two
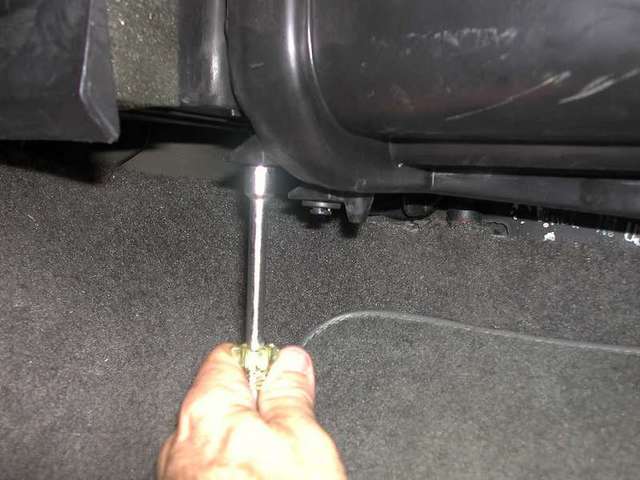
and 3
These screws are 5/16's. the back most ones need something short, a 1/4 drive socket is perfect for them. There is one more I didn;t show, it is near the back. With all 4 removed it is easy to take off the front of the "box".
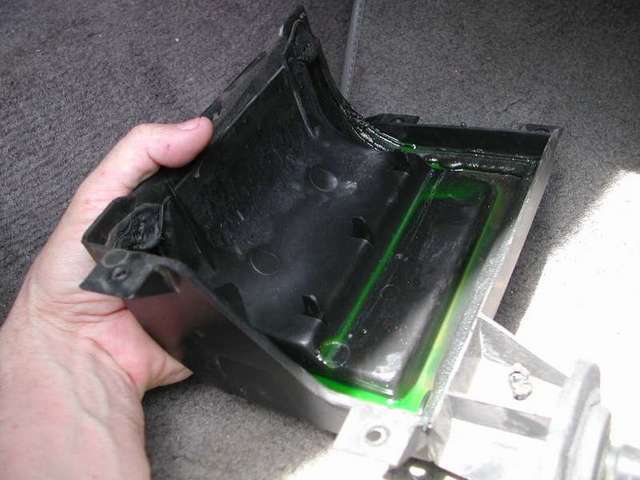
Look at the AF in this one, think I had a leak?
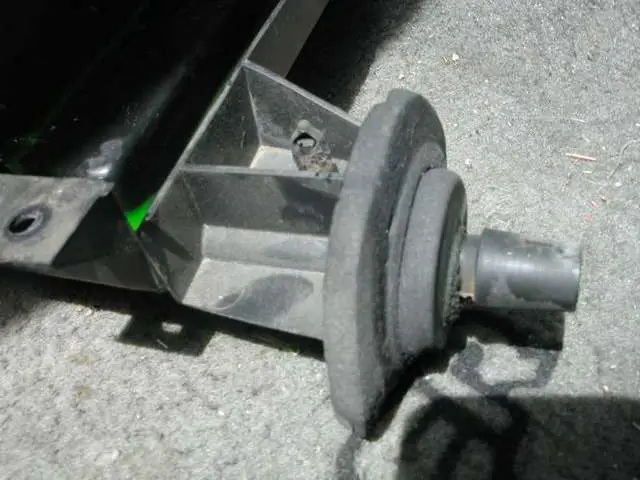
You will notice it has a drain so it won't leak into the passenger compartment should it fail.. nice touch!
Once the front is removed, you are AT the core... (sounds like a bad sci fi movie, eh?) From the looks the leak was somewhere near centerline....

Remove the hoses (sometimes easy sometimes you need to cut them off, don't worry, you have enough extra to do that) and you have just the ends of the core tubes sticking out..
pull the core into the passenger compartment until the hose connectors clear the firewall, then down and out. EASY ! Disassembly COMPLETE !
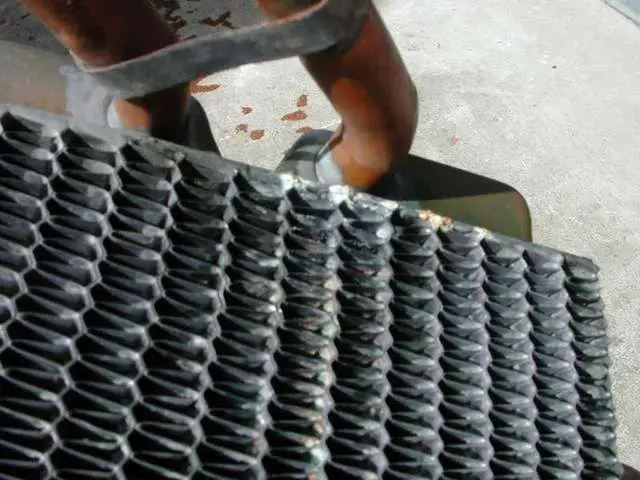
Looking at the core, it appears this one started leaking at the top seam...
upside down

since it was less than 4 years old good chance of electrolysis (more on this later). The new one is more or less identical.
This is a place where a helper can be nice. I did it without one, but there is nothing holding the core in place but the hoses. Reinstallation is just reverse of taking it out.. carefully up then thru the firewall. A helper can apply pressure on the core while you work the hoses on. Tighten the clamps, put the box half back on and add the 4 screws, and YOU ARE DONE !
Whoever figured this one out at FORD ought to get a bonus. Unfortunately later Explorers do not have it this easy.
Now about the core. The core that went I picked up a few years at Autozone for under $20. The new one I bought at CarQuest for close to twice that. Side by side they look nearly identical. Was the Autozone one bad? Well maybe, maybe not. If a heater core fails in short order, suspect electrolysis. How to check ? Put a voltmeter probe in the antifreeze and one on the battery ground. Anything around .2 volts or higher is BAD news.
I had replaced the radiator, flushed the system and added new AF since the heater core was installed, so of course it checked out ok - NOW. But, I could have had electrolysis before. So no verdict. The Carquest core was "made in the USA". We'll see.
Anyway, now you can have heat in your Explorer this summer. In Minnesota it will be a blessing. Ok you guys in Florida can stop laughing now.
So.... that said, here we go:
Ah, summer, the time when a young man's heart turns to.... heater cores? Usually this time of year is when the AC threads start up, but a heater core failure is no respecter of seasons.
If you have never had a heater core failure, they often show up in a way that scares the bejesus outta ya.... a puff of what looks like smoke appears at the vents! Whoa nellie, get out the fire extinguisher! Not. The leaks usually are so ssmall they atomize antifreeze and it shows up looking for all the world like smoke or steam. Relax, well sorta relax, you have a leaky heater core. Is all. No big deal for us 1st Gen Explorer owners, as you will see.
Now the heater core is a pretty simple device, a little radiator really.... and in summer you COULD just disconnect the two hoses going to it, and using a hose connector and clamps just hook em together and wait til fall - I know, been there done that. But I decided to just go ahead and replace mine, and do a photo thread of the process.
In the years I have been doing car stuff I have replaced a "few" heater cores (including this one! More on that later) and I gotta tell you... FORD hit it out of the park on the first generation Explorers in this department. It is a very easy job, 4 screws and 2 hose clamps - that's IT. No dropping the dashboard (81 Cougar, an ALL day job) or wierd contortions to get to it.
Ok let's get at this task. The heater core is in a little chamber under the glovebox, and the hoses connect on the firewall just behind the glovebox, here:
The "box" (if you like $5 words I think it might be properly called a plenum chamber) is in 2 "clamshell" halves.. it looks like this as it just sits there:
and 4 screws hold the box together... I'll show you the first 3, the 4th is just in the back on the center hump side.. here is 1
and two
and 3
These screws are 5/16's. the back most ones need something short, a 1/4 drive socket is perfect for them. There is one more I didn;t show, it is near the back. With all 4 removed it is easy to take off the front of the "box".
Look at the AF in this one, think I had a leak?
You will notice it has a drain so it won't leak into the passenger compartment should it fail.. nice touch!
Once the front is removed, you are AT the core... (sounds like a bad sci fi movie, eh?) From the looks the leak was somewhere near centerline....
Remove the hoses (sometimes easy sometimes you need to cut them off, don't worry, you have enough extra to do that) and you have just the ends of the core tubes sticking out..
pull the core into the passenger compartment until the hose connectors clear the firewall, then down and out. EASY ! Disassembly COMPLETE !
Looking at the core, it appears this one started leaking at the top seam...
upside down
since it was less than 4 years old good chance of electrolysis (more on this later). The new one is more or less identical.
This is a place where a helper can be nice. I did it without one, but there is nothing holding the core in place but the hoses. Reinstallation is just reverse of taking it out.. carefully up then thru the firewall. A helper can apply pressure on the core while you work the hoses on. Tighten the clamps, put the box half back on and add the 4 screws, and YOU ARE DONE !
Whoever figured this one out at FORD ought to get a bonus. Unfortunately later Explorers do not have it this easy.
Now about the core. The core that went I picked up a few years at Autozone for under $20. The new one I bought at CarQuest for close to twice that. Side by side they look nearly identical. Was the Autozone one bad? Well maybe, maybe not. If a heater core fails in short order, suspect electrolysis. How to check ? Put a voltmeter probe in the antifreeze and one on the battery ground. Anything around .2 volts or higher is BAD news.
I had replaced the radiator, flushed the system and added new AF since the heater core was installed, so of course it checked out ok - NOW. But, I could have had electrolysis before. So no verdict. The Carquest core was "made in the USA". We'll see.
Anyway, now you can have heat in your Explorer this summer. In Minnesota it will be a blessing. Ok you guys in Florida can stop laughing now.
") I ended up finishing the job with a steak knife!
I ended up finishing the job with a steak knife!


