- Joined
- March 4, 2007
- Messages
- 26,320
- Reaction score
- 122
- City, State
- anaheim hills,california
- Year, Model & Trim Level
- 95 ranger 4x4/ 91 X 4x4
...I've done several water pumps on Fords but this one is a little different...
..First, the weep hole is on the top..

..Second, the snout that runs to the bottom hose actually runs through the middle of the big alternator bracket in a special slot just for it (running down about 8 o'clock)..This is also where the slip in neck that meets the water pump joins..Sorry I couldn't get a better picture..

_____________________________________________________________________
Disclaimer: This is just how I did it. Do so at your own risk. Check your Haynes/Chilton's or service manuals for torque specs..:biggthump
..Shopping for this water pump I went to every major retail and wholesale house in my area (except Ford) and everyone was selling the same identical water pump just in different boxes..
...The prices ranged from $47.99 to $89.99 and one supplier was selling the same water pump for $185.99..
Note:..Be sure yours comes with 1 large and 1 small O ring..One company was selling the lower price unit with only the large O ring and said the small one had to be special ordered..
..The large O ring goes in the groove by the impeller and the small one goes inside the snout and does not have a groove..Both of these areas require RTV.
..Here are a couple pictures of the new and old water pump together..The freeze plug will be on the bottom when installed.


..First you need to drain the radiator. Check with your local parts store for where to safely discard your old antifreeze.
..The drain **** on the 2.3L radiator is on the drivers side bottom of the radiator..This is a pic of it and I also pull mine out to be able to evacuate any debris that may be in the radiator..

Mine was surprisingly clean which means the cooling system is healthy and free of rust and such..:biggthump
..Next, you need to remove the 4 bolts attaching the fan clutch to the pulley with a 10mm wrench..I like to do this with the serpentine belt on..

..This is a view using a regular 10mm wrench..This is much easier to do if you have a longer 10mm wrench as it gets your arm outside the the fan shroud and cuts down on the arm rash and burns..

..Once you have the bolts loose and ready to come out, remove the 2 bolts holding the fan shroud at the top..

..Pull the fan shroud toward the water pump and then pull the fan shroud up..It is just clipped t the bottom and once you do this it is free..

..Now place the fan shroud over the fan and let it hang there..Finish removing the 4 clutch fan bolts and remove the fan shroud and clutch fan together..Be careful not to damage the radiator..
..Now is a good time to inspect your fan shroud and fan for crackes or breakage..I found that my fan had been hitting the shroud and believe that to be from when I broke the motor mount.

..Here are a couple pics of the clutch fan and the 10mm wrenches..The longer one is preferred..


I like to clean all the dirt and debris from these items and all the pulley's to also inspect them for cracks and regain some more HP from the loss of weight..
..The fan clutch pulley

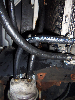
..Next you need to work from the bottom below the alternator. This picture is looking from the bottom, straight up the lower hose which is attached to a metal neck that slips into the water pump..
This neck goes straight up then 45's into the alternator bracket where it meets the water pump. This neck has a nipple which holds a heater line as shown in this picture (left hose)..
.Also in this same picture (top of pic), you can see there is a bracket welded to this neck that attaches the neck to the alternator bracket with the use of 2-8mm bolts..You need to now remove these to bolts..

..This is where it gets tricky :scratch:
Note: You are working around the alternator and starter so it would be a good idea to disconnect your battery if you haven't already..
..I used a long punch and a rubber mallet from the top, against the neck bracket to punch it downward, so this neck would pull out the water pump since it is RTV'd in..
Note: These necks are usually thin and can be delicate after years of use so use care when working on and handling it. If you damage these they will leak and they are a Dealer only item..
..After you have separated the neck from the water pump (I did not need to disconnect the lower hose or heater hose), finish removing the 3 water pump mounting bolts and pull the water pump out.
..Sorry, I forgot to get pics of the actual removal and re-install..
..Clean the neck and the water pump mounting surface. Since there is no gasket required, I then put both O rings in their locations, applied the RTV, and re-installed the water pump..
Next was to crawl underneath, slip the neck into the water pump and immediately mount the neck bracket to the alternator bracket. Check the curing time on your RTV.
...Other than that, putting everything back together is a breeze..The only hard part left is indexing the first bolt on the fan clutch..
..Hopefully this will help others tackling the 2.3L water pump..
_________________________________________________________
..As an added bonus, I'll throw in some extra pics of this area and the serpentine belt routing..


..First, the weep hole is on the top..
..Second, the snout that runs to the bottom hose actually runs through the middle of the big alternator bracket in a special slot just for it (running down about 8 o'clock)..This is also where the slip in neck that meets the water pump joins..Sorry I couldn't get a better picture..
_____________________________________________________________________
Disclaimer: This is just how I did it. Do so at your own risk. Check your Haynes/Chilton's or service manuals for torque specs..:biggthump
..Shopping for this water pump I went to every major retail and wholesale house in my area (except Ford) and everyone was selling the same identical water pump just in different boxes..
...The prices ranged from $47.99 to $89.99 and one supplier was selling the same water pump for $185.99..
Note:..Be sure yours comes with 1 large and 1 small O ring..One company was selling the lower price unit with only the large O ring and said the small one had to be special ordered..
..The large O ring goes in the groove by the impeller and the small one goes inside the snout and does not have a groove..Both of these areas require RTV.
..Here are a couple pictures of the new and old water pump together..The freeze plug will be on the bottom when installed.
..First you need to drain the radiator. Check with your local parts store for where to safely discard your old antifreeze.
..The drain **** on the 2.3L radiator is on the drivers side bottom of the radiator..This is a pic of it and I also pull mine out to be able to evacuate any debris that may be in the radiator..
Mine was surprisingly clean which means the cooling system is healthy and free of rust and such..:biggthump
..Next, you need to remove the 4 bolts attaching the fan clutch to the pulley with a 10mm wrench..I like to do this with the serpentine belt on..
..This is a view using a regular 10mm wrench..This is much easier to do if you have a longer 10mm wrench as it gets your arm outside the the fan shroud and cuts down on the arm rash and burns..
..Once you have the bolts loose and ready to come out, remove the 2 bolts holding the fan shroud at the top..
..Pull the fan shroud toward the water pump and then pull the fan shroud up..It is just clipped t the bottom and once you do this it is free..
..Now place the fan shroud over the fan and let it hang there..Finish removing the 4 clutch fan bolts and remove the fan shroud and clutch fan together..Be careful not to damage the radiator..
..Now is a good time to inspect your fan shroud and fan for crackes or breakage..I found that my fan had been hitting the shroud and believe that to be from when I broke the motor mount.
..Here are a couple pics of the clutch fan and the 10mm wrenches..The longer one is preferred..
I like to clean all the dirt and debris from these items and all the pulley's to also inspect them for cracks and regain some more HP from the loss of weight..
..The fan clutch pulley
..Next you need to work from the bottom below the alternator. This picture is looking from the bottom, straight up the lower hose which is attached to a metal neck that slips into the water pump..
This neck goes straight up then 45's into the alternator bracket where it meets the water pump. This neck has a nipple which holds a heater line as shown in this picture (left hose)..
.Also in this same picture (top of pic), you can see there is a bracket welded to this neck that attaches the neck to the alternator bracket with the use of 2-8mm bolts..You need to now remove these to bolts..
..This is where it gets tricky :scratch:
Note: You are working around the alternator and starter so it would be a good idea to disconnect your battery if you haven't already..
..I used a long punch and a rubber mallet from the top, against the neck bracket to punch it downward, so this neck would pull out the water pump since it is RTV'd in..
Note: These necks are usually thin and can be delicate after years of use so use care when working on and handling it. If you damage these they will leak and they are a Dealer only item..
..After you have separated the neck from the water pump (I did not need to disconnect the lower hose or heater hose), finish removing the 3 water pump mounting bolts and pull the water pump out.
..Sorry, I forgot to get pics of the actual removal and re-install..
..Clean the neck and the water pump mounting surface. Since there is no gasket required, I then put both O rings in their locations, applied the RTV, and re-installed the water pump..
Next was to crawl underneath, slip the neck into the water pump and immediately mount the neck bracket to the alternator bracket. Check the curing time on your RTV.
...Other than that, putting everything back together is a breeze..The only hard part left is indexing the first bolt on the fan clutch..
..Hopefully this will help others tackling the 2.3L water pump..
_________________________________________________________
..As an added bonus, I'll throw in some extra pics of this area and the serpentine belt routing..