Driver Side Rear Door won't Unlock/Open | Ford Explorer Forums - Serious Explorations

  • Register Today It's free!

Driver Side Rear Door won't Unlock/Open

fixt

Well-Known Member
Joined
November 15, 2010
Messages
144
Reaction score
2
City, State
North Carolina
Year, Model & Trim Level
1996 5.0L XLT AWD
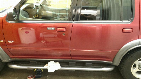
The rear driver side door would not unlock/open.
Removed the rear seats and managed to get the door panel off without wrecking it.
The lock solenoid didn't appear to go full throw to unlock, and neither inside or outside handle worked to unlock or open. I could see the knob handle move but there was no travel to unlock
WTH?

I need the new solenoid anyway, so I cut the plastic part sticking out of the solenoid below the linkage rod. Still couldn't get throw on the linkage. With a lot screwing about inside with little to no room and hard to see anyway, I managed to get one of the lock ears to rotate and then it would open using the inside and outside handle.
Lubricated and it worked a few times, right back to failed lock, won't open.
Broken internal spring lock spring?

I'm guessing I need a new lock, solenoid, and associated linkage.
Any one had this happen?
Advice from anyone willing to share experience?


Join the Elite Explorers for $20 each year.
Elite Explorer members see no advertisements, no banner ads, no double underlined links,.
Add an avatar, upload photo attachments, and more!
.


Well, the little return spring was broken. Put it back in place and the lock still does not want to unlatch. I can push a little tab in back of the lock and it unlatches every time, but not with the operating linkage.
Looks like time for a new lock mechanism as well.

I read a bunch of threads on this, but almost all devolved into either the lock solenoid or the little yellow outside door handle retainer thingy and handle return spring. None of those did me much good.
The hole in the lock does me no good for opening inside the door. I just keep screwing with it until it randomly opens.

Parts to be ordered tomorrow when Ford local dealership opens. I want reliable parts because I do not want to do this again anytime soon.


This may sound dumb, but, is the child proof lock in the open position?


I had the same problem and i hooked a small spring onto the inside of the handle at the top and the other end to the rod. The problem was the rod was slipping too far down for the latch to fully unlock. Lifting up slightly on the rod will allow you to unlock it and for both the inside and outside handles to work.


No, its not the childproof lock. That only inserts a cam position to allow or prevent opening from the inside handle. No effect on outside handle, its linkage connects to a a different position on the latch.

The outside handle returns just fine like its spring is intact. Neither inside/outside mechanism on the latch itself will unlatch the door. I have to screw with it with a screwdriver catching it on a protruding cam and it will unlatch about 25% of the time (or less). The opening on the latch that springs open when unlatched works always when the tab in the lock is pushed with a narrow screwdriver (not accessible when closed). Highly frustrating, just screw with it til it opens, and its tight in that rear door. The window channel could not be in a worse place for this job.
The tab in the back of the latch (the one I pushed with a narrow screwdriver) is not being contacted by the operating linkage in all cases. Outside and inside both operate this tab. Frustrating, its not repeatable. Latch is shot.

I ordered new latch and lock actuator today. Expensive stuff at about $140 arriving tomorrow morning, about $70 each.
ETA: Parts total latch and actuator $136.64
Linkage is good.
Rain expected.:( Rear seats piled in the back :( Hands hurt:(
Its Ford OEM parts because I do not want to do this again. Just have to get it unlatched again to proceed.

Its one of those things you don't want to do enough to get good at.
Maybe I can take the old one apart and get pictures unless it goes sproing! when drilling rivets out.


OK, the latch and lock actuator is replaced, seats reinstalled, everything tested and it all works good down to the dome light sensor.

You must attach all the linkages with the funny 90 reverse bends before sliding the latch plate in place. Just leave the actuator hanging and slip it in the door while wiggling the latch plate in place. Make sure the new actuator is secure on the correct two knobs. The inside door handle linkage must also be attached before screwing the latch plate in place. While these two are attached to the latch plate wiggle and wallow the latch plate until it slips past the window channel and you're 90% home.

You don't have to drill the old actuator rivet out. You can pry the old hanger open and slip the new actuator in AFTER you attach the linkage to the latch plate. Open it with a screwdriver and turn it up slightly, it will pop out.
You can see this on a new actuator, the hanger comes on it.
The outside door handle plastic linkage is a weird thing and doesn't come new with the assembly, so if yours is screwed you must order that extra.
It has a little round portion that will hinge open if you can your hand in there with a small screwdriver against it. Note the position of the exposed threads, thats where it will need to snap back closed. Its a hard one to explain. It hinges toward you and will simply snap shut on the outside door linkage threads when aligned.

The dome light sensor wire is hard to get on, keep fooling with it and it will slip on.

Pay close attention to all your linkages throughout this whole process, insuring they are routed correctly when you slip the latch plate past the window channel. You have to attach one inside lock linkage with the 90 bend later, after screwing the latch down with a large phillips head. LARGE, and these screws are soft; don't booger the heads.
You're trying to work from the inside out is the only way to explain it.

Its a real pain in the ass as its tight in there and requires patience as much as anything else. I HATED it.
Be meticulous if you are faced with this.
I'll get some pictures of the old lock later and add to this showing how to open the lock from inside the door, if you're lucky unlike me.

ETA: Also, there is no dust cover/rubber boot on the new lock actuator. It comes naked. Maybe could have saved the boot, didn't try.


Mine was also fried. The kids would have to get to the other side to exit. this would occur about 25% of the time. Re-unlocking(and re-unlocking...) would work most of the time. I finally noticed that the lock button on the door seemed to be a little high in the locked position. When the door finally unlocked I screwed the button in a little. It's been about 3 weeks and I haven't had a problem since. I'm guessing coincidence but I'll take it!


Lock Internals Pictures Added

I was bored today and its raining sideways, so I drilled the lock apart and took pictures. Maybe it will help someone else and prevent them the grief I went through to figure out how the guts of a thing work that I had never seen the inside of. Its full of magic and the magic is held in by 5 cent springs. If a spring breaks it lets the magic out.

The spring that you can see through the large hole was broken and fell out on disassembly. No idea where it went or what it does.
The outside handle linkage was what I used to open the door by means of a large screwdriver through the hole in the door, at about a 45 angle on the edge of the linkage. Gave it a hard rap with my hand and it popped open.
The circled hole shows inside the where the latch tab is that must be pushed to open. You might get lucky and open it here with a screwdriver
RearDoorLatchAssembled_zpsc6e5bf28.jpg


Dome light switch goes in the diamond shaped hole in the top picture and turns about 30d to lock in and line up with the screw. It comes with a new latch assembly. It rides on a cam shown in a later picture to turn on the light. Pushed in is closed to turn on the light.
DomeLightSensor_zps9799d4f3.jpg


When the child safety lock is disengaged, it allows the inside inside handle linkage to engage the unlatch cam by catching the lower part of the slot.
DriverRearDoorLock_zpsdad030de.jpg


Child safety lock engaged, linkage misses the unlatch cam from inside door handle. Child safety latch affects inside handle only. Inside handle linkage goes through the white button. Pay attention to its orientation so that it will clear locking linkage on reassembly.
DriverRearDoorLockChildSafety_zps1891a809.jpg


This is the inside of the latch back plate, the part you can kinda see through the holes in the door. You can see the ears on the dome light sensor and where the infamous little spring connects to the plate. When unlocked the opening tab is in a lower position and should contact the unlatch tab on the front plate, shown with an open label below.
PICT0064-crop_zps909bcad8.jpg


Inside of the back plate shown in locked position. In locked position the tab slides up to clear the opening tab on the front plate, it won't contact it.
LatchPlateinsideofBack_zps3f53c6ef.jpg


The front plate, the part that the screws go in to. Shown in latched position.
The white circle is approximately where the hole is in the back plate. Its this arm which must disengage the latch. Note the door latch "claws" are closed.
DoorsideofLatchPlateGuts_zpscc707ef6.jpg


Front plate again, shown unlatched. Dome light sensor rides up on high point of cam to depress and turn on light. Unplugged, the light goes out
LatchPlategutsUnlatched_zps3351854e.jpg


OK, the latch and lock actuator is replaced, seats reinstalled, everything tested and it all works good down to the dome light sensor.

You must attach all the linkages with the funny 90 reverse bends before sliding the latch plate in place. Just leave the actuator hanging and slip it in the door while wiggling the latch plate in place. Make sure the new actuator is secure on the correct two knobs. The inside door handle linkage must also be attached before screwing the latch plate in place. While these two are attached to the latch plate wiggle and wallow the latch plate until it slips past the window channel and you're 90% home.

You don't have to drill the old actuator rivet out. You can pry the old hanger open and slip the new actuator in AFTER you attach the linkage to the latch plate. Open it with a screwdriver and turn it up slightly, it will pop out.
You can see this on a new actuator, the hanger comes on it.
The outside door handle plastic linkage is a weird thing and doesn't come new with the assembly, so if yours is screwed you must order that extra.
It has a little round portion that will hinge open if you can your hand in there with a small screwdriver against it. Note the position of the exposed threads, thats where it will need to snap back closed. Its a hard one to explain. It hinges toward you and will simply snap shut on the outside door linkage threads when aligned.

The dome light sensor wire is hard to get on, keep fooling with it and it will slip on.

Pay close attention to all your linkages throughout this whole process, insuring they are routed correctly when you slip the latch plate past the window channel. You have to attach one inside lock linkage with the 90 bend later, after screwing the latch down with a large phillips head. LARGE, and these screws are soft; don't booger the heads.
You're trying to work from the inside out is the only way to explain it.

Its a real pain in the ass as its tight in there and requires patience as much as anything else. I HATED it.
Be meticulous if you are faced with this.
I'll get some pictures of the old lock later and add to this showing how to open the lock from inside the door, if you're lucky unlike me.

ETA: Also, there is no dust cover/rubber boot on the new lock actuator. It comes naked. Maybe could have saved the boot, didn't try.

Hey fist, I'm having pretty much the same problem as you, I cant get the full movement on my lock tab because its hitting another can in the mechanism. I'm stuck getting the latch mechanism out though the only rod I can get off is the one for the outside handle. Any tips to getting the others off? My actuator is fine so I don't really want to remove it, but if its the only way I suppose I'll have to. Thanks


Its been a while so I'm trying to remember.
I used a long screw driver against the door handle tab until it finally unlocked.
It seems that the other linkages slipped out after pressing on them. At least I don't remember any special contortions needed to remove them. It seems like I did have to remove the actuator linkage after prying apart the actuator mount and reinstall the actuator after the linkage was hooked up to the lock due to the way the linkage is bent.

Shine a light in there and look at everything carefully to make note for the reinstall, the order they have to go back in. The hardest part was fooling with the lock tab at the handle linkage to get it unlocked, that took a while.

I'm sorry but its been a while since that evolution and I don't remember the gritty details other that its tight as hell in there and an exercise in patience to get it unlocked. Once the door is open you have more room to work.

Good luck with it, its a pain for a relatively simple mechanism.


Ok, thanks anyway mate. Back to sitting in the rain trying to get it out!


Mine did this for a while. While that probably helps my actuators finally quit. I replaced them both in the rear without doing anything to the mechanism and they work silky smooth. Just remember because they are firing doesn't mean they are doing full strength.


Back
Top