How to: - Manual Transmission in 4.6 V8 4X4 | Page 3 | Ford Explorer Forums - Serious Explorations

  • Register Today It's free!

Prefix for threads which are instructional.
nice just keep the photos coming


Join the Elite Explorers for $20 each year.
Elite Explorer members see no advertisements, no banner ads, no double underlined links,.
Add an avatar, upload photo attachments, and more!
.


OK so here's a bit more...

Looking under the truck, towards the front under the driver's side you can see the tcase hanging down. It will still hit the corner of the seat reinforcing channel before rotating enough for the bolts to match the output case of the tranny.

If you look close- i marked it out.

IMG_4975.JPG


IMG_4976.JPG


Then cut it out.

IMG_4977.JPG


Capo%252520symposium%252520350.jpg


Now when the bolts are in the tcase... it just fits.

IMG_4984.JPG


IMG_4986.JPG


So the tranny and tcase now physically fit under a 2002-2005 Explorer !!

Capo%252520symposium%252520182.jpg


I didn't cut the entire channel out, but it no doubt weakened the truck at this location, and I didn't think that was safe. I have three kids, and I value their lives and my own. And I don't want to endanger anyone on the road either. So after the test fit, I took the tcase down and welded the hole up.

IMG_5037.JPG


May not be as strong as the original box frame, but I figured I could weld in an indent. I made a cardboard template...

Capo%252520symposium%252520384.jpg


Capo%252520symposium%252520406.jpg


Then I unfolded it and made a metal copy

Capo%252520symposium%252520428.jpg


Then I bent that like the cardboard and welded it in. I'm not the best welder, I know, but in my defense it was over my head and it was tricky.

Capo%252520symposium%252520467.jpg


There was one other fitment issue...

The splines supporting the rear output shaft of the tcase were to big to reinstall the tcase support crossmember.

I needed to cut the one on the bottom like this

Capo%252520symposium%252520645.jpg


Transmission crossmember

Next issue to solve was the transmission crossmember.

When we installed the 5 speed rear insulator/mount under the transmission,

IMG_5049.jpg


we realized that the ATX was longer, and the bolts for the 5 speed mount were about 2-3 inches further forward and wouldn't fit into the holes in the crossmember.

So we bent a piece of metal wide enough to support the transmission where it needed to sit with the crossmember in place. Notice that the flange we bent up is not just supported by a little gussett. It sits on the bottom flange of the factory crossmember... In the end, it is solidly welded, but just in case my welds are not perfect, the forces are transmitted to the "ledge" or flange at the bottom of the crossmember.

IMG_5051.jpg


Tack welded in place for test fit

Capo%252520symposium%252520652.jpg


After the test fitting looked good, I welded it entirely, and coated it with rocker guard and mounted it under the truck.

Capo%252520symposium%252520738.jpg


K- Last post for tonight...

Now that we know that the big pieces (drive train) from the F150 and F250 can actually be made to fit underneath the Explorer, the next big task is to be able to shiftthe 5 speed gearbox from in the cab.

So this is the bit that needs to poke through the floor.

Capo%252520symposium%252520414.jpg


Remember I said we needed to cut out in front of the factory opening in the floor?

IMG_4939.JPG


Look at this angle- the shiny black part just in front of the opening, where I've drawn in red where the shifter will poke into the truck is the heater core box. You can imagine that this is not the best place for the shifter to come through the fllor.

IMG_4942.JPG


Remember I said it would be good to have chosen a transmission from a 1999 F150 (green overlay)?

1998%2525201999%252520overlay2.jpg


Here's why.

IMG_4965.JPG


The lower gear shift lever and cap had to be removed just to be able to fit the transmission under the heater core box, which is right below your radio and climate controls.

The above picture is taken from a severe angle down near the centre console would be in the truck.

Looking down from where the driver sits- you can't even see the shifter opening in the tranny. :eek::eek::eek:

IMG_4966.JPG


One more time :eek: :eek: :eek: :eek: :eek:
WHISKEY TANGO FOXTROT

Here's a shot from an angle- the lower shift lever needs to have the upper shift lever bolted on top of that too! There was absolutely no room to get the shifter installed.

IMG_4968.JPG


The two black plastic thingys on either side of the opening are the vents for the floor heat. You need to remove those for better access. I had to cut the lower shifter lever down as low as I could and grind a new slot in it for the clamp for the upper shifter before I could even test fit it in here with the heater core box cut back for clearance.

Capo%252520symposium%252520223.jpg


This picture shows how close the lower shifter is to the the heater core box after I modified it to close it off with a piece of aluminum after all the mods. This in in Neutral.

Capo%252520symposium%252520276.jpg


That's a bloody tight fit. And thats without the upper shifter too !
I think I quit that day and went home not sure what to do, so I searched online for solutions.

After some searching on the internet, I found what others were doing to make their modifications work when they put transmissions into in cars that the pieces were not intended for.

I saw things like this:

IMG_5008.jpg


and this

IMG_5012.jpg


This looked promising. One thing I'd like to point out is that as good as trhis looked for a solution, My friend Blaine pointed out that thoise designs looked sketchy- it's not a good idea to have the shifter mounted to the tranny, and the adapter attached to the vehicle due to the movement of the drivetrain.

That makes sense.

So next time I could make it to the shop, I started to build my own. I found heim joints at my local hardware distributors.

Capo%252520symposium%252520622.jpg


Then I drilled a piece of steel rod to accept the thread. And built a bracket that mounted to the tranny further back in the truck, positioning it where it felt comfortable for me in the driver's seat with the shifter attached to the bracket.

IMG_5147.jpg


I don't have great pics of this- but there is a piece of angle steel with two holes drilled it it where the tcase bolts to the tranny, and at the back at the seam of the tcase. Then I welded a piece spanning the two L brackets that I had bolted to the tranny. On that "bridge", I welded a clevis- two vertical pieces of metal with holes drilled for the bolt that goes through the heim joint. Make sense?

Also you can see in this picture that the front angle iron and the rear angle iron are offset from each other- the holes at the front where the tcase bolts to the tranny is not in line with the rear at the seam of the tcase where I attached the back piece of angle iron.

(And the clevis welded to the bridge was as close to the driver as I could put it.)

Capo%252520symposium%252520747.jpg


Also: make sure the "bridge" is narrow enough to see the bolts and nuts, or installing this or removing it if you ever need to service it will be a ***** if you can't get a wrench or socket on the heads of the nuts/bolts.

close%252520up%252520of%252520shifter%252520bracket.jpg


Note in the above picture that the two attachment points on the front are to studs, the back two are bolts. After I drilled the holes for the front, I filed the holes down to the bottom to create slots, so you can drop the bracket down over the studs from the top, put on the nuts, and then put the bolts through the back. With just holes in there, you can't get it into place.

And now we need to attach it to the lower shift lever coming out of the floor under your dash! Here's what you start out with this: This is what the bottom of the upper shift lever from an F150 looks like.

m5r21.jpg%25257Eoriginal.jpg


See how it cups over the top of the lower lever, and is held in place by the bolt going through it? That's absolutely not going to fit on this setup.

Trust me- get a tranny from a 1999 !!

In order to make this work in my truck, I had to cut the top of the old upper shifter as low as I possibly could, just keeping it above the bolt, and then welded two arm on the sides of it to make a pivot in front of the lower shift lever instead of on top of it.

So this is what I started with- notice that I cut a new notch in the front of and lower on the shaft of the lower shift lever- this is for two reasons... First is that n the original F150 setup I had, the bolt went through from front to back... The new notch allows me to tighten the bolt from the sides instead of front to back where I have no access.

The second is that by cutting the top of the "cup " off the upper shifter, I exposed the hole and was able to push it lower down the shaft to the new notch. I needed every millimeter. (That's 3/64ths of an inch for you Americans!)

Capo%252520symposium%252520276.jpg


This is what I came up with

Capo%252520symposium%252520407.jpg


Here it shows the bar that was welded to join my shift lever with the lower shift lever under the dash

Capo%252520symposium%252520423.jpg


And here it shows how that was attached to the shift lever I made by welding a clevis on the lever. The bar that joins them has a smaller piece of rod welded at 90 degrees to the axis of the rod and cut to the proper width to fit between the clevises and has bushings in them to slow down wear.

The lower you go on the back lever, the less throw you will have to engage the gears. If you notice one of my earlier photos, I had three nuts under the threaded rod I made. I wound up removing 2 of the to get a throw that felt good to me from the driver's seat.

Capo%252520symposium%252520300.jpg


So here are some pictures I took when I was making the cover for the hole in the floor when it was all done. This is in the the upper gears in the gate (1, 3, 5).

Capo%252520symposium%252520553.jpg


And here in the lower gears in the gate (2, 4, R)

Capo%252520symposium%252520577.jpg


That's it for now.

Next time I'll get to how we get power from the tcase to the differentials... F150 and Explorer do not have the same Ujoints.

Stay tuned

Dave


Dave! This is awesome stuff, I can't wait to get my swap started :) the wife is gonna be sooo excited to drive this, probably more then me lol....I'll pm ya some more stuff, but this answers one of my main questions, which was how ya got the shifter working lol....


Hi guys- I'm new to your forum, and I have some questions.

I have a 2002 Explorer Limited, V8 4.6 litre 4X4 and I love it, but the ATX transmission is toast. I never did like auto's, and would rather modify this once to accept a manual transmission and keep the 4X4. I have searched a bunch of info, but I am not sure if this has been successfully done by anyone here to know if it is in fact do-able.

The last post I've found that seems close is below:

According to what I have been able to find out so far:
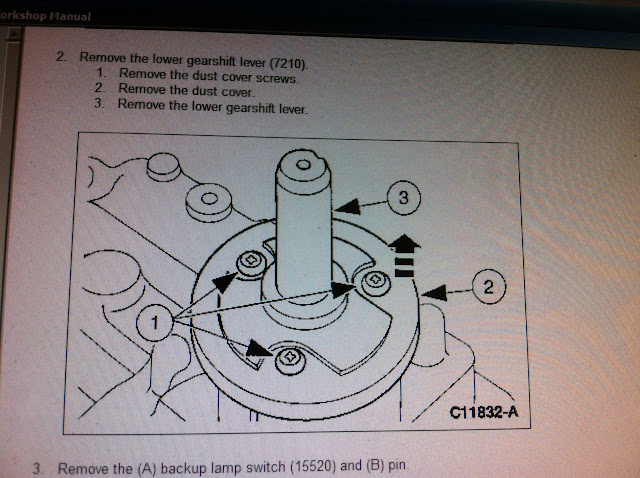
Code:
macknos94
05-29-2010

Here is what you will need to swap in a manual tranny with the 4x4 t case.
Tranny and slave out of 97 body style 4.6 f150 along with a manual t case from the same style truck. Clutch peddle out of 3rd gen along with the master. Then the hydro line can come from any manual 3rd gen ex.
As for the clutch and flywheel you just need one for a 4.6 f150. Last but not least a tune to cut out the electric tranny and t case stuff. It's a straight forward swap and you won't have to do much cutting besides the shift and t case shifter.

As for the drive shaft length I haven't gotten that far but they should be the right length.

Can't remember who posted this in another thread, but I copied it for reference. (apologies to O/P)


I've looked up on transmission info and found the following trans ID codes regarding the M5R2 transmissions for 4 wheel drive applications:

f150 '97-'98
F65A-BD
F75A-DA
F85A-DA

f150 '99-2000
XL34-ZB
XL34-ZC

f250 '97-'98
F65A-FD
F75A-DA
F85A-DA

f250 1999
XL-34-ZB
XL34-ZC


1. Will any or all of these work (ie; direct bolt up to bellhousing, input output shaft splines compatible, transfer case etc?)
2. Does anyone know what the differences are between the years, or between f150 vs. f250? (ie:Are there differences in bellhousing, input or output shafts, or gear ratios?)
3. Can I still use the electronic t-case from my truck? (Would prefer this, for costs, and cleanliness inside cabin, though I'm not opposed to doing fabrication or modification work- These posts talk about the manual transfer case from the f150.)
4. can the ECU simply be flashed to tell it to ignore the (lack of) input from the missing 5R55S (I think that's the ATX that's in it now)?

I don't need heavy duty, my Explorer is a daily driver, don't tow often and don't do much off road- I'm just trying to see which options might work, so I can broaden my search, maybe find a lower mileage transmission, and hopefully save money. (Or based on the differences, if all of these would work, is one of these better for a daily driver?

Thanks in advance- would love to have her fixed and back on the road with three footpedals! (I'm not including the e-brake!)

Dave

Edit March, 2016

View attachment 325080

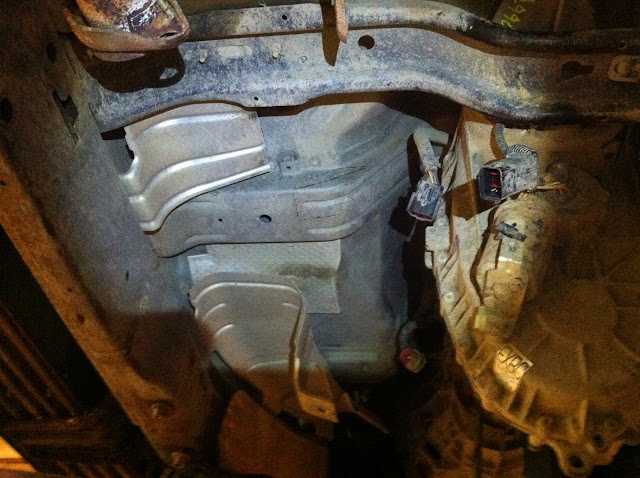
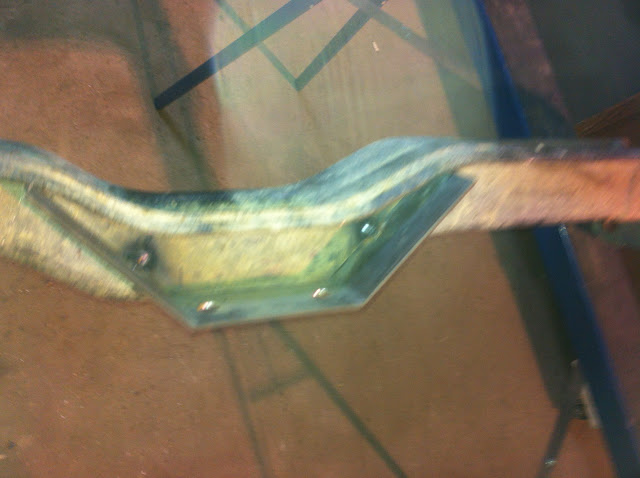
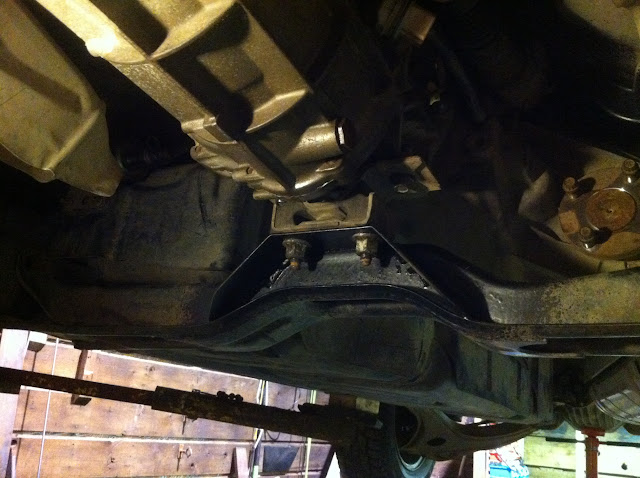
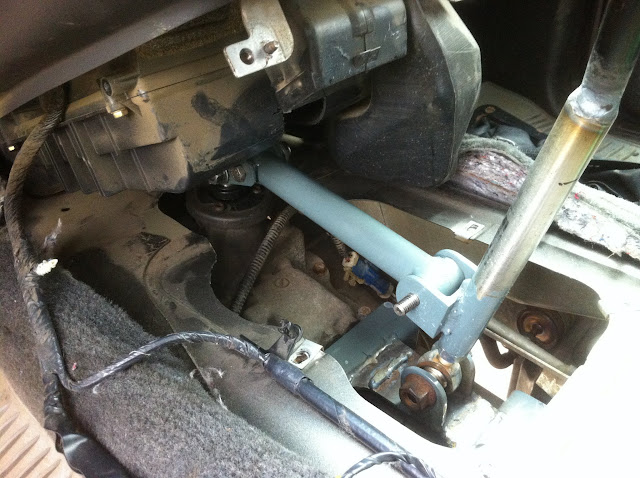
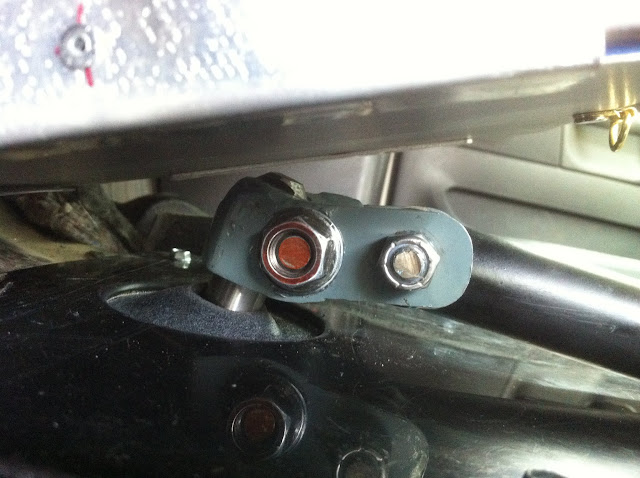
Sorry for the delay in posting- but this DID get completed!

For those of you who are interested in how this was done- read on. I am going to post up my pictures of what I needed to do to complete this swap.
I know this list is old but I was thinking about doing this to my 4.6l 2002 Explorer. You said you were going to post pictures of what you needed but I don’t see any. Would you be willing to post them or I can give you my email if you would be willing to send directly if that is easier


I know this list is old but I was thinking about doing this to my 4.6l 2002 Explorer. You said you were going to post pictures of what you needed but I don’t see any. Would you be willing to post them or I can give you my email if you would be willing to send directly if that is easier
Just so you know if you click on people’s accounts you can see when they were last seen and Op was last seen in around august 2019 so I don’t think you’ll be getting an answer from him anytime soon


Using this thread as a guide for when I do this... anyone else other than OP try this?


Using this thread as a guide for when I do this... anyone else other than OP try this?
iirc OP does have some pics, but theyre duplicated. try letting rick know in the suggestions subforum, there should be a sticky


iirc OP does have some pics, but theyre duplicated. try letting rick know in the suggestions subforum, there should be a sticky
thanks. wish i could contact OP for all the build info, would make life a lot easier lol


thanks. wish i could contact OP for all the build info, would make life a lot easier lol
yep! hopefully rick sees that and fixes the pics


yep! hopefully rick sees that and fixes the pics
where do i contact rick again, or is rick the OP? sorry for sounding dumb


Back
Top