mechjames
Well-Known Member
- Joined
- September 27, 2007
- Messages
- 511
- Reaction score
- 2
- City, State
- Richmond, BC
- Year, Model & Trim Level
- 1994 Explorer XLT
I have a question to those who have installed james duff coil buckets.
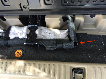
I installed the passengers side coil bucket and then went to install the drop bracket on the passengers side. The drop bracket doesn't sit flush with the frame, it hits the coil bucket.
Should I grind the corner of the coil bucket maybe 1/8-1/4 inch so the drop bracket sits flush at the frame?
I noticed the bottom of the coil bucket isn't sitting quite flush with the frame either (see pictures)
Should I loosen the 3 bolts on the side and bolt it in the bottom first so it's tight against the frame, then use a drill and slot out the 3 side holes to where the bucket sits?
Also the explorer has bump stops on both sides. The hole is half inch on the pass side bucket, but the frame isn't because the bump stop bolt is small. Does the bump stop get eliminated and the hole enlarged on the frame so a 5th bolt can be used to hold the coil bucket (3 on side, 2 on bottom), or just 4 bolts hold the coil bucket (plus the 2 for the shock mount)