MaioCampo
Active Member
- Joined
- May 29, 2012
- Messages
- 61
- Reaction score
- 4
- Year, Model & Trim Level
- 1993 Explorer
Hey,
I used a couple of threads to help me with my LIM gasket replacement. I also used the Chilton manual. Each were valuable to me, so I here present my own notes on the job.
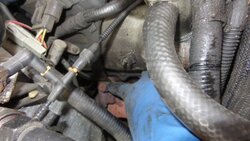
First, my problem was a coolant leak that appeared to be coming from somewhere behind the AC compressor. The thermostat housing, upper heater hose, and freezer plug were all checked and none appeared to be the culprit.
Thermostat and hoses are pretty easy, but for those wondering about the freeze plug see the following thread: http://www.explorerforum.com/forums/showthread.php?t=301245&highlight=freeze+plug
The two threads I used to help me with the LIM gasket replacement are:
http://www.explorerforum.com/forums/showthread.php?t=384221&highlight=LIM (opening post has another link to documentation that I printed out)
http://www.explorerforum.com/forums/showthread.php?t=307425&highlight=LIM (very good descriptions with photos)
I like checklists, so here is my write-up in a checklist fashion. As with everything, each vehicle will be different, and folks will want to do things their own way. As a rookie I was afraid of this job, but it was really easy. Take your time, read several threads, get the steps straight in your head, and then jump in, taking lots of photos and bringing all questions here.
Here we go:
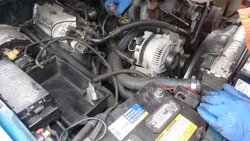
[ ] Disconnect battery negative
[ ] Disconnect inertia switch (under carpet, under passenger side dash)
[ ] Remove gas cap to relieve pressure
[ ] Attempt to start engine (should not start)
[ ] Remove air intake duct
[ ] Drain coolant
[ ] Remove belt (Tensioner - 16mm)
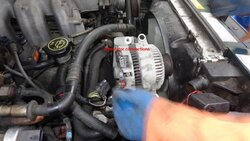
[ ] Unplug Alternator (3 plugs)
[ ] Remove upper radiator hose
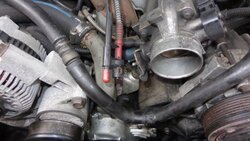
[ ] Remove throttle cable (red; gently pry off with small flathead)
[ ] Remove throttle cable bracket from upper manifold (2 bolts - 10mm)
[ ] Unplug TPS (throttle body; big/wide; red/black inside)
[ ] Remove throttle body (4 bolts - 8mm) * I replaced gasket
[ ] Remove IAC (2 bolts - 10mm) * I replaced gasket
[ ] Unplug IAT (round; white)
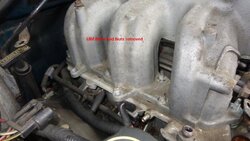
[ ] Remove bolt from top of upper intake holding vacuum line (10mm)
[ ] All vacuum hoses from vacuum tree at back of upper intake
[ ] Remove coil pack (2 bolts - 13mm; 1 bolt - 17mm)
[ ] Remove upper heater hose
[ ] Unplug canister purge valve (looks like cylinder; connected to vacuum line to throttle body)
[ ] Remove fuel rail connections (wear safety goggles; open garage; prepare for fuel)
[ ] Remove harness to left (wire to water pump remains)
[ ] Remove studs from fuel rail (6 studs - E7 external torx socket)
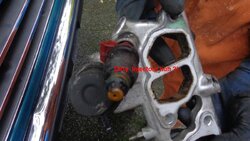
[ ] Carefully disengage fuel rail assemby from injectors by lifting and rocking rail (Chilton)
[ ] Remove fuel injectors from lower intake manifold by lifting and gently rocking (Chilton)
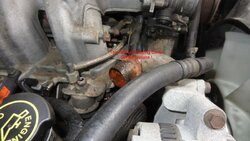
[ ] Unplug temperature sending unit (small elbow connector near/under thermostat housing)
[ ] Unplug ECT sensor (round harness to right of thermostat housing)
[ ] Use zip ties to keep wire harnesses out of way (open up space directly above valve covers)
[ ] Remove valve cover gaskets (8 bolts/per cover - 10mm)
[ ] Remove lower intake manifold (6 bolts - 10mm; 2 nuts - 13mm)
* Be careful if you remove the fuel rail. While lifting I lost grip and the rail slapped back down onto the LIM and broke a fuel injector.
Reassembly notes:
* Gasket Kit - FEL-PRO MS98005T
* Place rag in valley to prevent material from dropping in
* Take time to clean all mating surfaces on lower intake, fuel rail, valve covers, and upper intake.
* Clean all nuts and bolts
* Remove and inspect rockers (3 bolts/per side - 15mm)
* Per Chilton, loosen outside to inside, one/two turns at a time
*Attach rocker arm assembly
* Install valve cover gaskets and covers
* I left thermostat housing on throughout the gasket replacement, but later found the LIM holes to be stripped. Used Helicoil tool to fix all three holes, then reattached housing to LIM before installing. 3x 10mm bolts - 7 ft lbs.
* Be careful with lines connected to canister purge valve. The valve connectors can be brittle, and break easily.
* Install upper manifold gasket
* Take time with reassembly. Take in stages (LIM, Fuel Rail, Valve Covers, UIM). At each stage clean, assemble, then check all connections (vacuum & electrical).
* Bring all questions here. Bring all questions here. Bring all questions here.
Hopefully that helps someone.
I used a couple of threads to help me with my LIM gasket replacement. I also used the Chilton manual. Each were valuable to me, so I here present my own notes on the job.
First, my problem was a coolant leak that appeared to be coming from somewhere behind the AC compressor. The thermostat housing, upper heater hose, and freezer plug were all checked and none appeared to be the culprit.
Thermostat and hoses are pretty easy, but for those wondering about the freeze plug see the following thread: http://www.explorerforum.com/forums/showthread.php?t=301245&highlight=freeze+plug
The two threads I used to help me with the LIM gasket replacement are:
http://www.explorerforum.com/forums/showthread.php?t=384221&highlight=LIM (opening post has another link to documentation that I printed out)
http://www.explorerforum.com/forums/showthread.php?t=307425&highlight=LIM (very good descriptions with photos)
I like checklists, so here is my write-up in a checklist fashion. As with everything, each vehicle will be different, and folks will want to do things their own way. As a rookie I was afraid of this job, but it was really easy. Take your time, read several threads, get the steps straight in your head, and then jump in, taking lots of photos and bringing all questions here.
Here we go:
[ ] Disconnect battery negative
[ ] Disconnect inertia switch (under carpet, under passenger side dash)
[ ] Remove gas cap to relieve pressure
[ ] Attempt to start engine (should not start)
[ ] Remove air intake duct
[ ] Drain coolant
[ ] Remove belt (Tensioner - 16mm)
[ ] Unplug Alternator (3 plugs)
[ ] Green - Top
[ ] White - Middle
[ ] Red - Bottom (remove cover, then remove 10mm nut)
[ ] Remove Alternator (3 bolts - 13mm)[ ] White - Middle
[ ] Red - Bottom (remove cover, then remove 10mm nut)
[ ] Remove upper radiator hose
[ ] Remove throttle cable (red; gently pry off with small flathead)
[ ] Remove throttle cable bracket from upper manifold (2 bolts - 10mm)
[ ] Unplug TPS (throttle body; big/wide; red/black inside)
[ ] Remove throttle body (4 bolts - 8mm) * I replaced gasket
[ ] Remove vacuum line from throttle body
[ ] Unplug IAC (small; red & black; orange inside)[ ] Remove IAC (2 bolts - 10mm) * I replaced gasket
[ ] Unplug IAT (round; white)
[ ] Remove bolt from top of upper intake holding vacuum line (10mm)
[ ] All vacuum hoses from vacuum tree at back of upper intake
[ ] Picture (either take a digital pic, or draw one)
[ ] Remove spark plug wires from coil[ ] Note position of all wires
[ ] Unplug coil pack (wide)[ ] Remove coil pack (2 bolts - 13mm; 1 bolt - 17mm)
[ ] Remove cylinder looking part attached to coil (unplug, or 6mm bolt)
[ ] Remove upper intake manifold (6 nuts - 13mm)[ ] Remove upper heater hose
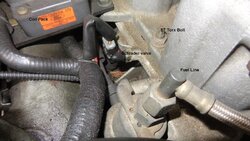
[ ] Unplug canister purge valve (looks like cylinder; connected to vacuum line to throttle body)
[ ] Remove fuel rail connections (wear safety goggles; open garage; prepare for fuel)
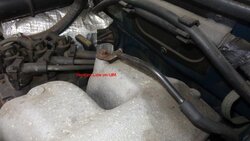
[ ] Front fuel line - attached to fuel pressure regulator - (17mm wrench)
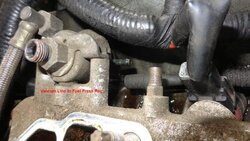
[ ] Vacuum line - attached to fuel pressure regulator
[ ] Back fuel line - attached to fuel rail - (adjustable wrench)
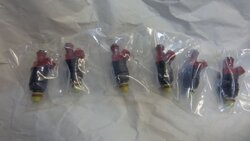
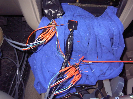
[ ] Unplug fuel injectors (6x - note position, wire length should make it obvious)
[ ] Unplug 2 plugs at far back of engine (1 passenger side; 1 driver's side)[ ] Vacuum line - attached to fuel pressure regulator
[ ] Back fuel line - attached to fuel rail - (adjustable wrench)
[ ] Unplug fuel injectors (6x - note position, wire length should make it obvious)
[ ] Remove harness to left (wire to water pump remains)
[ ] Remove studs from fuel rail (6 studs - E7 external torx socket)
[ ] Carefully disengage fuel rail assemby from injectors by lifting and rocking rail (Chilton)
[ ] Remove fuel injectors from lower intake manifold by lifting and gently rocking (Chilton)
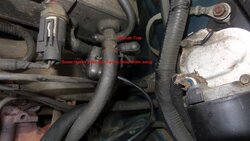
[ ] Unplug temperature sending unit (small elbow connector near/under thermostat housing)
[ ] Unplug ECT sensor (round harness to right of thermostat housing)
[ ] Use zip ties to keep wire harnesses out of way (open up space directly above valve covers)
[ ] Remove valve cover gaskets (8 bolts/per cover - 10mm)
[ ] Remove lower intake manifold (6 bolts - 10mm; 2 nuts - 13mm)
* Be careful if you remove the fuel rail. While lifting I lost grip and the rail slapped back down onto the LIM and broke a fuel injector.
Reassembly notes:
* Gasket Kit - FEL-PRO MS98005T
* Place rag in valley to prevent material from dropping in
* Take time to clean all mating surfaces on lower intake, fuel rail, valve covers, and upper intake.
* Clean all nuts and bolts
* Remove and inspect rockers (3 bolts/per side - 15mm)
* Per Chilton, loosen outside to inside, one/two turns at a time
*Attach rocker arm assembly
[ ] 15 ft lbs
[ ] 25 ft lbs
[ ] 40 ft lbs
[ ] 50 ft lbs
* Per Chilton tighten outside to inside, one/two turns at a time
* Install two-part LIM gasket[ ] 25 ft lbs
[ ] 40 ft lbs
[ ] 50 ft lbs
* Per Chilton tighten outside to inside, one/two turns at a time
[ ] Clean mating surfaces
[ ] Tabs over each port.
[ ] RTV surface between sides (flat surface between valley sides). Extra bit at corners.
* Attach LIM (immediately after applying RTV)[ ] Tabs over each port.
[ ] RTV surface between sides (flat surface between valley sides). Extra bit at corners.
[ ] 18 ft lbs (per Chilton) - two turns at a time
[ ] Cross pattern - corners then inners
* Install fuel rail (Chilton)[ ] Cross pattern - corners then inners
[ ] Lubricate all injector o-rings with clean engine oil
[ ] Install injectors into fuel rail using light twisting/pushing motion
[ ] Clean LIM and fuel rail mating surfaces
[ ] Position new fuel rail gasket to LIM
[ ] Carefully install fuel rail assembly to LIM. Make certain to correctly position injector insulators (plugs).
[ ] Push down on the fuel rail to make sure o-rings are seated
[ ] Hold fuel rail in place and install retaining studs finger tight
[ ] Tighten studs to specification (6 to 7 ft lbs - Haynes) - Use cross pattern
[ ] Connect front fuel line to fuel pressure regulator
[ ] Connect rear fuel line to fuel rail
[ ] Attach vacuum line to fuel pressure regulator
[ ] Connect the fuel injector wiring harness at injectors
* Install valve cover gaskets and covers
[ ] Clean all mating surfaces
[ ] RTV at LIM seam
[ ] Position new valve cover gasket (make sure right-side up)
[ ] Install bolts & nut finger tight
[ ] Tighten nut and bolts (3 to 5 ft lbs) - Use cross pattern
[ ] RTV at LIM seam
[ ] Position new valve cover gasket (make sure right-side up)
[ ] Install bolts & nut finger tight
[ ] Tighten nut and bolts (3 to 5 ft lbs) - Use cross pattern
* I left thermostat housing on throughout the gasket replacement, but later found the LIM holes to be stripped. Used Helicoil tool to fix all three holes, then reattached housing to LIM before installing. 3x 10mm bolts - 7 ft lbs.
* Be careful with lines connected to canister purge valve. The valve connectors can be brittle, and break easily.
* Install upper manifold gasket
[ ] Clean all mating surfaces - fuel rail and upper intake
[ ] Position new fuel rail gasket on top of fuel rail
[ ] Install 6 nuts finger tight
[ ] Tighten 6 nuts in cross pattern (Haynes)
[ ] Position new fuel rail gasket on top of fuel rail
[ ] Install 6 nuts finger tight
[ ] Tighten 6 nuts in cross pattern (Haynes)
[ ] 6 ft lbs
[ ] 12 ft lbs
[ ] 16 ft lbs
[ ] 12 ft lbs
[ ] 16 ft lbs
* Take time with reassembly. Take in stages (LIM, Fuel Rail, Valve Covers, UIM). At each stage clean, assemble, then check all connections (vacuum & electrical).
* Bring all questions here. Bring all questions here. Bring all questions here.
Hopefully that helps someone.