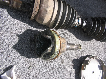
Here are a few more pictures of the process. I had to cut mine because the fuel float was cracked and needed to be replaced. Soldering the float isn't easy. If you have a big crack in it, the solder will just fall right through as you move along... If you solder correctly. Don't use epoxy: the gas will eat right through it.
This is on a two door 1993 model.
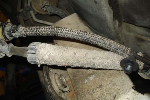
The fuel lines are 3/8" and 5/16". You can buy the combination tool for about $8 at Auto Zone. Don't even bother with the plastic tools. They are a waste of time and money for most fuel line work, even the kind with the longer sleeves. You can expect the fuel line tines to be stuck.. Don't be afraid to work the coupling up and down while you're using the tool. Put some linear mojo on 'em.
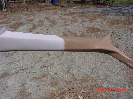
I found some 18-ga or so stainless steel for a patch and used the bandsaw at work to cut it. I cut it 10"x11", which left about two inches of overlap to fasten it down. So far all I've done is drilled a hole for the small non-seat-holding stud, threaded the nut tightly onto it, and speed taped all around the patch. I plan on using a combination of rivets and self-drilling screws to hold it in place permanently. Oh and some black RTV underneath.
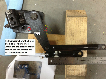
All I did to access the pump, by the way, was drill a 3/8" hole off to one side and then cut an H-shape with some aviation tin snips. I just curled the metal back to access the pump, and when I was done, I curled the metal right back in place. Used some 16" channel locks and a ball pein both times.
Anyone wanting more pics can just post asking for them and I'll get em posted up.
HI. OLD POST but popular one. I have a 93 - Navajo ( 2 door) and trying to pinpoint where I need to cut from above. These pictures may have expired. What are the chances you still have these around? I have an idea but would be nice to have visual references for it. Also under the carpet is a long plastic cover running along the bottom of both of the seats. Since I only removed the drivers side rear seat so far not sure what this thing is.
Thanks, ...
First is the far view:
Next the inside view where you'll be working:
Here are the nuts you need to remove:
Seat unbolted and out of the way - both seats need to be unbolted, because there's a piece of black plastic underneath the seats bolted down on either side. Don't have any idea what it does. I left mine out.
Far view:
Up close: