2006 Explorer FT-7800 Install
Hi, name here is Hal, KD7DYV and I live in Eagle Point, Oregon. Here is a weekend project. Upon searching the net, I found that there is not a wealth of information on later model Ford Explorer / Expedition radio installs. Here is what I came up with, in mounting a Yaesu FT-7800, and Diamond NR73BNMO Dualband antenna.
We all know the challenges of late model installs, like no space to mount, air tight cabins, ect. Finding a mounting place that doesn’t interfere with the SRS airbags, cup holders, is out of sight, and yet within grasp. I wanted no mic I my face while I am driving, but not hidden so well as to take my eyes off the road. All the while, making sure it doesn’t become a missile inside the cab in an abrupt stop, and the most important of all, the wife approves of the installation. Then there is the antenna. Has to be out of the way, not hitting the garage, drive throughs, ATM’s, and the like, but still have a higher gain, and match the car aesthetically. In the 2006 Explorer, in the upper center console, there is a little cubby for sunglasses. That is where this project begins.
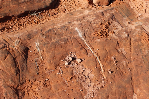
While placing the removable control head of the FT-7800 in just about every conceivable location in the cab, I began to see that the criteria above would be difficult to meet. It was either in the SRS area, in the knee area, interfered with the shifter or cup holder area, or was just really plain ugly, and the wife would never go for it. Then I stumbled upon the sunglasses cubby. Removing the single screw located in the garage door opening cubby that holds up the center console, and popping the retainers out on the front end, allowed it to be lowered rather easily. Release the wire plugs, and out it comes. All the console wiring routes from the front, as shown below.

A very handy tool, is the wire fish tape, from the big box home store. It is steel, flexible, and runs down wire runs like no coat hanger can. I ran it down the front right side, to the right A post. After removing the A post handle, and popping the A post plastic trim loose, I was able to make the fish go right around the 90° angle, and down to the kick panel, behind the just removed glove box. 3 screws, and a slight compression of the sides, and she pops right out. Set it aside.
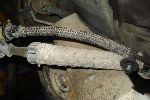
Noting that the Mic cable for the FT-7800 is a common RJ connector, I started to do the research into the schematics, and low and behold, it is just a straight through 6 conductor cable. Just a multi-line phone cord. I was thrilled to not have the mic hanging from my roof! A quick trip to Wally World yielded a 10ft. 6 conductor wire, and a 6 pin straight through connector. Perfect for the mic extension. Back home, I attached both the remote Yaesu wire and the new mic wire and the speaker wire to the wire fish, and pulled it all back up to the center console carefully. They are the white and black wires taped together in the photos above, and below. Also the speaker wire, which cannot be seen in this photo.
Above, the wires running up the A post, from the bottom.
Below, is the inside of the center console. Note the two screws that retain the rear heater controls. Removing them, allows the heater controls to come out, which in turn, allows the sunglasses cubby door to be removed, and saved. Replace the controller and the screws. The remote head has all the connectors on the right side of the radio. So I only had to open a hole on one side, and chose to do it through the recess on the right side. If I remove the radio, and put the door back on, the hole will not be seen.


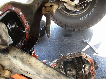
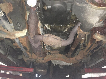
I then drilled two 3/16” holes in the rear face of the console, to allow for mounting the speaker bracket, and ran the speaker wires, mic wires and remote control wires through their respective holes, and snapped the console back in place. I decided earlier to mount the radio itself under the passenger seat. I positioned the radio under the seat in a safe place, out of the harness way, and slid the seat back and forth to ensure proper clearance. I then marked the bracket edges and removed the radio. Since the seats have the airbags built right in, I disconnected the battery, and just left it until after supper, about 30 minutes. I then removed the seat wiring connector, and the four attaching bolts. Remove seat, and set aside. Removing the right passenger foot kick panel, and door threshold revealed the factory wire run trough.
Checking behind my drill, I found that the fuel tank is mounted underneath. There is about an 1 ½” gap, so no worried about the self tapping screws, just make sure that you don’t run the drill bit though the fuel tank. Loosely mounted the radio bracket, and began running the wires.
A view of the factory wire trough opened up, and my wires laid out. Wire run is under the carpet.
I had some excess remote wiring, so a couple loops in the wire trough took care of that. After soldering the PL-259 connector on the new coax, pulled through the excess wire, to the kick panel area. Tightened the radio install, and closed the wire trough.
After tidying up the wire bundle to the kick panel, and cleaning the blood out of the carpet, I was able to reinstall the passenger seat and it’s wire harness.
There is a lot of clearance under the seat, for free movement.
There was that need to get through the firewall. I am not too worried about blasting holes through my firewall, so I did. It took a 3/8” grommet to run the coax and the power wire and fuse to the terminal block at the battery. After routing those, I gathered the loose wiring back up, and zip tied loosely into place. Then, reinstalled the right kick panel and threshold.
Note the extra black remote and speaker wire. Bundled and tied here.
Routing of the mic wire was pretty straight forward. I ran it above the glove box opening, to the lower center console, and across to the drivers side. That is where the coupling is also. Noting the size of the mic cord, I trimmed a small corner off of the center console lower trim panel, to allow the cord to pass, with no chaffing of the cord. Replaced the trim panel, and it fit like a charm, and will hold the mic cable fine. The mic bracket was mounted to the 3 blank panel above the heater fan control. I have my driving light switch mounted there also. Another easily replaced piece, at a later date if needed to be replaced.
And the corner notched out with Dremel.
Then mounted the bracket to the 3 hole bland next to the traction control button. Looks nice in the cab.
This has the added benefit of hiding the coupler and the ugly white phone wire. I am tall, and my normal position is with the seat all the way back. There is no problem reaching all the way, with plenty of cord left. Works good.
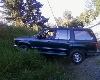
The finished project, looks like this, except you can't see the square holes in the mounting bracket, unless the flash is on.
The upper console and speaker.
The antenna was selected for a couple reasons. 1st, with the composite hoods, I needed a ½ wave or longer, in the 2m range, as to not require the ground plane. It had to be less than 34” overall, to clear the garage door, had to be NMO mount, to match all of my other mounts, AND had to be black, to match the vehicle. That will narrow down the selection a bit… Actually, only found less than a handful that would do what I needed. I chose the Diamond, NR73BNMO Dualband antenna. After installation, SWR test was 1.2 in the 146.000 range and 1.35 at 147.500 My old SWR meter will not go into the 70cm range, so that is as good as it gets for me. I may have been able to get it lower yet, by moving it forward, away from the A post of the drivers side, but I measured it out at the same distance as the AM/FM antenna on the right side, so that they match. I am concerned about aesthetics also, and wanted them to match with out sacrificing too much performance.

Testing has gone well, looks like I expected, wife is happy. Therefore, I am happy.
")
In the past, I have found that mounting the antennas on the left side of the car takes a couple of times driving to get used to it in the corner of your vision, but then it blends in and you don’t notice it. But you do notice it if it ever becomes loose, or has other problems. It also gets the antenna away from the side walk side of the car, and closer to the traffic side, and that removes some of the temptation that less caring individuals have for your car. It is less likely to be stolen, bent or broken off, if it is not right there in plain sight. I hope that somebody can use this idea, or any part if it to install their equipment.
Hal, KD7DYV
73
 I have my antenna mounted in the exact same location. Was that like a sunglass holder or something that was there where you mounted the head? Would be really cool if you could figure out a way to put the door back on so you can cover up the radio head when you leave the car.