How to: Negative cable fix for cheap! | Ford Explorer Forums - Serious Explorations

  • Register Today It's free!

How to: Negative cable fix for cheap!

mr cribb

US Army Retired
Joined
December 16, 2010
Messages
2,343
Reaction score
85
City, State
Naylor, MO
Year, Model & Trim Level
98 Z71, 89 stepside
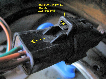
I came up with an inexpensive fix for the complicated looking negative cable on the 1st gen.

The original cable as we all know is one cable with two attachment points, they are the frame, and the engine block.

Now you COULD order the correct stock cable at your auto parts store for the sum of around 50 dollars.

HOWEVER What if you could fix the problem cable for less than 20 dollars?

YOU CAN!!

20141215_1753111_zps34959ad1.jpg
[/URL]

20141215_1721311_zps01f591de.jpg
[/URL]

The total cost of these two cables with sales tax was 17 dollars.

I recommend snipping off the extra lead that is coming off the side terminal cable. This extra piece WILL get caught in the oil filter when you go to change your oil filter. I found this issue after I changed my own oil and filter.


Join the Elite Explorers for $20 each year.
Elite Explorer members see no advertisements, no banner ads, no double underlined links,.
Add an avatar, upload photo attachments, and more!
.


What did you do for the 2-wire round (I assume ECM?) connector that's on the stock cable?

What you're describing is actually how the Bronco's were hooked up until Ford went with the 1-piece cable. I went with the more expensive one because it was 'right'. Knowing what I know now, I'd probably just make my own 2-piece with soldered connections and plenty of double-wall heatshrink. The aftermarket 1-piece is a little short too, from the frame to the engine block.


It'd be interesting to me to test the stock voltage drop over the negative wire and then compare that to the voltage dropped over these wires. If it's less, this is a fantastic mod everyone should do when needing new cables. If it's higher, I'd rather pay the extra 30 dollars and not overwork my ignition, starting, and charging system.


If anything the alternator seems to charge easier, and the starts seem quicker.

I'm at 3 months with the new cables, and there's been some really cold days here (at or around zero) and I have had absolutely no problems starting at all.


Since this repair, I have not had an issue with charging, starting, or any other electrical problems.

I did have an alternator quit on me, but it was factory with 231k miles, so the two are unrelated.

So I still vote for this modification.


doing this tomorrow


done- starts, charges and my lights are brighter


Everything flows through the battery cables. Resistance means voltage drop which means less power. Heck, maybe even having extra resistance means it's harder to push voltage to the battery meaning the alternator doesn't kick in as much and raise voltage to higher levels.

I didn't notice brighter lights but I noticed higher battery and charging voltages on the dash when I replaced my cables.


Sounds like a good mod, i may do this. I need to redo the battery terminals anyways.


yup its like it was charging just good enough to power everything, just not as good as it should have. the reason why i did this is because my cables were corroded and shorting out on themselves. burnt up a brand new alternator in the process. i bought the same exact alternator but did the wiring when i installed it and i could tell the difference on how it cranked, lights were brighter when using accessories and such, the needle on the gauge was a little higher than it was and it never drops when using all accessories etc. i even left my lights on once and it started with a little struggle but before, it would have been dead as soon as i turned the key. definitely do this if you have any signs of a weak system


yup its like it was charging just good enough to power everything, just not as good as it should have. the reason why i did this is because my cables were corroded and shorting out on themselves. burnt up a brand new alternator in the process. i bought the same exact alternator but did the wiring when i installed it and i could tell the difference on how it cranked, lights were brighter when using accessories and such, the needle on the gauge was a little higher than it was and it never drops when using all accessories etc. i even left my lights on once and it started with a little struggle but before, it would have been dead as soon as i turned the key. definitely do this if you have any signs of a weak system

:salute: Glad you found the results to be outstanding like I did.


yup yup thank ya sir


Join the Elite Explorers for $20 each year.
Elite Explorer members see no advertisements, no banner ads, no double underlined links,.
Add an avatar, upload photo attachments, and more!
.


Mines still cheaper :p

Even if your method was more expensive, I'd go your route. That mid-cable crimp is a horrible design on the factory cable. Using your method, I'd solder each end and then seal it with some heatshrink if you can find the right size or just electrical tape the hell out of it.


Back
Top