vapor76
New Member
- Joined
- September 19, 2012
- Messages
- 7
- Reaction score
- 0
- Year, Model & Trim Level
- 1999 Ford Explorer
I found out firsthand today why tune-ups are so expensive. On the 1999 Explorer with the 4.0L V6 SOHV, the plugs are a bit of a pain to get to, especially on the passenger's side of the engine. I have a Haynes manual for my vehicle; I found it was vague on what would be involved to change the spark plugs.
In case you're about to undertake the same project, I wanted to offer what I learned from my experience. You'll need the following tools and supplies:
Remove the cover over the intake assembly using the 9/32” socket. Store it out of the way. Pull hose and rigid tube out of the intake breather hose. Remove the wiring harness from the mass airflow sensor. Unclip the breather housing, loosen the 5/16” screw on the intake hose, and move the intake breather hose and housing out of the way.
I suggest starting with the passenger's side first to get the most frustrating part of this project out of the way. Using the flat screwdriver, remove the front passenger's side hub cap. Then using the 1/2" drive breaker bar and 3/4" socket (or your tire iron), loosen the lug nuts. Jack the vehicle up and secure it on a jack stand and finish removing the lug nuts and tire.
Next, remove the wheel well. There are four (4) Phillips screws and four (4) 8mm screws that secure it to the vehicle. There are two (2) 10mm lag bolts at the front of the wheel well - DO NOT remove these yet. One of the Phillips screws will be under the back corner of the wheel well under the running board (if equipped). Pull the wheel well out of the fender. You may notice a vacuum reservoir (black spherical component) with two small vacuum lines; it is secured by the 10mm bolts that you did not remove earlier. Free the lines from the clip securing them to the wheel well, then remove the bolts securing the vacuum reservoir. Gently stow it out of the way.
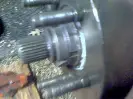
Look at the engine from the engine bay. On the passenger's side, you'll see the two front spark plug boots quite easily. The third one closest to the firewall is hidden by the air-conditioning evaporator housing. Ease of access to all three of these plugs is primarily the reason why you just removed the tire and wheel well. Even though you can see the two front plug boots from above, you’ll still find it difficult to maneuver your tools in such a way to access the plugs.
Go back to the wheel well and beginning at the back of the engine, work your spark plug socket onto the spark plug closest to the firewall. Once the socket is seated, use your stubby socket to back it out. You may find it necessary to use your standard ratchet to break it loose, but you’ll want to transition back to the stubby socket as there’s not much room to work. Once this spark plug is out, replace it and its suppression wire.
Replace each plug and wire one at a time using plenty of anti-seize compound and spark plug boot grease. Once you get to the driver's side, you can access the plugs from above. You may find it easier to thread the plugs back in to their holes by hand by using the spark plug socket; be sure the threads are completely seated before using a ratchet to tighten them. Failure to do so may result in stripping the treads on the engine, the plug, or both.
If necessary, gap each plug to your vehicle’s specifications (in my case, my plugs were already gapped). As you progress from the passenger’s side to the driver’s side, you’ll find that each plug will require a little different tactic to loosen and remove it. The middle plug on the driver’s side required the use of my universal joint. I also found it easiest to remove the plug on the driver’s side closest to the front of the engine by routing my socket and 6” extension directly under the pipe leading from the EGR valve to the exhaust pipe. I then added my 2” extension and ratchet.
Be patient, work purposefully, and be prepared to spend between two and four hours on this project. Have all the parts, tools, and supplies you’ll need beforehand. Remember safety first. Work on a cool engine with a disconnected battery.
In case you're about to undertake the same project, I wanted to offer what I learned from my experience. You'll need the following tools and supplies:
- 1/2" drive breaker bar (optional)
- 1/2" drive, 3/4" socket (optional)
- 3/8" drive ratchets, stubby and standard
- 3/8" drive, 5/8" spark plug socket
- 3/8" drive universal joint
- 3/8" drive 2" and 6" extensions
- 1/4" drive, 8mm and 9/32" sockets
- 1/4" drive ratchet (or you can use a 3/8"-to-1/4" adapter)
- Phillips screwdriver
- flat screwdriver
- 5/16" nutdriver
- spark plug gap gauge
- floor jack with sufficient capacity to lift your vehicle
- a jack stand
- anti-seize compound
- spark plug boot grease
Remove the cover over the intake assembly using the 9/32” socket. Store it out of the way. Pull hose and rigid tube out of the intake breather hose. Remove the wiring harness from the mass airflow sensor. Unclip the breather housing, loosen the 5/16” screw on the intake hose, and move the intake breather hose and housing out of the way.
I suggest starting with the passenger's side first to get the most frustrating part of this project out of the way. Using the flat screwdriver, remove the front passenger's side hub cap. Then using the 1/2" drive breaker bar and 3/4" socket (or your tire iron), loosen the lug nuts. Jack the vehicle up and secure it on a jack stand and finish removing the lug nuts and tire.
Next, remove the wheel well. There are four (4) Phillips screws and four (4) 8mm screws that secure it to the vehicle. There are two (2) 10mm lag bolts at the front of the wheel well - DO NOT remove these yet. One of the Phillips screws will be under the back corner of the wheel well under the running board (if equipped). Pull the wheel well out of the fender. You may notice a vacuum reservoir (black spherical component) with two small vacuum lines; it is secured by the 10mm bolts that you did not remove earlier. Free the lines from the clip securing them to the wheel well, then remove the bolts securing the vacuum reservoir. Gently stow it out of the way.
Look at the engine from the engine bay. On the passenger's side, you'll see the two front spark plug boots quite easily. The third one closest to the firewall is hidden by the air-conditioning evaporator housing. Ease of access to all three of these plugs is primarily the reason why you just removed the tire and wheel well. Even though you can see the two front plug boots from above, you’ll still find it difficult to maneuver your tools in such a way to access the plugs.
Go back to the wheel well and beginning at the back of the engine, work your spark plug socket onto the spark plug closest to the firewall. Once the socket is seated, use your stubby socket to back it out. You may find it necessary to use your standard ratchet to break it loose, but you’ll want to transition back to the stubby socket as there’s not much room to work. Once this spark plug is out, replace it and its suppression wire.
Replace each plug and wire one at a time using plenty of anti-seize compound and spark plug boot grease. Once you get to the driver's side, you can access the plugs from above. You may find it easier to thread the plugs back in to their holes by hand by using the spark plug socket; be sure the threads are completely seated before using a ratchet to tighten them. Failure to do so may result in stripping the treads on the engine, the plug, or both.
If necessary, gap each plug to your vehicle’s specifications (in my case, my plugs were already gapped). As you progress from the passenger’s side to the driver’s side, you’ll find that each plug will require a little different tactic to loosen and remove it. The middle plug on the driver’s side required the use of my universal joint. I also found it easiest to remove the plug on the driver’s side closest to the front of the engine by routing my socket and 6” extension directly under the pipe leading from the EGR valve to the exhaust pipe. I then added my 2” extension and ratchet.
Be patient, work purposefully, and be prepared to spend between two and four hours on this project. Have all the parts, tools, and supplies you’ll need beforehand. Remember safety first. Work on a cool engine with a disconnected battery.
") Or, is it a lot easier on the 2000 model?
Or, is it a lot easier on the 2000 model?