- Joined
- February 8, 2003
- Messages
- 9,824
- Reaction score
- 84
- City, State
- Sacramento, CA 95827
- Year, Model & Trim Level
- 1992 XLT
I have seen a number of A4LD cases. On some of the older ones with high mileage, the place where the shift lever enters the case is worn.... it is just steel riding in the aluminum case. In once case I knew it had been a leakage problem.
Now, I am not saying this is the HUGE problem area, but it is one of the few problem areas in the A4LD (and for that matter 5R55) case. Omega Tool here in Sacramento has fabricated a tool to bore out the lever hole and put a bronze bushing in it. Now I am not advocating everyone run out and pop $140 for this tool.... but I thought you ought to know it is out there and how it works.... hence this thread.
The tool itself is a flat metal piece that bolts to the pan rail. Mounted on it is a housing to guide the 7/8's inch reamer....

As you can see the end of the tool has a guide to make your you are concentric to the case bore (this is a well designed shop made tool jig!)
You insert the reamer into the jig and then mount it on the pan rail and this is what you have....


(notice the hole in the round part)
Hook up an electric drill (or a powerful battery operated one) use some WD-40 in the hole for reaming fluid application (see I told you this was a well designed jig) and have at it.... adding lubricant along the way in that hole I pointed out to you.... Nice if you have a helper....(I didn't)

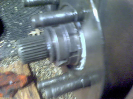
When you pull the reamer out here is what you have... an oversized lever bore hole...

(yeah I know not the best reamed hole... but I didn't have a helper and besides it will have a bushing driven into it! (so there))
This is the bushing that goes into the hole. The slot is for the retaining pin (they supply roll pins with this kit)


(and yes that IS a tiny little blood blister on my hand.... and I am not telling you how I got it)
You mount it on the bushing driver, ALSO made specifically for this job to drive the pin perfectly deep into the new hole...

Position it into the proper alignment so the slot lines up with the holes in the case for the retaining pin...

Then drive it. I used a 24 oz deadblow hanner whichwas perfect to do the job..

And this is what you have when you finish:

Using a jewelers screwdriver to show why the slot is milled in the the bushing.

If you have this problem, there IS a solution.
ps. This tool belongs to James in Hawaii. He was kind enough to let me pick up HIS tool and use it and then ship it to him. Thank you JAMES ! I will be buying mine in a week or two!
pps. I have thought that I should offer a service to swap a sandblasted and cleaned case with all the upgrades - rear race, steel governor sleeve and this one (maybe even painted to your choice of silver or black) to the home rebuilder so they start out with a sound foundation.
Now, I am not saying this is the HUGE problem area, but it is one of the few problem areas in the A4LD (and for that matter 5R55) case. Omega Tool here in Sacramento has fabricated a tool to bore out the lever hole and put a bronze bushing in it. Now I am not advocating everyone run out and pop $140 for this tool.... but I thought you ought to know it is out there and how it works.... hence this thread.
The tool itself is a flat metal piece that bolts to the pan rail. Mounted on it is a housing to guide the 7/8's inch reamer....
As you can see the end of the tool has a guide to make your you are concentric to the case bore (this is a well designed shop made tool jig!)
You insert the reamer into the jig and then mount it on the pan rail and this is what you have....
(notice the hole in the round part)
Hook up an electric drill (or a powerful battery operated one) use some WD-40 in the hole for reaming fluid application (see I told you this was a well designed jig) and have at it.... adding lubricant along the way in that hole I pointed out to you.... Nice if you have a helper....(I didn't)
When you pull the reamer out here is what you have... an oversized lever bore hole...
(yeah I know not the best reamed hole... but I didn't have a helper and besides it will have a bushing driven into it! (so there))
This is the bushing that goes into the hole. The slot is for the retaining pin (they supply roll pins with this kit)
(and yes that IS a tiny little blood blister on my hand.... and I am not telling you how I got it)
You mount it on the bushing driver, ALSO made specifically for this job to drive the pin perfectly deep into the new hole...
Position it into the proper alignment so the slot lines up with the holes in the case for the retaining pin...
Then drive it. I used a 24 oz deadblow hanner whichwas perfect to do the job..
And this is what you have when you finish:
Using a jewelers screwdriver to show why the slot is milled in the the bushing.
If you have this problem, there IS a solution.
ps. This tool belongs to James in Hawaii. He was kind enough to let me pick up HIS tool and use it and then ship it to him. Thank you JAMES ! I will be buying mine in a week or two!
pps. I have thought that I should offer a service to swap a sandblasted and cleaned case with all the upgrades - rear race, steel governor sleeve and this one (maybe even painted to your choice of silver or black) to the home rebuilder so they start out with a sound foundation.