-
Performance Upgrades - Maintenance - Modifications - Problem Solving - Off-Road - Street Trucks.
Covering the Explorer, ST, Sport, Lincoln Aviator, Sport Trac,
Mercury Mountaineer, Mazda Navajo, Ford Ranger, Mazda Pickups, and the Aerostar.
Featuring H.I. - Human Intelligence.
Register Today It's free!
- Forums
- Generation Specific Forums
- 1995 - 2001 Explorer Ranger Merc. 2nd Generation
- Stock 1995 - 2001 Explorers
You are using an out of date browser. It may not display this or other websites correctly.
You should upgrade or use an alternative browser.
You should upgrade or use an alternative browser.
How to: Parking Brake Removal and Installation (with pictures)
- Thread starter bdriver000
- Start date
Prefix for threads which are instructional.
Elite Explorer members see no advertisements, no banner ads, no double underlined links,.
Add an avatar, upload photo attachments, and more!.
1oldguy
New Member
- Joined
- February 27, 2010
- Messages
- 4
- Reaction score
- 0
- City, State
- OH
- Year, Model & Trim Level
- 2004XLT
PB shoes
Try putting them together on the spring first. The wheels have to be free to rotate so you can rotate to a position between the wheel studs. It is still quite tight. You may have to play with the PB actuator arms.
I am unsure why this was done this way. I would think that you could use a system like linear pull bike brakes (found even on cheap bikes these days) to clamp the rear brake pads.
duke16
Well-Known Member
- Joined
- March 10, 2001
- Messages
- 921
- Reaction score
- 1
- City, State
- Raleigh, NC
- Year, Model & Trim Level
- 1997 5.0L AWD XLT
Does the axle have to come out or something??? I can not for the life of me stretch the springs enough so that both pads fall into place. I just have the 1 rear retractor spring on. Maybe I'm just not strong enough
Carguy3J
Explorer Addict
- Joined
- June 21, 2008
- Messages
- 1,525
- Reaction score
- 3
- City, State
- North East New Jersey
- Year, Model & Trim Level
- '99 4dr. XLT SOHC A4WD
Any trick to getting the pads on the with the retractor spring in place? The thing is so tight I can't spread the pads apart.
Does the axle have to come out or something??? I can not for the life of me stretch the springs enough so that both pads fall into place. I just have the 1 rear retractor spring on. Maybe I'm just not strong enough
It is MUCH easier to do this with the axle shaft removed. It's worth the time and effort to drain the diff, and pull the axles. It's also a good opportunity to check and service the diff and the outer axle bearings/seals, as well as a good excuse to switch to synthetic gear oil , if you don't already run it.
RickOTR
Explorer Addict
- Joined
- January 4, 2000
- Messages
- 1,255
- Reaction score
- 185
- Year, Model & Trim Level
- 97 Sport 4X4
If you want trouble free e-brakes just do away with OEM e-brakes and put a set of Mustang Calipers on. The Calipers are attached to the brake cables and are adjusted at the same time you adjust the brake pads with a special tool. This is what I did and it works like a charm. Also, its a direct bolt on.
97MM
Member
- Joined
- June 10, 2004
- Messages
- 25
- Reaction score
- 0
- City, State
- Springfield,MA
- Year, Model & Trim Level
- 97 Mountaineer AWD 5.0
If you want trouble free e-brakes just do away with OEM e-brakes and put a set of Mustang Calipers on. The Calipers are attached to the brake cables and are adjusted at the same time you adjust the brake pads with a special tool. This is what I did and it works like a charm. Also, its a direct bolt on.
Sorry to bring this up but what year mustang rear calipers bolt on direct?
Thanks in advance.
97MM
Member
- Joined
- June 10, 2004
- Messages
- 25
- Reaction score
- 0
- City, State
- Springfield,MA
- Year, Model & Trim Level
- 97 Mountaineer AWD 5.0
Sorry to bring this up but what year mustang rear calipers bolt on direct?
Thanks in advance.
Bump,
Does anyone know what Mustang rear brake Calipers bolt directly in. To a Explorer 95/01 or Mountaineer 97. Just curious to know cause I have rear e brake issue on my 97 Mountaineer, and wouldn't mind doing the switch to these calipers.
Thanks in advance..
Phreaq
Member
- Joined
- December 19, 2007
- Messages
- 25
- Reaction score
- 2
- City, State
- CA
- Year, Model & Trim Level
- 1992 XLT A/T 4x4
These brakes do wear out. I just replaced mine at 170000 miles because they were cracked and chipped off in places..This wasnt due to use but because of the heat that builds up in there.. Everyone should check these when replacing your rear brakes to do a thorough job.
JMO.
Cruz
I would consider that a hardware failure due to high mileage. I should have added that any time the rear brakes come off, it is a good time to inspect PB's. As a wheeler I tend to have my axles out a lot LOL
As to the Mustang calipers, I believe the style uses the disc brake pads with a spring loaded caliper. If there is no need for new rotors, It sounds great! I will look into this. The attachment to the PB lever is not at its best. And I have always liked the disc brake parking brake.
In the mean time 97MM google is your best friend. That's where I will be searching.
Trolling
Well-Known Member
- Joined
- June 11, 2010
- Messages
- 224
- Reaction score
- 0
- City, State
- kah-lee-fur-nyah
- Year, Model & Trim Level
- 1997
Bump,
Does anyone know what Mustang rear brake Calipers bolt directly in. To a Explorer 95/01 or Mountaineer 97. Just curious to know cause I have rear e brake issue on my 97 Mountaineer, and wouldn't mind doing the switch to these calipers.
Thanks in advance..
in for the info. it would be nice to do away with the in-drum parking brakes.
RaveDigger
Well-Known Member
- Joined
- April 2, 2010
- Messages
- 198
- Reaction score
- 2
- City, State
- Groton, MA
- Year, Model & Trim Level
- 2000 Sport 5 speed manual
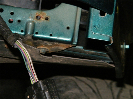
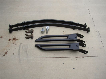
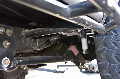
The last spring (there are three) is very difficult to get on using pliers even if you have a buddy to help out. I used a coat hanger to tension the spring and my buddy used a screwdriver/pliers to get everything in place. Here are pics of the technique, I hope it helps someone:


Bdriver000, thank for the writeup even though it was five years ago. I wouldn't have attempted this without your writeup.
Bdriver000, thank for the writeup even though it was five years ago. I wouldn't have attempted this without your writeup.
duke16
Well-Known Member
- Joined
- March 10, 2001
- Messages
- 921
- Reaction score
- 1
- City, State
- Raleigh, NC
- Year, Model & Trim Level
- 1997 5.0L AWD XLT
The last spring (there are three) is very difficult to get on using pliers even if you have a buddy to help out. I used a coat hanger to tension the spring and my buddy used a screwdriver/pliers to get everything in place. Here are pics of the technique, I hope it helps someone:


Bdriver000, thank for the writeup even though it was five years ago. I wouldn't have attempted this without your writeup.
Wish I'd have thought of using a coat hanger. I ended up using needle noise pliers that kept loosing grip on the spring.
RaveDigger
Well-Known Member
- Joined
- April 2, 2010
- Messages
- 198
- Reaction score
- 2
- City, State
- Groton, MA
- Year, Model & Trim Level
- 2000 Sport 5 speed manual
I tried the needle nose pliers for quite a while before I took a step back and tried to think of a better way.
tomballpkr
Member
- Joined
- May 8, 2005
- Messages
- 26
- Reaction score
- 1
- City, State
- houston ,tx
- Year, Model & Trim Level
- Explorer 2003 XLS 4.0L V6
Any tips on how to get the hold down springs installed? I am having a really hard time...
RaveDigger
Well-Known Member
- Joined
- April 2, 2010
- Messages
- 198
- Reaction score
- 2
- City, State
- Groton, MA
- Year, Model & Trim Level
- 2000 Sport 5 speed manual
You probably need a buddy to help, I wasn't able to do it alone. I used a flathead screwdriver and two hands to hold the clip down and compressed while he fed the pin through from the back. It was a pain in the ass.
tomballpkr
Member
- Joined
- May 8, 2005
- Messages
- 26
- Reaction score
- 1
- City, State
- houston ,tx
- Year, Model & Trim Level
- Explorer 2003 XLS 4.0L V6
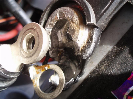
OK, here's how I did the hold down springs by myself with the axle still on:
I used vice grips to squeeze each spring shut and then used 2 tiny zip ties to hold it closed through the smaller end where the pin needs to ultimately reside. The vice grips were then released. I clipped off the remaining ends of the zip tie and made sure the bulky head part of the zip tie was on the top side of the spring so that it would not interfere on the back or the side. This keeps the hold down spring compressed so you don't have to try and do that in the tiny space with 1 hand.
Next, I fed the pin through the rear of the assembly and held it in there with 1 hand. With the other, I used needle nose pliers to situate the hold down spring (with zip ties still in place) and feed the pin through the rear section of the spring. Then I fed the pin through the front section of the spring and used a screwdriver to slide the head of the pin into the slot at the bottom of the front section. Once in there, it is still loose because of the zip ties compressing the spring but its not going to disengage.
Finally, you just need to cut the zip ties to release the spring. I used some tiny clippers to clip 1 of the zip ties but on the inner one I couldn't reach it. So I let a soldering iron heat up and then stuck it up in there and touched the zip tie to melt it and it immediately disengaged. Some tiny needle nose pliers were used to pull out the remnants of the zip ties.
I'm sure this could be done with a single zip tie on each spring if desired.
Hope this info helps someone...
dearden05
New Member
- Joined
- November 7, 2010
- Messages
- 7
- Reaction score
- 1
- City, State
- Sykesville, MD
- Year, Model & Trim Level
- '98 XLT
i found needle nose vice grips to be the real deal maker for this project, with them i was able to remove and re-install the springs almost as easily as if it were on a standard drum brake setup.
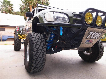
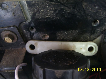
oh and by the way, what vehicle is pictured by RaveDigger, it appears to have a single leaf spring????
oh and by the way, what vehicle is pictured by RaveDigger, it appears to have a single leaf spring????
Betsy98Sport
Well-Known Member
- Joined
- April 30, 2010
- Messages
- 129
- Reaction score
- 3
- City, State
- San Diego, CA
- Year, Model & Trim Level
- 07 Ford Explorer Eddie B
The last spring (there are three) is very difficult to get on using pliers even if you have a buddy to help out. I used a coat hanger to tension the spring and my buddy used a screwdriver/pliers to get everything in place. Here are pics of the technique, I hope it helps someone:


Bdriver000, thank for the writeup even though it was five years ago. I wouldn't have attempted this without your writeup.
I used this technique by myself and was able to get it on with a coat hanger and needle nose pliers. Great idea!
dearden05
New Member
- Joined
- November 7, 2010
- Messages
- 7
- Reaction score
- 1
- City, State
- Sykesville, MD
- Year, Model & Trim Level
- '98 XLT
needle nose VICE GRIPS
Regular pliers would never cut it. Because they were vice grips, I could first concentrate getting a lock on the spring, then focused on extending the spring and aligning it's hook into the slot. Btw, the are the old style Vice Grips, STILL MADE IN AMERICA!
Regular pliers would never cut it. Because they were vice grips, I could first concentrate getting a lock on the spring, then focused on extending the spring and aligning it's hook into the slot. Btw, the are the old style Vice Grips, STILL MADE IN AMERICA!
bobflood
Elite Explorer
- Joined
- May 27, 2010
- Messages
- 1,578
- Reaction score
- 39
- City, State
- Powder Springs, GA
- Year, Model & Trim Level
- 1997 Eddie Bauer V8 2WD
Regular pliers would never cut it. Because they were vice grips, I could first concentrate getting a lock on the spring, then focused on extending the spring and aligning it's hook into the slot. Btw, the are the old style Vice Grips, STILL MADE IN AMERICA!
+1 on this! I just did this job by myself, and the "needle nose vise grips" made it possible. I used them both to install the upper outside spring and to hold the pad springs closed so i could put the pins in from behind. They were the only things narrow enought to work in that confined space. If I hadn't just serviced the differential 3-4 months ago, I would have pulled the axles.
Elite Explorer members see no advertisements, no banner ads, no double underlined links,.
Add an avatar, upload photo attachments, and more!.
specialized7
Well-Known Member
- Joined
- January 7, 2009
- Messages
- 534
- Reaction score
- 4
- City, State
- saskatoon
- Year, Model & Trim Level
- 99 SPORT
well this thread saved me much anger. I started by replacing the rotors to find out that the shoes were worn down to nothing!
it was hard but this thread helped alot!
it was hard but this thread helped alot!
Featured images

Featured images
Similar Threads
- Replies
- 2
- Views
- 527