my trac | Ford Explorer Forums - Serious Explorations

  • Register Today It's free!

my trac

rokr1292

Well-Known Member
Joined
January 11, 2011
Messages
290
Reaction score
1
City, State
richardsville va
Year, Model & Trim Level
'01 Explorer Sport Trac
Making a thread for the singular purpose of documenting what I do/have done to my trac. Will start tomorrow, I just know if I don't start one now, ill procrastinate.


Join the Elite Explorers for $20 each year.
Elite Explorer members see no advertisements, no banner ads, no double underlined links,.
Add an avatar, upload photo attachments, and more!
.


:popcorn:


okay.

Well im gonna start with what I did today. I wasn't happy with the way my trucks stereo sounded, so I replaced the speakers. I've already replaced the headunit, (will show pics of that too, I don't have install pics :/ and since im going to post those ill mention my ultragauge. Phew. Okay here goes. Theser are the speakers I bought:
2011-06-10_17-28-01_961.jpg

2011-06-10_17-36-44_519-1.jpg

some install pics
2011-06-11_17-24-58_34.jpg

2011-06-11_18-18-14_790.jpg

I thought this was an odd hole...
2011-06-11_18-29-28_46.jpg


During the install, I also used some tape to help some switches stop rattling, and removed those screens on the back of the doorpanel's speaker grate. Anyone wanna guess what that hole is from? My guess is some kind of window repairs done unprofessionally.

Anyway, headunit and gauge pics, the headunit is a jvc XR-KW610 double din. Gauge is from ultragauge.com love it. The wire isrouted through the bezel and dash into the obdII plug.
CIMG1581.jpg

daytime, kinda gives away 2 or three other little mods....
CIMG1582.jpg


And then just a few general pics.
2011-03-15_17-34-49_179.jpg

2011-03-15_17-35-38_112.jpg

last one for tonight
2011-03-15_17-35-03_105.jpg

hehe


Ohh, I forgot. I have pictures of what I pulled OUT of my trac, because they weren't stock...
2011-06-11_19-51-51_898.jpg

Two of these:
2011-06-11_19-51-59_943.jpg

and two of these:
2011-06-11_19-52-05_834.jpg


Hopefully everyone thinks the kickers are betterm I like the sound better, I can tell you that. The surrounds said" custom fit for ford/mazda" on the pioneers. My dad is taking the 2-ways to put in his toyota, idk what's gonna happen with the 3 ways yet.


okay, time for a new post

dropped in an ebay intake the other day, but before i get to those, ill go into a few other things ive already done

2011-06-14_19-44-07_935.jpg

This is my headunit, its a refurb from crispdeals.com, got it for 119 shipped. i wanted a double din, that illuminated green, with expansion options, and no touchscreen. i dont know, i just prefer buttons on a stereo, i like some tactile feedback. anyways, this is whats powering those kickers, no amp yet.

You probably noticed the ultragauge sitting there on the right, it blocks the headunits usb port, but i never use that anyway.
the gauge is held on by one of those cell-phone clip buttons, the little hanger was glued to the bezel by the previous owner. some doublestick foam tape holds the button to the gauge, but its been peeling, and ill be rigging it slightly differently soon
2011-06-14_19-44-41_332.jpg

the wire is run through the dash behind the bezel, down to the obdII port. there is only a few inches of wire out to allow the gauge to be taken out of the hanger, or to allow me to reach the buttons on the back.

I used to drive a ranger, and i loved the console ir had under the dash, those two cupholders with the rising rings that held a can just right. since i dont really want a full length console, and that cubby was not doing it (and since i didnt really have a useful cupholder: http://i804.photobucket.com/albums/yy328/gibsondale/2011-03-16_18-40-52_463.jpg) i figured id see if i could put one of the ranger style ones in there. what i needed was the console, the mounting plate, the little quarter-turn clips, and two self tapping screws. after removing the little cubby hole, those two screws went in the back holes (towards the dash) and the holes line up perfectly. the self tappers went in the front, just so there wouldnt be a gap under the console when it was installed. install the console with the clips, put the liners and rings in, and done. it looks stock, and with my cell phone mount in one of the cupholders, i still have three useable ones.
2011-06-14_19-44-00_835.jpg


now i kept the bag console. a lot of people dont like it, but i do. what i didnt like was the flippy-cup-cupholder that was on the front of it. especially because the previous owner cut a hole in it to mount his satellite radio controller
2011-03-16_18-40-44_961.jpg

the hole was ugly, and i wanted more cupholders, and someplace to put change. so i decided one one of these cupholders, from an older explorer, and its exactly what i wanted.
2011-06-14_19-43-47_829.jpg

now forgive the mess, but there it is. a very easy install. the only problem i had was that the rear screwholes next to the change organizer had no brace below them to screw into. i secured it with those two screws on the backside (its not pretty, i know, it wont stay that way) screwed into the console body.

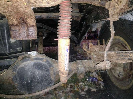
And now, some pictures of my new intake. i got it for 34+12 shipping, and installed it with spare bolts i had, but wasnt happy with the breather hose config (as pictured, i didnt cut it short because i wanted to be sure it was secure, and see if i needed to juryrig it.
Just the intake, from the right side of the trac
2011-06-17_19-37-16_323.jpg

the engine bay, from the left side
2011-06-17_19-37-07_417.jpg

the engine bay from the front
2011-06-17_19-36-59_581.jpg

Just the intake, from the front
2011-06-17_19-36-53_736.jpg

please note that the breather hose touches the alternator, and is only slipped inside the breather elbow. it holds by itself pretty well, but i made it sturdier today with some hose fittings, in pretty odd fashion. and as a temporary way to stop the hose from touching the alternator, (still havent cut it) ive run it under the maf wires because i havent found an elbow that would work yet. Im very happy with the kit though, it looks and sounds good, and at an unbeatable price. i plan on painting the piping black, and replacing the couplers with black ones as well. then i may try to build my own custom heat shield, because its definitely nor a "cold-air" intake. the tb cover will go back on eventually, but i like access to the throttle when im showing off from under the hood.

anyways, theres a little more about my trac, at least how it sits now, ill mention that the previous owner installed a magnaflow exhaust sysem (cat-back) and a truxedo low-pro soft tonneau cover. ive also installed a line-of-fire type led tailgate strip, and ventvisors on the four doors.

now as far as i can remember, thats all thats been done to my truck, dont know for sure what my next project will be but i hope it'll be soon.

ill try to post pics of my intake tomorrow, of how ive solved the "problems" ive had.

oh yeah, and can anyone tell me what this black box is? i want to remove that rusted part, then either sand and paint it, or remove it altogether if it wont hurt the filter in its absence, but i cant seem to pry the box off.
2011-06-19_19-11-27_144.jpg


So, more pictures, not sure if anyones still paying attention, but oh well.
2011-06-22_23-02-01_145.jpg

This is the hose that came with my intake along with some fittings I used to make it work for a while.

2011-06-22_22-56-50_64.jpg

then I switched from the blue tubing to 1/4" fuel line, because a:it would be easier to find an elbow fitting to fit the hole in the intake, and its black, like i plan to turn the whole intake. Is tthat too small for a breather line? I've had no problems so far. Id use a breather filter and a plug if it would be legal in VA, but I don't know whether or not it is. I also downsized with the fittings, my little assembly was too big.

2011-06-27_08-14-17_739.jpg

fittings painted, looks way better than the white nylon.
2011-06-28_15-08-55_452.jpg

the elbow on the intake, no hose laying on the alternator anymore.
2011-06-28_15-08-30_749.jpg

the breather fittings, ill be doing something about that hose clamp rubbing the other hose very soon.
2011-06-28_15-08-21_81.jpg

the whole intake, again, I just need to find out where I can get black couplers and paint the pipe, then I most likely will get a K&n filter to put on there, with a black filter wrap.

Okay, and this is a little sloppy, but its not finished yet, babysteps. I trimmed the tb cover to let me reach the throttle with my thumb when I feel like showing off a little. Excuse the wetness too, I was giving the engine bay a quick wash.
2011-06-28_15-09-04_811.jpg


Sorry about how slow I work, between work and school I don't have much time or money, so everything I do is gonna be budget-friendly, and in very small steps. Haha


Ohh and one more pic, came out of walmart the other day and saw 01STrunner's trac parked nearby
2011-06-23_20-13-53_989.jpg


I had the same exact intake setup that I ran on my'03 St in the warmer months but after it took in water driving through two feet of water in a rain storm it came off because it took in water.

As for the breather, I ran the tube from the valve cover to the intake for a summer and the next summer blocked off the hole on the intake tube and installed a breather element on the valve cover and it seemed to run better in the warmer months. You can get the breather elements from Adveanced, AutoZone, Pep Boys, etc.

Here's a picture of the setup I had and it came with a K&N fitler..

picture.php


picture.php


Nice, I wish my kit came with a K&N, I think the one I have is afe? Im not sure, but its definitely not K&N. What did you use to plug your intake? I just used a nylon 1/8 inch pipe thread plug.

I went and looked at the breather filters in autozone today and for ten bucks, I decided id just go and do it. With all the fittings and plugs I have, all I needed was the filter, and I do like the way it looks way better. Im thinking about maybe not painting the pipe black now, just changing the couplers, making the engine compartment all black with chrome highlights.
2011-06-29_21-11-14_105.jpg

2011-06-29_21-10-58_87.jpg


I used chrome tape and you can't tell it's even there unless you get really close and look for it. I did a couple layers to keep the heat out. Like I said though, I removed it and probably will end up selling the whole setup.


How much? Ill buy the filter if you'll sell it separately.


Give me your zip code and I'll find out what shipping would be.


pm sent.

anyways, i got bored today, decided to see if i could get black couplers. i cout get one from the local autozone, and i ordered the other two, i should get them tomorrow. then after work, i picked up a little piece of sheet aluminum, decided to start mocking up/making my heat shield. here are the pics. keep in mind, its not finished, just mocked up so i can see what space i have and where i need to fill. i started with a 6"x24" piece.

what i ended up with:
2011-06-30_22-53-44_70.jpg

how it fits, ill be making something to cover the bottom too:
2011-06-30_23-16-25_590.jpg

I only put in one bracket, because i hadnt figured out exactly how i was going to fasten the two pieces together
2011-06-30_23-16-31_718.jpg

how the front lines up (never realized how bad that rust was :,():
2011-06-30_23-16-36_870.jpg


The black box is a relay box.

Not a fan of CAI's that draw hot air from under the hood :thumbdwn: .......... but I won't rant on that ..... this time.:rolleyes:


Did I say it was a cold air intake? My bad if I did, I do the same thing, I usually try to say high flow or something else. It might not be a zabteck true cold air intake, but with a good heat shield, and higher flow (especially because the kit really has the filter tucked up into the hole behind the headlight) its gotta be at least a lukewarm air intake. Haha


No, you didn't say it but I see the photo. ;)


heat shield is in.
2011-07-02_17-44-01_556.jpg

i just used a piece of strapiron, pulled tight around the coolant/wiper fluid resevoirs to hold it in place, the front is nestled in between some wires and part of the body. (i put i piece of rubber in between to protect the wires/prevent rattle.)
2011-07-02_17-44-07_836.jpg

2011-07-02_17-44-13_962.jpg

then just a 1/4 bolt and nut holding the shield to the strapping.
2011-07-02_17-44-25_821.jpg

I also got the last of my black couplers from spectre, i think they look WAY better
2011-07-02_17-48-33_195.jpg

2011-07-02_17-48-39_593.jpg

and then the whole deal:
2011-07-02_17-53-34_22.jpg


i dont have an exact total, but my best estimate is right around a hundred dollars, and i love the way it looks. plus, its entertained me for a few days, i can always improve on it, and it sounds great at WOT. im very happy.


Sorry man, I've been extremely busy lately. I haven't been able to get a shipping cost but I'll get out there Tuesday and check. It'd probably take $50 shipped.


Join the Elite Explorers for $20 each year.
Elite Explorer members see no advertisements, no banner ads, no double underlined links,.
Add an avatar, upload photo attachments, and more!
.


Well, so far you have done everything to your trac as i wanna do to mine :p and they are identical too hahaha, silver paint and everything anyway. Im subbing to the thread! Love the heat shield and the black on the Induction system. I have that kit in my garage but am in the same boat as you and havent had time to install yet. 2 jobs and getting ready to start Purdue :) about how much time did it take to pop that induction system in??


Back
Top