To cam or not to cam? 4.0 OHV | Page 7 | Ford Explorer Forums - Serious Explorations

  • Register Today It's free!

To cam or not to cam? 4.0 OHV

Thoughts guys? I'm dropping on new heads anyway. I think if I pulled my rediator, id be able to get the cam out?

I am after mileage more than anything. I think that means very little overlap on the lobes but lots of lift. Wouldn't that mean I'd have to go with dual springs on the heads and custom push rods?

I'm also concerned about installing the cam properly. Getting the cam one tooth out on the timing chain would be a bad thing. There is also something about the cam sensor? Ugh. Having never done this, I'm concerned.

Am I correct on my assumptions? From reading these ohv threads, I know some of you have a very real understanding of this.
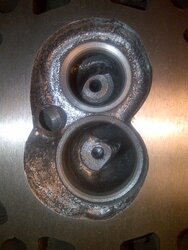


Join the Elite Explorers for $20 each year.
Elite Explorer members see no advertisements, no banner ads, no double underlined links,.
Add an avatar, upload photo attachments, and more!
.


Looks good for using the current push rods I have if I shave the heads. Excellent.


Join the Elite Explorers for $20 each year.
Elite Explorer members see no advertisements, no banner ads, no double underlined links,.
Add an avatar, upload photo attachments, and more!
.


Exactly. You shave some material off the bottom of the head. This makes the combustion chamber smaller, raising your compression ratio.

Yes, I knew the exhaust exit ports were smaller, but as I read it didn't seem to be a huge deal. I guess I was wrong. I think I will take the time to port match, and do a basic port job outlined in the document you posted the link to.

It wouldn't take long at all to smooth off the rough edges that cause the most flow restriction. Specially since the valves are coming off anyway.

Yea post some pics of before and after.my heads are engine quest and they redesigned the ports so alt of the stuff that normal ported takes out is gone.i had them just touch up mine ,straighten that big 90 in the exhaust and smoothed out the intake and a slight polish job.but as you know im probably down playing that a little;) ill post some stock heads90tm verses a stock EQ 95tm but won't post any final pics of my heads or intake;)


I ordered valves on Monday Nov 31, and hopefully the valves show up by the 10 th of November. I'll pull my motor apart over the long weekend and see what the big problem is. Then I can work on the heads. I will take pictures. Being I'm new to this, I will be very conservative. I'd be a very unhappy guy if I blew thru to a coolant port.


Valves are here, Just finished pulling the heads.
I'm a bit concerned that I don't see anything obvious wrong with the one head. Valves appear to be closed, valves look good on it. Oh boy. I sure hope the issue isn't rings on cyl's 1 and 3 giving me the 90psi.

I'll be using the warranty head. I'll polish the combustion chambers, pull the valves, and then do some bowl work and exhaust port work.

Then the heads are going to the machine shop to make sure the new valves seat, and possibly a bit of a shave.

Im getting better, Took about 3 hours to pull the heads.


How do the cylinders and head gasket look?


Man you should have really gone with the 422 cam!!so much more power and runs just the same .


cylinders and head gasket looks fine. Not sure what to say yet. Maybe a valve just isnt seating properly. I sure hope the different head fixes the issue.


Your funny! If I can get what I have working really efficiently, I'll be happy.

The 422 cam would have been nice. It doesn't really appear to have any more overlap than the 411 cam. I think with slightly increased compression, the 422 is the only way to go.


Your funny! If I can get what I have working really efficiently, I'll be happy.

The 422 cam would have been nice. It doesn't really appear to have any more overlap than the 411 cam. I think with slightly increased compression, the 422 is the only way to go.

yea for sure,the 422 will give you about 15 more hp right off the bat.throw higher compression and p+p your heads and that would be about another 20-25% increase on over all power,so all combined you would be looking at about 40ish+ hp increase.dont sound like much but that raw all motor power and with you doing just the upper, your not into it to much,being heads had to be done anyways.just hope this fixes your problem and im sure you will feel a slight power increase with that P+P your doing


Well, I'm going ahead with the hair cut on the heads. .020
The machine shop is doing 3 angle valve job, and installing the valves for me also.

I picked up some grade 8 bolts and anti-seize for the exhaust manifolds. The factory studs seem to be more of a pain in the a$$ than anything.

I think on re-assembly I'll do a baseline compression check. I'm sure pulling the fuse for the fuel pump will be good enough for this.


I would do it after a quick break in.also you do know the heads and lower intake need to be torrq in sequence.i allways put heads on finger tightthen intake and start torque intake to a couple pounds first then heads then intake.then start with first step on tq specs


And for compression test.i would do three.one cold.one warm and one put a little oil through the spark plug hole and then do one


Holy. Your really creating work for me. ;)

I'll follow your advice on the head/manifold sequence. I think I did that last time, but not as many times back and fourth as you suggest.

Thanks for the tips, always appreciated.


Hahaha i just like to make sure its all seated right.especially if you shave heads.ask your guy how many CC does he think taking that much off will reduce it or if free have him test how many you have before and after.you also using new head bolts and gasket im sure right?;)


Yup, new gaskets and head bolts.
Its too late to ask him to cc before and after. I'm picking them up this afternoon.

All gasket surfaces are prepped on the motor, head gaskets laying in place, cylinders and lifters cleaned and oiled/assembly lubed. I'm ready to put the heads back on.


Right on.do you do any more p+p to the heads?pics;)


I tried to get pics, but my camera phone didn't really do very well.
The pics look pretty bad. When I run my finger along the smoothed out area's things are pretty smooth with rough edges removed. First pic is a before.

I didn't do anything to the intake side other than a bit of bowl work.
 

Attachments

  • Valve Port-Before1.jpg
    Valve Port-Before1.jpg
    69.8 KB · Views: 320
  • valve port.jpg
    valve port.jpg
    77.6 KB · Views: 308
  • Exhaust port.jpg
    Exhaust port.jpg
    63.9 KB · Views: 322


Join the Elite Explorers for $20 each year.
Elite Explorer members see no advertisements, no banner ads, no double underlined links,.
Add an avatar, upload photo attachments, and more!
.


Back
Top