EMBPilot
Member
- Joined
- November 29, 2006
- Messages
- 43
- Reaction score
- 0
- City, State
- Jersey Shore
- Year, Model & Trim Level
- 2007 Ranger 4x4 XLT 4.0L
Just a quick post for the forums, I searched around last night about thermostat repair and didnt find much so i figured id put some info up.
My Experience Level is Low to Medium at best. The job took me only 3 hours working at a snails pace.
Symptoms: Engine temperature remained full cold, no matter how long the truck was running. Cabin heat would be warm enough but not hot. I could 'unstick' the thermostat by revving the engine to about 4k. This worked for the past month ive been driving around with this problem on borrowed time.
I lifted the front of the truck up slightly to get a 5 gallon bucket under the passenger side drain plug on the radiator. Open the 19mm drain plug slightly and I only needed to drain about 3-4" of anti-freeze into the bucket. I probably could have gotten away with less, i also learned i need to flush my system.
once thats done tighten plug snug and lower the front of the truck back down. Be nice, its plastic.
I removed the Air Intake hose from the air box to the butterfly valve on the air intake. Remove sensors and plugs and set a side.
Remove upper radiator hose that goes from passenger side top radiator to the engine fitting that holds the thermostat (the part with the 2 bolts in it). This hose should be empty.
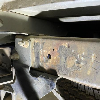
I removed the coolant hose end that connected to a separate horizontal pipe next to the engine block fitting. Shown in the picture below, its in the center top, you'll see the hose sitting to the left of the fitting it was plugged into.

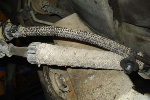
Removing this will help you get to the hose that goes to from the water pump to the engine fitting (yellow arrow). I wasnt able to remove this hose until I got the thermostat housing off the block, so i just loosened the hose clamps at the water pump and at the engine fitting. Shown here in the center, at this point i had the bolts backed out.

Next i removed both 1/2" bolts that hold the fitting to the block. They started turning with very small amount of pressure, i was pleasantly surprised. Note: A common problem is to have the bolts snap off in the block, i was lucky enough i just used a shot of PB, let them sit for a while and they came right out.
You may want to stuff a rag below the fitting we're about to take off, when it comes off, a little bit of coolant will come out onto the engine from the block.
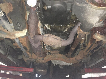
Slight tap knocked the fitting off the block with the one hose still attached but now with the fitting loose and the thermostat clear im able to get a better grip to get that small hose to pull it off.
Note the thermostat condition! OUCH!!

Remove the fitting now that the hose is free.

Stuff a lint free rag into the hole on the engine. I used a wire brush to clean any gasket bits from the engine. On the thermostat housing I used a wire brush, and wire wheel to clean the gasket off as well as coolant build up around the hose fittings.
Once the metal is shiny and nice on both surfaces set your new thermostat into the housing, spring facing rear of truck (as if it were installed on the truck), and set the new gasket onto the fitting over the thermostat. Now your ready to place all this back onto the truck.
(i did not coat the fitting with anything, i suppose you could/should?)
with bolts in hand, place the fitting complete with thermostat and gasket back onto the engine block. The long bolt goes in the top passenger side. Snug both of the bolts. Using a combination of 4" 2" 6" and universal joint i was able to finagle the bottom bolt in and out. The bolts arent impossible to get to, just takes a small amount of creativity. Once the bolts are snugged up, I torqued them to about 22 Nm.
At this point I was then able to reconnect the two small hoses, one from the water pump to the thermostat fitting, the other to that horizontal bar. Remember the hose clamps. Reconnect the large upper radiator hose. Reconnect the airflow intake hose and air filter box with sensors and plugs.
I poured a little bit of coolant into the top of the radiator fill, and i made sure the over flow tank had plenty of coolant in it.
Turn heater valve in cabin to full hot.
i started the truck, for about a half second it made an awful noise metal noise that I suppose was the water pump or something spinning without coolant in it but it went away immediately once the truck was done cranking over. The truck warmed up to operating temperature in about 10 minutes, something it hasnt done in a month")
The job is really as easy at just 2 bolts, and the trickiest part is getting some of those old rubber hoses off without damaging them, and getting the 1/2" socket on the two bolts.
I ended up using 3 new hose clamps. After cleaning the coolant deposits off of the end fittings the spring loaded ford ones weren't tight enough. If you really wanted to plan ahead pick up upper, and lower coolant lines, and a few gallons of coolant you can change out those hoses and put new coolant in the system while your there. I did not.
Thats all really, i just wanted to put this post up for the community as a reference in case someone searches in the future, good luck its easy.
My Experience Level is Low to Medium at best. The job took me only 3 hours working at a snails pace.
Symptoms: Engine temperature remained full cold, no matter how long the truck was running. Cabin heat would be warm enough but not hot. I could 'unstick' the thermostat by revving the engine to about 4k. This worked for the past month ive been driving around with this problem on borrowed time.
I lifted the front of the truck up slightly to get a 5 gallon bucket under the passenger side drain plug on the radiator. Open the 19mm drain plug slightly and I only needed to drain about 3-4" of anti-freeze into the bucket. I probably could have gotten away with less, i also learned i need to flush my system.
once thats done tighten plug snug and lower the front of the truck back down. Be nice, its plastic.
I removed the Air Intake hose from the air box to the butterfly valve on the air intake. Remove sensors and plugs and set a side.
Remove upper radiator hose that goes from passenger side top radiator to the engine fitting that holds the thermostat (the part with the 2 bolts in it). This hose should be empty.
I removed the coolant hose end that connected to a separate horizontal pipe next to the engine block fitting. Shown in the picture below, its in the center top, you'll see the hose sitting to the left of the fitting it was plugged into.
Removing this will help you get to the hose that goes to from the water pump to the engine fitting (yellow arrow). I wasnt able to remove this hose until I got the thermostat housing off the block, so i just loosened the hose clamps at the water pump and at the engine fitting. Shown here in the center, at this point i had the bolts backed out.
Next i removed both 1/2" bolts that hold the fitting to the block. They started turning with very small amount of pressure, i was pleasantly surprised. Note: A common problem is to have the bolts snap off in the block, i was lucky enough i just used a shot of PB, let them sit for a while and they came right out.
You may want to stuff a rag below the fitting we're about to take off, when it comes off, a little bit of coolant will come out onto the engine from the block.
Slight tap knocked the fitting off the block with the one hose still attached but now with the fitting loose and the thermostat clear im able to get a better grip to get that small hose to pull it off.
Note the thermostat condition! OUCH!!
Remove the fitting now that the hose is free.
Stuff a lint free rag into the hole on the engine. I used a wire brush to clean any gasket bits from the engine. On the thermostat housing I used a wire brush, and wire wheel to clean the gasket off as well as coolant build up around the hose fittings.
Once the metal is shiny and nice on both surfaces set your new thermostat into the housing, spring facing rear of truck (as if it were installed on the truck), and set the new gasket onto the fitting over the thermostat. Now your ready to place all this back onto the truck.
(i did not coat the fitting with anything, i suppose you could/should?)
with bolts in hand, place the fitting complete with thermostat and gasket back onto the engine block. The long bolt goes in the top passenger side. Snug both of the bolts. Using a combination of 4" 2" 6" and universal joint i was able to finagle the bottom bolt in and out. The bolts arent impossible to get to, just takes a small amount of creativity. Once the bolts are snugged up, I torqued them to about 22 Nm.
At this point I was then able to reconnect the two small hoses, one from the water pump to the thermostat fitting, the other to that horizontal bar. Remember the hose clamps. Reconnect the large upper radiator hose. Reconnect the airflow intake hose and air filter box with sensors and plugs.
I poured a little bit of coolant into the top of the radiator fill, and i made sure the over flow tank had plenty of coolant in it.
Turn heater valve in cabin to full hot.
i started the truck, for about a half second it made an awful noise metal noise that I suppose was the water pump or something spinning without coolant in it but it went away immediately once the truck was done cranking over. The truck warmed up to operating temperature in about 10 minutes, something it hasnt done in a month
The job is really as easy at just 2 bolts, and the trickiest part is getting some of those old rubber hoses off without damaging them, and getting the 1/2" socket on the two bolts.
I ended up using 3 new hose clamps. After cleaning the coolant deposits off of the end fittings the spring loaded ford ones weren't tight enough. If you really wanted to plan ahead pick up upper, and lower coolant lines, and a few gallons of coolant you can change out those hoses and put new coolant in the system while your there. I did not.
Thats all really, i just wanted to put this post up for the community as a reference in case someone searches in the future, good luck its easy.