muzzymaniac
Well-Known Member
- Joined
- September 10, 2007
- Messages
- 438
- Reaction score
- 0
- City, State
- Kent, NY
- Year, Model & Trim Level
- 04 Explorer XLT 4.0L
Ok. I was at the local bone yard and spotted an 02 Mounty with a class III hitch. Hell ya! $30 and an hour later I left with the hitch.
I'm installing this on an 04 Ex XLT. All sizes listed are what I used on my truck - you may have different sizes on your truck.
Here's the class II to class III swap:
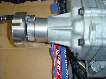
First - here's the class II and III side by side.

Open the hatch.
Remove tail lights. There are 2 screws on the inside frame that secure the lights. Once you remove the screws just wiggle and pull the lights straight back. Disconnect the lights and put some where safe.

Look down in the tail light opening and you'll see 2 screws. You want to remove the one toward the inside of the truck - it's kinda tilted back. Pic is of the left tail light and the bolt you want is circled. The screw is a 10mm.

Next is to remove all of the push things. Don't know what to call them. Basically use a flat screw driver to pry up the center post then pop out the whole thing.
I used this - a nylon trim remover.

Here are the pop things. They line the bottom of the hatch opening.

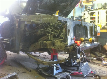
Crawl under the bumper. On each side where the cover meets the quarter panel you'll see a 7mm screw. Remove and put aside.

The cover should be pretty loose now. Gently pull up on the cover where it meets the quarter panel. It slides up only a 1/2" or so. There's a couple of hooks there that you don't want to break. Once the edges are free the rest of the cover should come right off.
I went around and cleaned all the areas that never see the light of day and sanded out a couple of real small rust spots and hit em with some rustoleum.
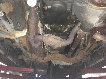
Now for the hitch...
Disconnect the upper electrical plug on the right side. Hopefully you were able to get the wire harness with your class III.

There are 3 18mm bolts on each side of the hitch. Remove. PB Blaster and a breaker bar or impact wrench come in real handy here.

Once the bolts are out just slide the hitch off. Yours may have a little rust/dirt hanging it up. Just grab a hammer tap away.
Installation of the class III is simply the reverse.
Before...

After...

A couple of notes....
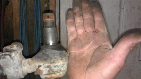
>Bolt/screw sizes vary. The hitch bolts on mine were 18mm and the ones from the donor Mounty were 15mm and much smaller. You need to use the ones that are original to your truck unless you get lucky and both are the same size.
size difference

>Use PB Blaster on your hardware and go slow. You don't need to go breaking any of it.
>Do your best to get the wiring harness from the class III donor. It makes life much easier and you'll have full use of the round trailer plug.
>I put never seize on all the threads during reassembly in case I ever want to take this apart again.
>Now go out and get yourself some 2" fun!!
I'm installing this on an 04 Ex XLT. All sizes listed are what I used on my truck - you may have different sizes on your truck.
Here's the class II to class III swap:
First - here's the class II and III side by side.
Open the hatch.
Remove tail lights. There are 2 screws on the inside frame that secure the lights. Once you remove the screws just wiggle and pull the lights straight back. Disconnect the lights and put some where safe.
Look down in the tail light opening and you'll see 2 screws. You want to remove the one toward the inside of the truck - it's kinda tilted back. Pic is of the left tail light and the bolt you want is circled. The screw is a 10mm.
Next is to remove all of the push things. Don't know what to call them. Basically use a flat screw driver to pry up the center post then pop out the whole thing.
I used this - a nylon trim remover.
Here are the pop things. They line the bottom of the hatch opening.
Crawl under the bumper. On each side where the cover meets the quarter panel you'll see a 7mm screw. Remove and put aside.
The cover should be pretty loose now. Gently pull up on the cover where it meets the quarter panel. It slides up only a 1/2" or so. There's a couple of hooks there that you don't want to break. Once the edges are free the rest of the cover should come right off.
I went around and cleaned all the areas that never see the light of day and sanded out a couple of real small rust spots and hit em with some rustoleum.
Now for the hitch...
Disconnect the upper electrical plug on the right side. Hopefully you were able to get the wire harness with your class III.
There are 3 18mm bolts on each side of the hitch. Remove. PB Blaster and a breaker bar or impact wrench come in real handy here.
Once the bolts are out just slide the hitch off. Yours may have a little rust/dirt hanging it up. Just grab a hammer tap away.
Installation of the class III is simply the reverse.
Before...
After...
A couple of notes....
>Bolt/screw sizes vary. The hitch bolts on mine were 18mm and the ones from the donor Mounty were 15mm and much smaller. You need to use the ones that are original to your truck unless you get lucky and both are the same size.
size difference
>Use PB Blaster on your hardware and go slow. You don't need to go breaking any of it.
>Do your best to get the wiring harness from the class III donor. It makes life much easier and you'll have full use of the round trailer plug.
>I put never seize on all the threads during reassembly in case I ever want to take this apart again.
>Now go out and get yourself some 2" fun!!


 Geoff
Geoff Thanks muzzymaniac for this great write up. I will have to make a word write up from this so I can take this info "to go."