daveatk81
New Member
- Joined
- September 15, 2011
- Messages
- 7
- Reaction score
- 0
- City, State
- Largo, Fl
- Year, Model & Trim Level
- 2001 Explorer Sport 4x2
This is my first post so bear with me. This is probably not a project for everyone, but I really wanted to do this to my explorer for a while.
I ordered Universal side markers on Ebay for like $10
Supplies I used:
Tape Measure or Ruler
Level
Tape, preferably masking tape
Cordless Drill/Screwdriver
Dremel w/ Metal Cutting Discs
Wire - Any wire that is the same thickness or thicker than the wire the Side markers came with
Strippers / Crimpers
Wire Connectors
Wire Hanger
Touch Up Paint
Heat Gun
Shrink Tubing

Disconnect Battery Ground Wire
To Start, the directions on the side markers said I needed a hole 7/8" X 1 1/8"
So I measured on my truck where exactly I wanted the side markers and marked the areas with electrical tape (I recommend using masking tape because electrical tape is impossible to keep straight, masking tape is already straight or it bends. Once I had my Square I leveled it with a level.

Next I grabbed my dremel, I took a deep breath, and right before I started to cut I decided to measure again and level again

so after all was fine I started the cut, I tried to keep the cut as clean as possible but it was tough, but I did fairly ok, but it was not a big deal because it would all be hidden behind the side marker. Here is the final first hole

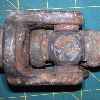
But there was a problem, if you look at the picture below there is a cross metal piece inside the fender and my side marker would not fit with it there, so I tried to cut a piece out of it and it would not even make a mark in that cross metal piece, I don't know why but I got real nervous because my side markers do not give me a lot of room to play around with so I cut the width 1/4" bigger toward the front of the car and it worked, the entire hole was covered, lessoned learned....

Once the hole was cut and the marker fit, I put the marker to the side and grabbed the wire and Wire Hanger. I bent the wire hanger to go from under the hood to the hole. Then I taped the wires to the end of the hanger and pulled them through to the hood. There is absolutely no room for hands or tools, so you need something like a wire hanger for running the wire through the fender.
Once the wire was run through, I Connected positive and negative to the side marker with wire connectors and covered this connection with shrink tubing and used the heat gun to shrink it tight. Then ran the wires on the side of the engine bay with zip ties, and made sure the wires were secured tight to where I wanted to connect ground too and the positive wire to the parking side lamp.
Then I took off the parking lamp next to headlight. There is 1 screw and it comes right out. Whether you are on driver side or passenger side, the blinker wire that you want is either Light Blue and White or the other side Light Green and White. Use the wire connectors that squeeze onto the 2 wires you want connected and it taps into the circuit.
Use a circle connector on the end of the ground wire and hook it up anywhere you like on the frame/body in the engine bay, just make sure the wire is out of the way and not going to melt from any heat.
Once the connections are secure, hook the battery ground wire back up and test your light by hitting the blinker, after you see that it works, put your side parking lamp back on.
Last I still had 2 screw holes to drill, so I put the marker in the hole I cut and marked the spots for the screw holes, once drilled, I screwed them in put the lens cover on and I was done! With this side at least....

Blinker on... its actually really bright, just doesn't look like it in the picture

Blinker Off...

I use this sight for everything when I have to do something with my explorer, so I felt like I should give back somehow. I know this was not the easiest project post to follow but I will get better eventually hopefully.
and I am probably going to put a fuse in between side parking lamp and side marker so if the side marker shorts out it will not short out my parking lamp or parking lamp fuse, I don't know if it is necessary though.
Good luck whoever does this, it looks great and I love that I did it!
I ordered Universal side markers on Ebay for like $10
Supplies I used:
Tape Measure or Ruler
Level
Tape, preferably masking tape
Cordless Drill/Screwdriver
Dremel w/ Metal Cutting Discs
Wire - Any wire that is the same thickness or thicker than the wire the Side markers came with
Strippers / Crimpers
Wire Connectors
Wire Hanger
Touch Up Paint
Heat Gun
Shrink Tubing
Disconnect Battery Ground Wire
To Start, the directions on the side markers said I needed a hole 7/8" X 1 1/8"
So I measured on my truck where exactly I wanted the side markers and marked the areas with electrical tape (I recommend using masking tape because electrical tape is impossible to keep straight, masking tape is already straight or it bends. Once I had my Square I leveled it with a level.
Next I grabbed my dremel, I took a deep breath, and right before I started to cut I decided to measure again and level again
so after all was fine I started the cut, I tried to keep the cut as clean as possible but it was tough, but I did fairly ok, but it was not a big deal because it would all be hidden behind the side marker. Here is the final first hole
But there was a problem, if you look at the picture below there is a cross metal piece inside the fender and my side marker would not fit with it there, so I tried to cut a piece out of it and it would not even make a mark in that cross metal piece, I don't know why but I got real nervous because my side markers do not give me a lot of room to play around with so I cut the width 1/4" bigger toward the front of the car and it worked, the entire hole was covered, lessoned learned....
Once the hole was cut and the marker fit, I put the marker to the side and grabbed the wire and Wire Hanger. I bent the wire hanger to go from under the hood to the hole. Then I taped the wires to the end of the hanger and pulled them through to the hood. There is absolutely no room for hands or tools, so you need something like a wire hanger for running the wire through the fender.
Once the wire was run through, I Connected positive and negative to the side marker with wire connectors and covered this connection with shrink tubing and used the heat gun to shrink it tight. Then ran the wires on the side of the engine bay with zip ties, and made sure the wires were secured tight to where I wanted to connect ground too and the positive wire to the parking side lamp.
Then I took off the parking lamp next to headlight. There is 1 screw and it comes right out. Whether you are on driver side or passenger side, the blinker wire that you want is either Light Blue and White or the other side Light Green and White. Use the wire connectors that squeeze onto the 2 wires you want connected and it taps into the circuit.
Use a circle connector on the end of the ground wire and hook it up anywhere you like on the frame/body in the engine bay, just make sure the wire is out of the way and not going to melt from any heat.
Once the connections are secure, hook the battery ground wire back up and test your light by hitting the blinker, after you see that it works, put your side parking lamp back on.
Last I still had 2 screw holes to drill, so I put the marker in the hole I cut and marked the spots for the screw holes, once drilled, I screwed them in put the lens cover on and I was done! With this side at least....
Blinker on... its actually really bright, just doesn't look like it in the picture
Blinker Off...
I use this sight for everything when I have to do something with my explorer, so I felt like I should give back somehow. I know this was not the easiest project post to follow but I will get better eventually hopefully.
and I am probably going to put a fuse in between side parking lamp and side marker so if the side marker shorts out it will not short out my parking lamp or parking lamp fuse, I don't know if it is necessary though.
Good luck whoever does this, it looks great and I love that I did it!