Blend door actuator and codes for dual zone controls | Ford Explorer Forums - Serious Explorations

  • Register Today It's free!

Blend door actuator and codes for dual zone controls

D Hook

Elite Explorer
Joined
October 10, 2010
Messages
1,137
Reaction score
94
City, State
Omaha, NE
Year, Model & Trim Level
06 Explorer Limited V-8
The blend door actuator on my 2006 Ltd. with dual zone controls failed a few months ago. Now that the weather is coming around would like to tackle this project. Found a blend door on Rock Auto but not sure it's correct one. Are the two doors different in any way? They both have the same part number so appear to be interchangable.


Doesn't say if this is for the left (drivers) side or right (passenger) side. I need the passenger side one.

Anyone have a correct part number for it?

I did a search on the board but didn't find much related to dual zone. No part numbers.

Thanks!


Join the Elite Explorers for $20 each year.
Elite Explorer members see no advertisements, no banner ads, no double underlined links,.
Add an avatar, upload photo attachments, and more!
.


I think they are the same part number for both front driver and passenger side. I bought two last year on Rock Auto, but only replaced one since only the passenger side was acting up. The part number is YH-1759 F7DZ-19E616-BA


Yes, that's the one they show. Good to know. Thanks!


As posted above, I think the blend door actuator is not working on the passenger side. But I don't get any clicking noise so not certain that's it. So I want to check for any codes in the panel display but not certain how to access them.

Can anyone post the instructions for getting to the diagnostic codes on the front HVAC panel? I found info for other ford products but can't seem to find anything for the Explorer with auto dual controls.

Pushing some different combinations I came up with: Press "Off" and "Defrost" at same time, then "Automatic" within 2 seconds. That brings up the fan icon, then shows two numbers: 22 on the left side of the display and 67 on the right side. Not certain what that means.

But can't find the correct button to clear the codes.

Any insight would be much appreciated. Have a new blend door to install but just want to check that the problem is that part and not something else. Plus, I've read somewhere that you have to clear the codes before the new blend door with calibrate correctly.

Thanks!


What initially led you to think it needed to be replaced? Symptoms mine had were when temps were set to 65 degrees or so on both the passenger and driver's side, the passenger side would blow warm air and wouldn't cool. I don't remember many clicking noises. The passenger side actuator would make a groaning noise sometimes. If you already have the part, I would say go ahead and replace it.


Mine is just the opposite; blows cold air all the time regardless of temp setting.

Thanks for the info on the groaning noise. I did have that too, before the temp setting stopped responding. No groaning noise now but won't respond to temp change.

Yes, planning on replacing it for sure. Was more curious about the codes that show up and if I'm using the correct method to get into the diagnostic mode of the front panel.

Thanks!


Thanks for the info on the parts number. Exact match for the one removed. I don't think the one I took out was an original FoMoCo part. It didn't have any Motorcraft markings. BTW, when I opened the old one, all the gears were intact. So I guess the motor must've burned out or something else. That's why I didn't hear any clicking under the dash. The last one of these I did was on a 2002 Explorer and that one clicked very loudly because one of the gears was stripped.

Ok, just finished up the actuator swap on the passenger side. Things to know:

1. Taking out the glove box door completely helps using two hands to handle the actuator but doesn't give you any better access to any of the bolts. But you'll want to have the door out when reinstalling.

2. Mine only had three screws holding it in so someone has changed out the actuator before and didn't put the 4th bolt in. Can't blame them. It's totally inaccessible without removing the whole dash. So after you get the three bolts out, check to see if it's loose or if you'll have to somehow remove that 4th bolt. Don't know how you'd do that without pulling the dash. All screws are 8mm.

3. There's a large wiring harness that runs right along the side of the actuator and is ALWAYS in the way, especially getting out the top bolt. There's no where to disconnect the harness so you just have to try to move it out of the way best you can. On mine, it prevented the socket wrench from backing out one of the bolts completely because the harness gets pinched against the steel brace that's part of the dash and then jams the wrench on the head of the bolt. So you have to get it out as far as you can with the ratchet, then switch to a open end 8mm wrench. Very slow going.

4. After getting the bolts out, the actuator slides out of the door socket and comes out freely. However, putting in the new one took the longest time of the project. The problem was that the socket where the actuator slides into was turned about 1/32" too far in one direction and wouldn't let the shaft align properly. And the door couldn't move since it was all the way against its stop. Spent about an hour trying to fight the harness in the way and the steel brace to get the actuator to align correctly. So I had to do some trickery to make it work.
a) Cut off the 4th ear that will not get a screw put back in anyway so it's no longer needed. Prevents that ear from hooking on wires.
b) Cut off 1/4" of the plastic shaft and file the edges. This gives just a touch more room to make the alignment work.
c) This was the trickiest part. After trying for another 1/2 hour trying to align the actuator shaft with the socket and having no luck, I decided,
since there was no returning the part anyway, I opened it up very carefully and looked at the gearing. I gently lifted the top gear and moved it one notch forward so the shaft no longer bottomed out against the outer case. This gave the shaft just enough of a turn to align with the
socket.
After that it slid right in. Having the glove box door off helped a lot to use two hands to help align the shaft/socket.

5. Be sure to plug in the new one before mounting it to be sure it turns as it should. Also, while you have it plugged in, use "Defrost/Off" buttons together and then "Automatic" within 2 seconds and you should see the fan icon come on. After a few seconds, you'll get all the icons to light up, meaning the new actuator is connected and operating as it should. If you still get the 24/67 numerical message, something isn't working right.

6. Mine was stuck on the coldest setting so I let the vehicle warm up and then pushed the "Dual" button and adjusted the temp to the coldest setting to watch the shaft turn. Once it reached it max position, shut off the heat system. Then, after you've pulled the old one out, compare the positions of the shaft to be sure they match.

7. After you have the actuator in place, use one screw to hold it temporarily. Just snug up the one screw to begin with. Then warm up the vehicle to running temp and test that the door is moving and the temperature on the passenger side responds to calls for heat or cooling. Then put in AT LEAST one more of the screws. If you can get all three back in, you're a better man than I!

Not something I'd like to do again.

Hope this helps.


Yeah I don’t recall it being a fun job to replace. Glad you like got it replaced. My hands are big and it was difficult to reach up in the recess. I too didn’t screw in that 4th screw as it was too much of a pita. The way I got the shaft piece to line up with the socket was turn the key on in the vehicle and set the temp to cold I think and then turned it back off and that allowed the socket to turn enough for the shaft to line up. There was some small round foam piece that was part of the original actuator but I couldn’t get it to seat properly so I just threw it away.
I also used a very small socket set I got online as that was the only size small enough that would fit up in the tight area where the actuator is located.


Yes, used a 1/4" socket set to get to the screws. Such a confined space didn't allow for much ratchet movement so it took some time on each screw.
And the foam also went away on mine.
My door was already set on cold before I started but still couldn't make the alignment work.
Watched a Youtube video about the actuators and general working practices and it sounds like, on mine, the gears didn't strip but rather, the contacts that tell the shaft were it is must've lost contact. When that happens, it will search for it's "home" spot and if not found will just stop moving. The video says that it will happen on these occasionally. So I have a spare set of gears and motor if I ever have a gear problem with another actuator. But as much of a PITA as these are to change I think I'll stick with putting in a new one if I need to replace again. Didn't use the Dorman part because of reported failure rates. Used this one instead:


use this part the motor craft part isn’t that much more and it’ll last longer

Also check this video out. I found it very helpful when I did mine:


Yes, I saw that video when I was searching for info on reading the codes. It's very short and doesn't discuss the codes at all but still helpful. Just wish he would've spent more time on the diagnostics and showed results after completion. It's important to note what the codes show before and after. Especially after, since the panel display test mode returns to it's normal status if the new part responds as it should. He's usually much more thorough than this but still helpful if you've never changed an actuator before and don't know where to start.

Thanks for the part number. If I ever have to replace this one (hope not) or the one on the driver's side, I'll use the Motorcraft part instead. Also important to be sure the door is free to move before installing the new actuator. Mine moved very easy.


As posted above, I think the blend door actuator is not working on the passenger side. But I don't get any clicking noise so not certain that's it. So I want to check for any codes in the panel display but not certain how to access them.

Can anyone post the instructions for getting to the diagnostic codes on the front HVAC panel? I found info for other ford products but can't seem to find anything for the Explorer with auto dual controls.

Pushing some different combinations I came up with: Press "Off" and "Defrost" at same time, then "Automatic" within 2 seconds. That brings up the fan icon, then shows two numbers: 22 on the left side of the display and 67 on the right side. Not certain what that means.

But can't find the correct button to clear the codes.

Any insight would be much appreciated. Have a new blend door to install but just want to check that the problem is that part and not something else. Plus, I've read somewhere that you have to clear the codes before the new blend door with calibrate correctly.

Thanks!
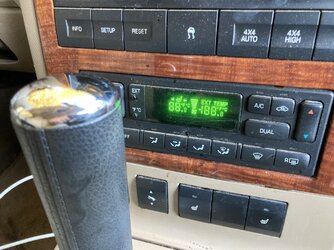
When I did the code check this is what I got, I have no idea what it means. Any ideas?

11652744-A8DE-4ECB-9BCD-667DAEE75C96.jpeg


Back
Top