OffTrac
Explorer Addict
- Joined
- February 22, 2010
- Messages
- 3,767
- Reaction score
- 14
- City, State
- Dublin, GA
- Year, Model & Trim Level
- '01 Sport Trac 4x4
My body mount bushings went from rotting and something to keep an eye on to completely gone seemingly overnight. If I had to do it over again, I would have just changed these out at the first sign of a problem. This really is not a tough job. Sorry if I state a lot of the obvious but I'm going to try to be thorough.
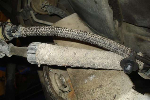
The problem:
These are shown in order, driver's A-D then passenger's A-D.


As you can see, the bushing under the driver's seat (B) and passenger's side C was gone, completely.
So, we have a clear diagnosis. I called my dealership (only shop I trust in my area, unfortunately) to see how much they'd charge to do this job for me as I was still not looking forward to this job and I'm not entirely opposed to paying for work even if I can do it myself. Quoted "at least six hours" at $95/hr = $570. That helped me get into my work clothes.
First, order your parts. I have an incomplete set of OEM bushings that are pending sale to everyone's favorite forum member. I wanted to do this job once and replace them all but ordering the missing ones was going to take too long to get since she needed emergency surgery. So, I ordered the Prothane kit 6-116-BL (there's also a red version for the more stylish among us). Ensure you have all the parts when they arrive.
Second, and something I neglected to do because my driveway is really long, gravel on half and dirt the other half and it's been raining all week, but wash the undercarriage before this job. I was as dirty after this job as messing with transmission fluid.
You may also want to spray your bolts with PB Blaster or Kroil. I didn't and did not find that necessary. Just use a propane torch. Which leads to the tools you'll need.
Jack
Four jack stands
Impact Wrench
Propane torch
Pry bar
Wrench and 5/8 socket
Torque wrench
To begin the job, remove the two scuff plates and kick panels. Just a slight tug and they'll pop out.


The driver's side kick panel has a plastic rivet that just pops out, the passenger does not and just snaps out.

Pull back your carpet and you'll see these rubber caps. I used a small pry bar to remove them but you can really just use your hand.

This is the bolt you're going to remove. You can loosen it now but I waited until I had all the carpet pulled back and all the rubber caps removed. Either way, just loosen, do not remove.

Move the front seats all the way forward. Remove the caps and the four nuts (5/8) from the base of the rear seat legs. Put them somewhere you won't lose them. Fold the seat up and pull the carpet toward the front. You may need to remove the caps on the back of the front seat but I didn't find it necessary. Remove the rubber caps.


Fold the seats back down to access the rear storage area. Remove the access doors so you don't break them. Remove your first aid kit, fire extinguisher and toilet paper. If you don't find these things back there, take a moment and reconsider some things.

You'll find the rubber cap in here. Remove.

Support the body on both sides with jack stands. I raised the body with the jack just enough to get the stands under the step bars, not really lifting the body, just giving support. The body lift, 35s and small jack means a few "jack extensions."

Loosen all bolts (forgot size but I'll try to remember to update) so that the body can be lifted away from the frame. Do not remove! Here's a good time to say that I did not do the A mounts at the front core. They were fine and I seem to remember there being something special about those mounts when I did the body lift. If I decide to go back and do them, I'll update.
Do yourself a favor and use a freaking torch. I tried without and while possible, it's just not as easy. Heating up those bolts and using an impact wrench makes this a couple seconds instead of two minutes of wrenching. Also attach a set of vice grips to prevent the bottom washer from spinning.


The D bushing (furthest rear) was in pretty good shape and required a much larger vice grip. You may find it easier to access on the driver's side by removing the e-brake cable but I didn't find it necessary.

When you're doing the D bushings, do not do this! There's a brilliant hole to the side of where you'll be working down in there. If you do happen to find yourself in this circumstance, do not spend 30 minutes searching for your flexible claw grabber pickup tool (does this have a real name?), give up and go buy one and then proceed to use this tool to drop the socket further into the body. My solution now is to either drill a hole in the body to remove it or fill it with expanding insulating foam to permanently add it to the body. I'm leaning toward the latter. Any other suggestions?

After you've wasted an hour and a half in frustration, move on. Put a regular socket on the impact wrench because you don't have another impact socket of that size; hope it doesn't round out. Be happy Jobsmart is actually pretty well made (good job Tractor Supply).Repeat both sides. Remember, do not remove!
Start on one side and remove one bolt and bushing set. Use vice grips and the impact wrench should pull the bolt right out. Replace the bushings. Prothane stamps the location and whether top or bottom onto each of the bushings. This is pretty idiot proof with the Prothane kit. I can't speak to the Daystar kit. OEM is obviously labeled with part numbers and you can match up with a Ford diagram. When the bushing is back in place, put the bolt back in just enough to get a few threads started. You'll still need some room to lift the body, especially if you have a body lift like I do. Repeat for the rest of the mounts.
The D bushings require some serious heaving and hoeing to remove. I've seen some people thread another bolt through the bottom and use a punch to knock it out from the top. I did not have a bolt in the correct size so grabbing with the large vice grips and violently shaking back and forth worked.
You will need to reuse the factory hardware. If the bushings have crumbled, it's easy to separate the bushing from the washers. If not, here's what I did. The only ones that really required any more than my small pry bar were the entirely intact D bushings. I just grabbed the bushing with the large vice grips and slammed it onto a scrap 2x6.

That provided a little separation and then I was able to use the pry bar to remove it the rest of the way.

I don't have any pictures after that but it's really just tightening all the bolts down after all of the bushings are replaced. I torqued down to 59 ft-lbs per Prothane's recommendations. I will check for tightness after a couple weeks of driving (less than 200 miles).
After all the bolts are tightened down, replace all the rubber caps. Put the carpet back in place. Rebolt the rear seats down and replace caps. Put kick panels and scuff plates back in place.
Test drive and revel in the great bump absorption, decreased body roll and silent ride (except for that damn socket now in the body).
Clean up your mess. Eat carry out Mexican and feel complete. Slightly regret that you didn't do this earlier and missed out on opening day of turkey season.
The problem:
These are shown in order, driver's A-D then passenger's A-D.
As you can see, the bushing under the driver's seat (B) and passenger's side C was gone, completely.
So, we have a clear diagnosis. I called my dealership (only shop I trust in my area, unfortunately) to see how much they'd charge to do this job for me as I was still not looking forward to this job and I'm not entirely opposed to paying for work even if I can do it myself. Quoted "at least six hours" at $95/hr = $570. That helped me get into my work clothes.
First, order your parts. I have an incomplete set of OEM bushings that are pending sale to everyone's favorite forum member. I wanted to do this job once and replace them all but ordering the missing ones was going to take too long to get since she needed emergency surgery. So, I ordered the Prothane kit 6-116-BL (there's also a red version for the more stylish among us). Ensure you have all the parts when they arrive.
Second, and something I neglected to do because my driveway is really long, gravel on half and dirt the other half and it's been raining all week, but wash the undercarriage before this job. I was as dirty after this job as messing with transmission fluid.
You may also want to spray your bolts with PB Blaster or Kroil. I didn't and did not find that necessary. Just use a propane torch. Which leads to the tools you'll need.
Jack
Four jack stands
Impact Wrench
Propane torch
Pry bar
Wrench and 5/8 socket
Torque wrench
To begin the job, remove the two scuff plates and kick panels. Just a slight tug and they'll pop out.
The driver's side kick panel has a plastic rivet that just pops out, the passenger does not and just snaps out.
Pull back your carpet and you'll see these rubber caps. I used a small pry bar to remove them but you can really just use your hand.
This is the bolt you're going to remove. You can loosen it now but I waited until I had all the carpet pulled back and all the rubber caps removed. Either way, just loosen, do not remove.
Move the front seats all the way forward. Remove the caps and the four nuts (5/8) from the base of the rear seat legs. Put them somewhere you won't lose them. Fold the seat up and pull the carpet toward the front. You may need to remove the caps on the back of the front seat but I didn't find it necessary. Remove the rubber caps.
Fold the seats back down to access the rear storage area. Remove the access doors so you don't break them. Remove your first aid kit, fire extinguisher and toilet paper. If you don't find these things back there, take a moment and reconsider some things.
You'll find the rubber cap in here. Remove.
Support the body on both sides with jack stands. I raised the body with the jack just enough to get the stands under the step bars, not really lifting the body, just giving support. The body lift, 35s and small jack means a few "jack extensions."
Loosen all bolts (forgot size but I'll try to remember to update) so that the body can be lifted away from the frame. Do not remove! Here's a good time to say that I did not do the A mounts at the front core. They were fine and I seem to remember there being something special about those mounts when I did the body lift. If I decide to go back and do them, I'll update.
Do yourself a favor and use a freaking torch. I tried without and while possible, it's just not as easy. Heating up those bolts and using an impact wrench makes this a couple seconds instead of two minutes of wrenching. Also attach a set of vice grips to prevent the bottom washer from spinning.
The D bushing (furthest rear) was in pretty good shape and required a much larger vice grip. You may find it easier to access on the driver's side by removing the e-brake cable but I didn't find it necessary.
When you're doing the D bushings, do not do this! There's a brilliant hole to the side of where you'll be working down in there. If you do happen to find yourself in this circumstance, do not spend 30 minutes searching for your flexible claw grabber pickup tool (does this have a real name?), give up and go buy one and then proceed to use this tool to drop the socket further into the body. My solution now is to either drill a hole in the body to remove it or fill it with expanding insulating foam to permanently add it to the body. I'm leaning toward the latter. Any other suggestions?
After you've wasted an hour and a half in frustration, move on. Put a regular socket on the impact wrench because you don't have another impact socket of that size; hope it doesn't round out. Be happy Jobsmart is actually pretty well made (good job Tractor Supply).Repeat both sides. Remember, do not remove!
Start on one side and remove one bolt and bushing set. Use vice grips and the impact wrench should pull the bolt right out. Replace the bushings. Prothane stamps the location and whether top or bottom onto each of the bushings. This is pretty idiot proof with the Prothane kit. I can't speak to the Daystar kit. OEM is obviously labeled with part numbers and you can match up with a Ford diagram. When the bushing is back in place, put the bolt back in just enough to get a few threads started. You'll still need some room to lift the body, especially if you have a body lift like I do. Repeat for the rest of the mounts.
The D bushings require some serious heaving and hoeing to remove. I've seen some people thread another bolt through the bottom and use a punch to knock it out from the top. I did not have a bolt in the correct size so grabbing with the large vice grips and violently shaking back and forth worked.
You will need to reuse the factory hardware. If the bushings have crumbled, it's easy to separate the bushing from the washers. If not, here's what I did. The only ones that really required any more than my small pry bar were the entirely intact D bushings. I just grabbed the bushing with the large vice grips and slammed it onto a scrap 2x6.
That provided a little separation and then I was able to use the pry bar to remove it the rest of the way.
I don't have any pictures after that but it's really just tightening all the bolts down after all of the bushings are replaced. I torqued down to 59 ft-lbs per Prothane's recommendations. I will check for tightness after a couple weeks of driving (less than 200 miles).
After all the bolts are tightened down, replace all the rubber caps. Put the carpet back in place. Rebolt the rear seats down and replace caps. Put kick panels and scuff plates back in place.
Test drive and revel in the great bump absorption, decreased body roll and silent ride (except for that damn socket now in the body).
Clean up your mess. Eat carry out Mexican and feel complete. Slightly regret that you didn't do this earlier and missed out on opening day of turkey season.