Changing a radiator | Ford Explorer Forums - Serious Explorations

  • Register Today It's free!

Changing a radiator

JTH1972

Well-Known Member
Joined
June 8, 2010
Messages
167
Reaction score
0
City, State
Kelowna, BC
Year, Model & Trim Level
96 XL V6 4X4
So, I'm about to tackle this project tomorrow.

Besides for application of common sense, does anyone want to share some mishaps or "I wish they would have told me before hand" moments you'd care to share?


Join the Elite Explorers for $20 each year.
Elite Explorer members see no advertisements, no banner ads, no double underlined links,.
Add an avatar, upload photo attachments, and more!
.


Should be fairly straight forward. If you have an automatic the lines going to the rad may give you some trouble if the fittings are rusted to the tube. Take your time, wiggle them back and forth with some rust penetration, tighten, loosen, repeat.


I don't know if the manuals say to remove the fan/fan clutch assembly, but I always removed the fan/fan clutch when changing the radiator. Just makes more room to work.


If you dont have a fan clutch removal wrench set, fan/fan clutch removal is not nessesary. Here are some tips for fast radiator removal:

1) Drain cooling system of course. there is a port on the lower passenger corner of the radiator that, while slow, will drain the radiator and wont create such a mess

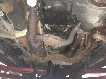
2) Undo Fan shrough (2 8MM bolts) and slide it towards the motor over the fan. Leave there.

3) Robo Grip pliers work wonders on the stock radiator clampy-clamp hose fittings. I would go ahead and replace these with traditional style radiator clamps. And since youre in here, change out the upper and lower hoses as well. Being an OHV motor, you want the cooling system in tip top shape.

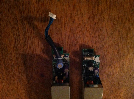
4)Trans Lines. They can and will turn on you. Hold the bigger tab with one wrench, and apply pressure to the nut with a second wrench. It's not on tight, but may be corroded. When putting them back in on install, apply teflon tape. Every trans line fitting ive ever put back on has leaked. This fixes it.

5) remove the 2 10MM bolts holding the radiator in, push towards the motor slightly, and wiggle it on out. It will catch on the shroud, hoses, fan, your mother-in-law, but it does come out.

Just take your time, accept you will have to clean up coolant off the floor/ground afterward, and enjoy yourself on a job well done with a spanking new radiator :thumbsup:


I don't know if the manuals say to remove the fan/fan clutch assembly, but I always removed the fan/fan clutch when changing the radiator. Just makes more room to work.

I'm probably going to end up replacing the water pump anyway since I'm this deep into it, so I'm sure I'll be pulling that too.


Take your sweet time loosening the water pump bolts, especially if it's the original water pump. You don't want one of those snapping. It's ok to use a 3/8" flex handle/breaker bar to crack them loose, but take it easy and loosen/tighten/loosen/tighten then give it time to cool rather than get in a rush and snap a bolt.

Use water pump / thermostat gasket sealant on the water pump gasket. Sucks to do the job then have the water pump gasket leak.

Torque the water pump bolts to spec with a torque wrench.

Tighten the fan blade to fan clutch bolts really good. Torque them if you can.

Replace the heater hoses with high quality 5/8" hose. Gates Green Stripe is good stuff. Regular parts store heater hose is fine, though.

Use constant torque clamps for heater and coolant hoses if you can. No more leaks!

Sand down and paint the water outlet neck with rustoleum engine primer/paint if it's rusty and you don't want to buy a new one for $30-40 in a few more years. Or, buy a new one and replace it now.

Don't use Prestone or anything Dex-cool for coolant. Use Zerex G-05 or Zerex Green. Napa sells both. Use distilled water for a 50/50 mix.

Follow the factory burping procedure to purge air. Fill radiator and coolant reservoir, put cap on halfway to first click, still loose, run motor until thermostat opens with heater on high once it starts to get to opening, let cool completely, refill, put cap on halfway again, run motor again, heater on high once it starts to get warm, when thermostat opens turn off, let cool, refill radiator and top off reservoir. Seems like a hassle but beats getting a big air bubble in there that sticks the thermostat closed and sends the engine into fits with the building pressure. Also beats having to change out a brand new thermostat you just put in.

Check for leaks over the next few days, just in case.


In hindsight, I might not pull the water pump. Despite the upper grime, the lower part of the pump looks kinda shiny. Maybe replaced by previous owner?

Also, I found a new coolant leak while looking under the motor so I'm going to post pics of that one later and see if anyone has any advice on that one.

If the rad hoses look in decent shape, do they need to be replaced?

Why does every Explorer rad I've seen around this age all seem to have a leak from the upper passenger side of the rad?

While we're on the topic too with fan clutches, how can you tell if the clutch is gone?


If the hoses are OE they should be replaced.


The one does have "Motorcraft" on it, but could be factory replacement? They don't look like 18 year old hoses.


Worm clamps or spring clamps? If the hoses are the least bit hardened they should be replaced. If one springs a leak it means a set of heads.


Worm clamps or spring clamps? If the hoses are the least bit hardened they should be replaced. If one springs a leak it means a set of heads.

Definitely spring clamps on the lower hose, and that's the OE one. That will for sure be replaced and get new clamps for it. Upper one is definitely not OE and I'm trying to remember if I replaced it already or not? that's the fun of trying to do maintenance on a couple of vehicles.


Err on the side of caution, I lost a rad hose and had to do the top end. Pretty annoying as I had thought to change them and had just not got around to it.


Replace all hoses and thermostat no matter when they were changed last and use new clean fluids!

if any wonder why just ask and I can tell you how one by one I blew hoses over a few months because I did not do that and then lost the T stat in the end also. All coasted me more in the end then the pennies I saved at the start! I am now old and wise not young and dumb like then LOL Also get good screw hose clamps not cheap ones there worth there weight in gold again a few pennies saved up front can cost a lot down the line been there done that and have a PHD from that school!


It's usually worth replacing the hoses when you're completely draining the system anyway, rather than wait until it goes and then go through it all just to replace a single hose.

Hoses will last a long time, but if the rubber is stiff from all the use and hot-cold-hot-cold temp changes, it can eventually crack or tear, and even a small small opening can spray out an impressive amount of coolant under pressure.

I know you're doing the job soon, but I'm selling a kit with hoses and thermostat if you wanted to save money that way:

http://www.explorerforum.com/forums/showthread.php?t=365870


A leak from the upper passenger side could just be from a connection leak at the hose. The radiators do eventually leak from the tank seals though, they are just plastic tank sides clamped on to an aluminum body with rubber seals. Using good coolant helps though, the new stuff like Prestone and Dex-cool type coolants take a toll on them and cause leaks. Zerex Green is some of the last real "Green" color coolant like the stuff that came in the Explorer when it was new. Zerex G-05 is the yellow stuff that has been in newer Fords for the last few years. Works great in the Explorer.


A leak from the upper passenger side could just be from a connection leak at the hose. The radiators do eventually leak from the tank seals though, they are just plastic tank sides clamped on to an aluminum body with rubber seals.
No, this is definitely leaking from the tank right at the top. No sign of leaking from that hose. There's usually the top of the rad, the battery, plastic air intake line, and upper hose covered in a shower of green. Which is why I'm replacing the rad in the fist place.

Using good coolant helps though, the new stuff like Prestone and Dex-cool type coolants take a toll on them and cause leaks. Zerex Green is some of the last real "Green" color coolant like the stuff that came in the Explorer when it was new. Zerex G-05 is the yellow stuff that has been in newer Fords for the last few years. Works great in the Explorer.
Besides for Prestone and regular "store brand" stuff (Napa, Canadian Tire) I don't think I've seen the other stuff up here. I'll keep my eyes open though.

Nice price on the parts. One hose up here would probably cost me what you want for the whole thing. Unfortunately, I need to try to get this done soon, and it'll cost me more in topping up the antifreeze while waiting for the parts to arrive (2-3 weeks easily, and then more with Christmas on the way).


Removing the big nut behind the fan clutch is much easier than removing all the pulley bolts with a 1/2 inch wrench. Just did it today. To break the big nut loose I still had to hold one of the pulley bolts with the 1/2 inch wrench, but it didn't take much force. Once the fan assembly and shroud are out of the way, the radiator is a piece of cake to remove. I think the big nut is 1 1/4" if you have a wrench that big.

On my '92 (RIP), a quick hit with a hammer on the side of the wrench was all it took to knock the big nut on the clutch loose, but that didn't work today on my '94.

Edit: As you're standing in front facing the engine, the big nut loosens in the counter-clockwise direction.


It just makes sense to do all of the cooling system.

Here's how mine went:
12-16-2010 purchase truck from lot (was an impound) noticed water leak from water pump had dealer change water pump.

Noticed temp gauge spiking and no heat--- heater core failure changed that the next day.

Noticed a water leak from radiator, kept it full.

I asked an opinion of a mechanic and the ford 4.0, said don't let it run hot. I took the advise to the fullest.

02-05-2011
Replaced radiator and hoses, new coolant.

10-31-11
thermostat failed stuck shut changed the following day and replaced with a 180 degree stat to allow more warning on chance of failure.

8-31-12
thermostat failed-changed

9-22-12
again the flippin thermostat failed me.... changed so far so good.

I run a 180 degree unit and know where it runs on the factory gauge, anything beyond the "R" in NORMAL is a failure, also where I live it isn't blistering cold in the winter, so I don't need to OE temp.

the 195 degree unit runs between the "RM" when my 195 failed it got to the "L" thank goodness it was 20-25 degrees outside to cool off the truck until I got home.


Doesn't running a cooler thermostat also increase fuel useage?


Doesn't running a cooler thermostat also increase fuel useage?

Without getting too much into therodynamics and stoichiometric calculations, if the motor never reaches operating tempurature, then the pcm will run just a tad richer in order to make the combustion event hotter, thus raising the temp of the engine. If the engine never reaches operating temp, then the rich mixture will continue, thus not only decreasing fuel economy, but also wearing out the o2 sensors faster.


Join the Elite Explorers for $20 each year.
Elite Explorer members see no advertisements, no banner ads, no double underlined links,.
Add an avatar, upload photo attachments, and more!
.


Without getting too much into therodynamics and stoichiometric calculations, if the motor never reaches operating tempurature, then the pcm will run just a tad richer in order to make the combustion event hotter, thus raising the temp of the engine. If the engine never reaches operating temp, then the rich mixture will continue, thus not only decreasing fuel economy, but also wearing out the o2 sensors faster.

I'm not disputing the above, but I get the same mileage as I did with the OEM 195 degree t-stat.

My direct reasoning for running the lower temp t-stat is to have more advanced warning of overheating issues.

When my 195 degree t-stat failed on a 30 degree evening I didn't notice the gauge until it was almost too late, and since the factory heads are prone to cracking when they overheat, this is merely added insurance for me.


Back
Top