HID Fog Install Questions | Ford Explorer Forums - Serious Explorations

  • Register Today It's free!

HID Fog Install Questions

aaronc_98

Member
Joined
May 3, 2011
Messages
21
Reaction score
0
City, State
Maple Grove, MN
Year, Model & Trim Level
2013 Explorer Limited
For those who have install HIDs for fogs:

- what do you need to do to access the bulbs?
- Where did you mount the ballasts?

I know the bulbs are H11, any other hints?

Thanks,

AC


Join the Elite Explorers for $20 each year.
Elite Explorer members see no advertisements, no banner ads, no double underlined links,.
Add an avatar, upload photo attachments, and more!
.


Are you just trying to match the factory HID bulb color? If so Sylvania has a new line of bulbs that are the whitest they have ever made and are the same color temp as factory HID. They are the ZXE line.


For those who have install HIDs for fogs:

- what do you need to do to access the bulbs?
- Where did you mount the ballasts?

I know the bulbs are H11, any other hints?

Thanks,

AC

As far as install once under the car u will c a plastic guard keeping u from getting to the fogs. There are 3 10 mm bolts that need removed and u can hold it back while doing install. As far as mounting there is a metal bracket on the inside of each fog that I used to do install. Ill upload a pic tomorrow if that will help. U will love the HID addition


Like wvusport said, you need to unscrew those 3 10 mm bolts. I also unscrewed the 4 screws running inside the finder flare to gain better access to the foglights. There's more than 4 screws there but all i needed to unscrew were 4. The passenger side foglight is the trickiest because a fluid reservoir is right behind the access hole to the foglight. Taking the OEM fog out wasn't the problem, it was screwing the new one in. I don't have the smallest hands, so that could have been the reason it was the issue. others may not have had the same problem. I ziptied the ballasts and excess wires up higher to avoid possible exposure to water.


wvusport - looking forward to the pics.

thanks

AC


wvusport - looking forward to the pics.

thanks

AC

Hey sorry took so long. I just went out and took pics. Its kinda dirty, but you'll get the idea.

HIDfogs3_zps9626a28c.jpg

This pic is an overall. If you see the green zip tie, its an additional holding of the ballast with the provided 3M tape.

HIDfogs2_zps519c1362.jpg

Here is another pic. Once it gets warmer outside, ill clean it up a bit, but for , now it will do.

Hope this helps. I have a lot more photos if there is another angle your looking for, just let me know!


Good deal- thanks. I will likely just zip tie them as you did...

thanks,

AC


Good deal- thanks. I will likely just zip tie them as you did...

thanks,

AC

No prob, and BTW, the three bolts on the bottom are 8mm, not 10. I think I wrote that they are 10, I was wrong!


Do you need the wiring harness for the Fogs? I ordered it from DDM but the installation instructions don't mention the wiring harness. I got it working without the harness but a couple times I started the Explorer and the driver's side didn't come on. That only happened twice after initial install and then it fired right up the next 12 times in a row although it did have a slight flicker at start up that the passenger side did not have.

Also, the rubber gromet that is says to slide up to the back of the bulb to protect it from the elements won't lay flat or slide all the way down due to the other wiring coming out of it. I have it pushed as close as I can get it.

No you don't need to extra wiring harness. Everything you need comes with the kit. No need to buy the extras available. In order to get that rubber grommet up the hole, I had to the rubber in between the two holes of the grommet in order to slide it up. So I have one hole instead of two tiny holes now. With the flickering problem, just make sure all the connections are fully clipped. Should do the trick.


I installed my Morimoto headlight kit from TRS this weekend on my Ex Sport.When installing the bulbs in the headlight housing be extra careful, i bent the return wire and broke the brown protective sheath on it, i had to order new bulbs from the Retrofit Source. i have one dead spot in the lighting pattern in front of the drivers side, I ran out of time on Sunday night to investigate. I'll get some pictures up soon of the complete install.

Only installed the headlights for now, I'm in the process of fabricating brackets for the fog light ballasts behind the lower bumper fascia.


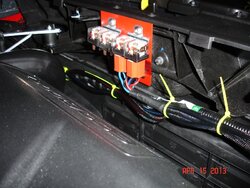
Picture of my TRS installation, fabricated brackets for relays and ballast then powder coated. Probably too much time invested but it was fun. The empty relay is for the fog light HID conversion (not installed yet). Zip ties are temporary, going to remove excess wire lengths from the harness as the last step in install.
 

Attachments

  • driver side 1.JPG
    driver side 1.JPG
    135.5 KB · Views: 872
  • pass side 1.JPG
    pass side 1.JPG
    141.8 KB · Views: 855
  • relay harness mount 2.JPG
    relay harness mount 2.JPG
    105.7 KB · Views: 840
  • relay harness mount.JPG
    relay harness mount.JPG
    171.2 KB · Views: 859


Iraia did you ever find out the cause of the deadspot? I see a similar issue with my TRS kit also on the driver's side.


I haven't had a chance to investigate the deadspot, but I suspect it is due to a combination of a marginal projector (halogen OEM) and the bulbs used by TRS. I have two sets of 5000k 9005 bulbs and the results are the same. The bulb does not seat 100% in the headlight assembly, I can "wiggle" it a little, I fabricated a "spacer" to add to the bulb base, but haven't installed it yet to comment. The focal length of the bulbs, OEM 9005 halogen and 9005 HID, are the same.
 

Attachments

  • DSC00019 800 x 600.jpg
    DSC00019 800 x 600.jpg
    140.3 KB · Views: 758


Iraia, good work on the install, appears as though you take pride in your work. Nice and clean.


I haven't had a chance to investigate the deadspot, but I suspect it is due to a combination of a marginal projector (halogen OEM) and the bulbs used by TRS. I have two sets of 5000k 9005 bulbs and the results are the same. The bulb does not seat 100% in the headlight assembly, I can "wiggle" it a little, I fabricated a "spacer" to add to the bulb base, but haven't installed it yet to comment. The focal length of the bulbs, OEM 9005 halogen and 9005 HID, are the same.

I also have the loose bulb issue. Pics of spacer?


I also have the loose bulb issue. Pics of spacer?

I installed the spacers I fabricated with the TRS bulbs, I'll post a photo of them tomorrow, it did not rectify the dead spot to the left of center of both headlight assemblies at all, I "assume" it is a combination of the inferior reflector, projector lens that Ford has implemented and the aftermarket bulbs from TRS in the assembly that have contributed to the overall light output, for what it is worth, upgrading the OEM Halogen to an aftermarket HID, in the end, is going to give you a better quality of light. (Holy run on sentence) but by no means, it is better than OEM.


Iraia, good work on the install, appears as though you take pride in your work. Nice and clean.

Thanks, I appreciate the response, one of my professors in Architecture school once said to me "God is in the details" so I take that for what it is worth. Cheers.


Join the Elite Explorers for $20 each year.
Elite Explorer members see no advertisements, no banner ads, no double underlined links,.
Add an avatar, upload photo attachments, and more!
.


I also have the loose bulb issue. Pics of spacer?

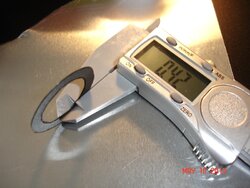
Here are the photos I promised. I used a plastic report cover to cut out the spacers, I'm sure you could buy one from Office Depot or such. The first picture is the halogen base thickness, the second is the HID base thickness, the third picture is a similar spacer I used for the bulb base thickness and the last is the actual thickness of the plastic report cover.
 

Attachments

  • HID bulb with spacer.JPG
    HID bulb with spacer.JPG
    141.9 KB · Views: 751
  • HID base thickness.JPG
    HID base thickness.JPG
    155 KB · Views: 749
  • halogen base thickness.JPG
    halogen base thickness.JPG
    124.1 KB · Views: 757
  • spacer thickness.JPG
    spacer thickness.JPG
    122.3 KB · Views: 737


Back
Top