MMR custom face gauges (FINALLY!) | Ford Explorer Forums - Serious Explorations

  • Register Today It's free!

MMR custom face gauges (FINALLY!)

Spas

Explorer addict
Elite Explorer
Joined
August 27, 2001
Messages
5,490
Reaction score
101
Location
Down by da river, hon
City, State
North East, MD
Year, Model & Trim Level
'95 Sport
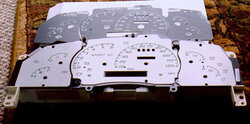
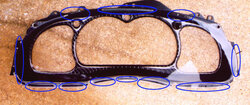
Hey, everybody! Here's pics of my new slivery white face gauges that I've been promising for the last 2 months!

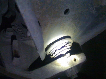
The writing has been changed to a slanted, 'serpentine' font and some of the original dummy lights have been removed, like the fuel reset and RPMs x 1000... They're a shade of white with silver sparkles, so they're really luminescant in dim light-I love it! There's a faint green glow about the whole faces when it's dark outside, but it's not that noticable-the numbers are MUCH brighter, however :D MMR makes these babies in red, yellow, blue and silver/white, with (I think) either blue, green, red or white letters...I'll have to check. I like them a lot, especially my little "SPORT GT" where the rpm's used to be.

I'll post better pics as I get them!
 

Attachments

  • dash new.jpg
    dash new.jpg
    57.1 KB · Views: 929


Join the Elite Explorers for $20 each year.
Elite Explorer members see no advertisements, no banner ads, no double underlined links,.
Add an avatar, upload photo attachments, and more!
.


thasts sweet spas even another great addition to your great x :D


Looks great

:D :D


Pic #2
 

Attachments

  • dash old n new.jpg
    dash old n new.jpg
    72.9 KB · Views: 854


Oh yeah, and that's a new carbon fiber bezel around the faces :D


Looks great, I made my owns on photoshop, but I used one downloaded from someone here at the forum, some items where missed, and I drop the project...:(
Do you have the photoshop file?? It will be very helpfull...

Great job...!!


hey spas how would i go about getting that done for my x ?


any pics of them on at night?


They look really nice Spas. I like the carbon fiber guage bezel. It looks good with the light colored guages. How did you do it?? Or where did you get it??


Spas,
Man, I gotta Know where you got the guage faces and carbon fiber bezel.


Good work Linsey, nice addition to a nice Explorer.

Happy trails!!


WOW

Thanks for the compliments gang!! :bounce:

Here's the link to MMRUSA:
Dead Link Removed

Terry is the gentleman who arranged for them to be made. He should already have the template for a 98-2001 X so they shouldn't take too long to make ;)

Oso- I kind of deleted the photoshop file (sorry!), but I still have the JPEG copy that I made, if that would help. I was surprised how identical my new gauges are to the photoshop image I made..

The carbon fiber bezel I won on Ebay-the guy who sells them almost always has a few for sale. Just type in 'Explorer bezel' in the search box. One word of caution though: to put that bezel on you have to break the plexiglass cover that protects the gauges. BE VERY CAREFUL, CUZ THAT PLASTIC BREAKS EASY! Thank God that you can't see the crack that I put in mine..Super glue really is your best friend when it comes to these things. :D Speaking of, you'll need it to glue down the gauge faces so they don't pop up and cause your needles to stick (Geez, I only tore the dash apart 4 times to figure that one out :rolleyes: )

The best thing to do is to leave the plexiglass off while you drive around for a day or so, so you can just reach through and adjust them as needed. Best way to set the speedo is to have a pal with cruise control ride in front and put on the emergency blinkers or interior light when he/she hits the speed you're trying to set.

I'm still trying to take a picture of them at night, but I'm having a little difficulty getting my camera to take the shot without blurring it. That's the only gripe I have with the se gauges: The lights are bright, but it's unevenly distributed. By that I mean that some of the numbers and letters are a little darker then the others....Honestly it's not that noticable. I probably should have used more super glue to hold it down. Damned if I'm takin' that sucker apart again though! I've never cursed so much in my whole life! lol


Spas, thanks a lot for the information. What do you mean you have to break the plexiglass to put the bezel on?? Does it not fit properly or something??


Unfortunately, the original bezel is stuck to the plexiglass from the factory. In order to get the carbon fiber in there, you have to gently pry the 'glass' away from the bezel by snapping it along the edges. I only broke enough to slip the carbon fiber in there, over the odo trip reset (sweating bullets at the time, too!). After you super glue the plexiglass back down, you can't even tell that you broke it, because it dries clear and hides any cracks. The new bezel is actually just a strip of formed carbon fiber with an adhesive backing to it (It's REAL carbon fiber, too!). It goes on pretty easily...just make sure you have it properly lined up before you peel off that tape! Hope that helps :)


Oh yeah, I forgot that the clear plastic was stuck to the bezel pretty good. If I remember right, to take the bezel off, there are 6 or 7 little torx screws right?? So you're saying that the carbon fiber bezel sticks to the guages instead of being screwed on like the stock one??


They look great installed!

Hey,
The gauges look great installed in your 'splorer!!

I'll add the Explorer application to my site this week so anyone else can order them online. btw, there are actually 11 color options to pick from.
My favorite is the blue face with yellow letters.
Anyone who has questions, etc....call me toll free or email me.
Thanks Terry
mmrusa.com
1-888-542-3626


i cant find the explorer gauges on your website


I know, they are not on the site yet.
I'll have them on there later this week.
In the mean time, you can call if you have any questions, comments or want to order a set.
Terry


If I remember right, to take the bezel off, there are 6 or 7 little torx screws right?? So you're saying that the carbon fiber bezel sticks to the guages instead of being screwed on like the stock one??

Uhm. To take the PLEXIGLASS off, you have to remove 7 torx screws. There are two pieces to the whole gauge pod-the plexiglass cover and the actual gauges themselves. The factory bezel is actualy a molded piece of textured plastic that was sealed to the edges of the plexiglass by melting little tabs of the plexiglass to the bezel. In order to put the carbon fiber in there, you have to remove the protective cover (the plexiglass) from the gauge faces, and gently break some of the tabs (on the plexiglass). Super glue will hide any cracks you may put in the tabs after you slide the carbon fiber in. Better? :)

Hi, Terry! they sure look good, huh? ;)


Join the Elite Explorers for $20 each year.
Elite Explorer members see no advertisements, no banner ads, no double underlined links,.
Add an avatar, upload photo attachments, and more!
.


Here....the blue circles are where the tabs of plexiglass are melted onto the bezel..I broke three or four on the top to get the carbon fiber in...if that doesn't help then I'm just gonna have to drive out there and show you myself ;)
 

Attachments

  • dash bezel copy.jpg
    dash bezel copy.jpg
    94.6 KB · Views: 689


Back
Top