'92 X 302 Swap and more... | Page 2 | Ford Explorer Forums - Serious Explorations

  • Register Today It's free!

'92 X 302 Swap and more...

A minor set-back

well...got some bad news today. The alignment shop called this morning to report that the alignment is as close as we can get it. The camber is within 3%...but the front end should settle as the springs wear over the next month or so. If they don't settle enough as we expect...we may have swap out 2" coil spacers for some 1"....but hopefully not.

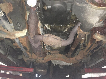
Now for the bad news...upon the shops test drive to check the alignment adjustments, he apparently went to brake and well.....it broke all right. The new extended rear driveline shattered at the splines. Apparently the axle flip kit failed some how and when he pressed on the brakes, the entire rear axle tilted forward....hard. Not sure how it happened, U-Bolts were torqued and re-torqued to spec....there is no way they were loose, though they were definately loose after the driveline broke. Upon reflection...the flip kit did seem more difficult than it should have been to install, and the U-bolts weren't exactly a symetrical install on both sides.

Never seen a lift give more grief than this....calling into the place that shipped us the parts to see if there was a screw up some how. The overall service wasn't the best to begin with.

Plans are to get another new driveline...and to fab up a rear axle set up. We're calling in the troops for this one. Pics and updates to come....one way or another...:roll: :thumbdwn:


Join the Elite Explorers for $20 each year.
Elite Explorer members see no advertisements, no banner ads, no double underlined links,.
Add an avatar, upload photo attachments, and more!
.


Please tell me you put a bigger drop pitman arm on this since you took those original post-lift pictures. Your steering will be horrific at highway speeds with it at that angle. A quick helpful part to buy to correct this a bit is the Skyjacker "extreme" drop pitman arm, the FA600 I believe. Not lookin to rip on you, but the prime steering setup on these cars will be setup close to horizontal about an inch above hub center IIRC.

http://therangerstation.com/Magazine/winter2008/steering_tech.htm
-This will give you some ideas.


If I were you I'd hunt down your stock springs for the rear, and reinstall those on top of the axle while removing those coil spacers. The skyjacker front springs are softer than any other bolt on kit for these cars - as you suspect they will settle 1-1.5 inches or so, and when they do, THEN I would say bust out those coil spacers and bolt them up. You can clear those 35's with ease with a 6 inch lift, I ran this setup for a while with no problems - trim out the lower rearward corner of each of the front fenders a little bit, and you should be rub free.

P.S. - Using the stock rear leaf packs on top of the axle, and removing the coil pucks, you can hunt down some stock drive-shafts and they will bolt in headache free.


Updates...

Thanks for the info. We were taking a good hard look at using the extended pitman arm for the reasons you mention during install. The kit of course doesn't come with it, so we used the one we had on hand. Honestly we haven't gotten far enough down the road yet to see how she handles. But now that we're going back to the drawing board a bit, I think that's what we'll end up doing.

The outfit that made our first extended driveline said they will stand behind their product. It shouldn't have broke the way it did, so they are going to make us a new one.

To alleviate the camber issue, we're going to swap out the 2" coil spacers for some 1"...did some measurements and that should take care of it. The real issue we're having regarding rubbing in the front has more to do with the dual shock set up. We also took some measurements and plan on putting 1/2" wheel spacers on to prevent that rubbing. We realize that this puts additional strain on several components, but we can't really think of a better alternative at this point.

The real question mark is the rear end. I now have a better understanding of what took place, but it's still somewhat a mystery about exactly what went wrong and why. Talked to the manufacturer today, and they are also going send us some new axle flip brackets to replace the ones that broke at the welds. I'll take some pictures and pass those along so you guys can see what I'm talking about.

What worries us is what will prevent the rear axle from doing the same thing...not sure if it was just a fluke or if we need to do some custom fabbing to strengthen the set up and give the driveline a better angle. Never heard of those brackets failing...I'll keep you guys posted.


Broken Axle Flip Brackets

So here are some pics. They aren't the best, its kinda hard to tell, but if you look close you can see the fractures that occurred on the rear side of the brackets.
 

Attachments

  • Broken Axle Flip Bracket.jpg
    Broken Axle Flip Bracket.jpg
    60.3 KB · Views: 1,570
  • Broken Axle Flip Bracket 3.jpg
    Broken Axle Flip Bracket 3.jpg
    73.5 KB · Views: 1,544
  • Broken Axle Flip Bracket 2.jpg
    Broken Axle Flip Bracket 2.jpg
    33 KB · Views: 1,534
  • Broken Axle Flip Bracket 4.jpg
    Broken Axle Flip Bracket 4.jpg
    31.8 KB · Views: 1,603


here's one for good measure...
 

Attachments

  • ...sigh.....jpg
    ...sigh.....jpg
    101.4 KB · Views: 3,756


waiting game....

Well I got on the horn today. New axle flip brackets are in the mail. 1" coil spacers should arrive tomorrow. I also got the 6-8" pitman arm (FA600) coming in the mail as well. As mentioned previously, the new extended driveline is also currently in the shop, we should have everything by the middle of next week.

Oddly enough, the manufacturer (Superlift) has had a few of the axle flip brackets fail at the welds before. They didn't have a lot of explanation as to why. They do have what they call a limited lifetime warrenty on their parts....not sure what that means. Needless to say, we're not feeling the most confident in their product at the moment, but since it's free....we'll give it another shot.

I'll keep ya'll posted as things develope.


You could just switch to generic spring perches instead of using the superlift kit. your truck looks good. hope everything works out this time around.


If I were you, I'd be welding those spring perches to the axle.


Yeah, that's what we're planning to do, don't want to take any more chances. Obviously, the brackets are meant to work so you don't have to weld them on...but we don't really have anything to lose from welding, I'd rather sell the rig before I ever take this lift set up off.


wait wait...they weren't welded on in the first place? :roll:


maybe I'm all wet here....I thought the Superlift axle flip brackets or "spring perches" were designed so you didn't have to weld them onto the axle? The install instructions said nothing about it, and when speaking to the manufactuers and the distributer (they also install the lifts themselves) they said welding wasn't required.

Now that I think about it though, I do recall reading from some others on the forum that they did do some welding with this system to make sure, and avoid this same issue I faced.


Getting Road Worthy...

After one screw up after another between Superlift and Jackit.....:mad:, The Ex is finally getting it's final alignments done today. Along with that we'll be putting on the extended drop down pitman arm, swapping out the 2" coil spacers for 1" coil spacers, and putting on 1/2" wheel spacers to keep the front tires from rubbing the dual shocks at full articulation. Ahh yes, also welding up the rear leaf spring perches to make sure the axle doesn't go anywhere this time. Will send an update and some pics upon completion :D


I hope everything stays together this time!


diggin the setup. lookin forward to seeing the 5.0 swap.


thanks man, me too! haha...


what parts in the drive line had to be extended?


Update

I had a machine shop extend the driveline. They extended the tube itself.

Well we drove her home from the alignment shop today.....running like a dream. Honestly its the best ride its been for over two years. We ended up passing on the wheel spacers as they actually caused the tires to rub because of the adjusted angle. As of now, there is a still a lil rub at full articulation on the second shock...but you really have to be cranking hard.

Took care of some things while the front end was under the knife including new wheel bearings, new ball joints, and new u-joint. All of which were pretty due.

The 4.88 gears are perfect, they balanced with the 35x12.5s well, getting off the line feels stock again.

the KM2's feel smooth down the HWY.....it was raining pretty good on the way home, we were throwing water our the front of the rig which was cool to see. The bigger tires almost adjusted the speedometer back to normal to counter the change the gears made.

1" coil spacers in front with the 4" leaf under lift springs (now in a leaf over configuration) in the rear gave us just the rake we were looking for. About 6.5" in the front of total lift, and about 8" of lift in the back.

Stearing was great, for the first time since I've owned the vehicle it doesn't pull to one side going down the highway. Chalk that up to a good alignment and the Dual steering stablizer.

Really happy with the end product. Pictures to come!


Lessons Learned

First, make damn sure you check the welds when you get the axle flip rear leaf spring perches from Superlift. I'm not sure who else makes them, but I'd advise going elsewhere.

I'm sure others have had better luck...but something as important as the integrity of the welding on parts holding the rear end together should not be left up to chance.

The first pair we got looked correct, but failed almost instantly at the welds. The second pair we got had one with shoddy tac welds that was shaped right, and one that was welded correctly but was mishapen, and simply wasn't going to work. When we got the replacement for the misfit part, it came with the same weak tac welds as the other, and wasn't welded on straight.....U GOT TO BE KIDDING ME. We finally just said screw it and took matters into our own hands, broke apart the bent one, re-welded it, and welded up the other we had on hand to be up to snuff. Then we welded both to the axle to make sure they didn't go anywhere.

The second lesson learned is the Dual Shock set up. While the idea seems cool, we're not certain if the benefits out-weigh the cons at this point. We got them on for now, so we'll see how much of a nuisance the rubbing turns out to be before we change anything around. But if starting from scratch and you really want dual shocks up front, I'd consider fabbing a set up yourself and putting one on either side of the spring or at least one behind the other, rather than side by side as the kit has it. If you go with skinnier tires than 12.5....you may be ok.

Other than that...it was a fun project, looking forward to playing with my new and improved toy.

Oh....and 2" coil spacers on top of the 6" lift up front was too much camber to get aligned...maybe after some settling it could be done, but I don't know.


Finished Pics

Sorry I didn't get any while she was all cleaned up. Couldn't wait to go up to the hills and get her dirty....and then it started snowing like crazy. We're sittin' on 6 inches or so today. Enjoy.
 

Attachments

  • Shadow and the Ex.jpg
    Shadow and the Ex.jpg
    42.4 KB · Views: 1,279
  • One more....jpg
    One more....jpg
    37.4 KB · Views: 1,149
  • First Hill Climb with new legs.jpg
    First Hill Climb with new legs.jpg
    40.9 KB · Views: 1,172
  • 180418_1661138367018_1193947336_1457487_7149616_n.jpg
    180418_1661138367018_1193947336_1457487_7149616_n.jpg
    45.3 KB · Views: 1,203


Join the Elite Explorers for $20 each year.
Elite Explorer members see no advertisements, no banner ads, no double underlined links,.
Add an avatar, upload photo attachments, and more!
.


A little Trimming

As the title indicates, we decided to do a little trimming on the front fender wells. Full lock with any articulation was rubbing a bit and well...we decided to go for it. Really not that difficult at all. The metal is pretty thin. All we needed to do was get out the tools, take off the chrome rubber stripping, and measure her up and have at it. Not super professional by any means, but it gives us all the room we need (for now :D ). Oh...and the camber got re-adjusted after these pics were taken to make up for the springs settling.
 

Attachments

  • Pax Side Wheel Well.JPG
    Pax Side Wheel Well.JPG
    25.3 KB · Views: 1,107
  • Drivers Side Wheel Well.JPG
    Drivers Side Wheel Well.JPG
    25.4 KB · Views: 1,114


Back
Top