Follow along with the video below to see how to install our site as a web app on your home screen.
Note: This feature may not be available in some browsers.
Performance Upgrades - Maintenance - Modifications - Problem Solving - Off-Road - Street Trucks. Covering the Explorer, ST, Sport, Lincoln Aviator, Sport Trac, Mercury Mountaineer, Mazda Navajo, Ford Ranger, Mazda Pickups, and the Aerostar. Featuring H.I. - Human Intelligence.
I'll keep checking back to see what you end up doing. I'm interested in doing it, but I don'th ave my car near me for about 1 month, so i'll have to keep reading up.
Join the Elite Explorers for $20 each year. Elite Explorer members see no advertisements, no banner ads, no double underlined links,. Add an avatar, upload photo attachments, and more!.
I've been sitting on this idea since I first read about doing custom paper gauges, I was going to try it first, but haven't gotten to it... SO I figured I'd share it and see what you guys think. Seems like it would be super easy to take that same template to a custom metal fab shop... and have them cut it out of some super thin brushed alluminum... Anyone see a reason why this wouldn't work?? I think it would be sweet. It seems like you could do the same kind of thing for the ac/fan panel too, stick it on with some spray adhesive... I've got the JVC KDSH99 (mp3 player) cd player in, and its got the brushed al face, so those three combined would look way awesome. Just some ideas.
bigtigexplorer, how do your needles look colored with a shapie? Do the still light up well? I am a but hesitant to just go and marker them, i still want them to glow at night. thanks
Gary
Rx4phun, If you go back to page one of this thread, scroll down about 3/4 of the way down I posted a couple of pictures of the paper Tiger gauges I made. There is a good night shot where you can see the needles.
When/if you decide to go for it. Do it at night and use one fluid stroke from the base of the needle to the tip at a time testing the brightness between strokes until they are the color you want.
bigtig, are you having the same problems with the light coming through on your gauges too, or is it just because harry is trying to do this in white? How did you make the black layer on yours?
With the Tiger gauges I made, I wasn't concered with the night time color so I just put the paper gauges over the factory gauges. Hence no problems, however I'm currently make another set for Explorer4u2c which are having the same problems.
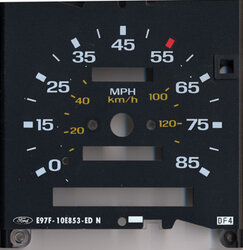
The 3rd generation prototype has just been completed and I think it's a keeper.
It's still a stock bulb in there so I'm thinking when I put a white LED bulb in, it will be brighter and more blue.
Dead Link Removed
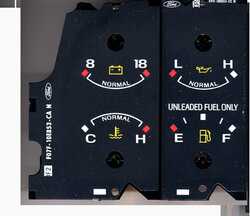
This is the order of the completed gauge.
TOP
1) White layer (White laser paper).
2) Black layer with dummy lights (Transparancy paper).
3) Black layer with dummy lights reversed (Transparancy paper).
BOTTOM
I know the needles don't show but now that part I of this project is complete, I can move on to part II.....
I'm going to fabricate something similar to the intelliglow/ indiglow needles that are out and incorporate them into the gauge faces. I have an idea of how to construct them but need the components for testing (which will probably be ordered tomorrow).
Yeah that's right, only three. And the high beam one is supposed to be blue but I had to light it from behind when scanning and that changed the color. The other two are red.
Join the Elite Explorers for $20 each year. Elite Explorer members see no advertisements, no banner ads, no double underlined links,. Add an avatar, upload photo attachments, and more!.