-
Performance Upgrades - Maintenance - Modifications - Problem Solving - Off-Road - Street Trucks.
Covering the Explorer, ST, Sport, Lincoln Aviator, Sport Trac,
Mercury Mountaineer, Mazda Navajo, Ford Ranger, Mazda Pickups, and the Aerostar.
Featuring H.I. - Human Intelligence.
Register Today It's free!
- Forums
- Generation Specific Forums
- 2011 - 2019 Ford Explorer 5th Generation Explorer
- Modified 2011- 2019 Explorers - Tuning & Mods
You are using an out of date browser. It may not display this or other websites correctly.
You should upgrade or use an alternative browser.
You should upgrade or use an alternative browser.
Elite Explorer members see no advertisements, no banner ads, no double underlined links,.
Add an avatar, upload photo attachments, and more!.
LakersCentral
Well-Known Member
- Joined
- November 11, 2013
- Messages
- 232
- Reaction score
- 3
- City, State
- Southern California
- Year, Model & Trim Level
- 2014 Explorer Sport
I'm thinkin about giving this a shot on my black 2014 sport... while in "summer mode". I need to make sure its fully reversible for snowboarding season ")
Anyone have any experience with putting the rails back on?
Anyone have any experience with putting the rails back on?
LakersCentral
Well-Known Member
- Joined
- November 11, 2013
- Messages
- 232
- Reaction score
- 3
- City, State
- Southern California
- Year, Model & Trim Level
- 2014 Explorer Sport
thanks. wasn't sure since there was mention of sealant, glue, and "trimming".
I would obviously need it to be waterproof up top... so are you saying that no glue or sealant is needed for that? ...or that the glue or sealant would be reversible?
Did you only have the rails off to recolor them... or did you drive around with them off?
I would obviously need it to be waterproof up top... so are you saying that no glue or sealant is needed for that? ...or that the glue or sealant would be reversible?
Did you only have the rails off to recolor them... or did you drive around with them off?
txaggie
Well-Known Member
- Joined
- July 11, 2012
- Messages
- 219
- Reaction score
- 0
- City, State
- Plano, Texas
- Year, Model & Trim Level
- 2013 Ford Explorer
Hey LakersCentral - my bad, I totally misread your post. I replaced the silver rails on my Explorer with black ones directly. There was no time difference between the replacements. So I don't have any experience with leaving them off for an extended time.
BTW, the cost for new black rails is just about the cost that I was quoted to anodize or paint the silver ones. So the original silver ones are in my attic
BTW, the cost for new black rails is just about the cost that I was quoted to anodize or paint the silver ones. So the original silver ones are in my attic
comper
Active Member
- Joined
- March 27, 2014
- Messages
- 63
- Reaction score
- 0
- City, State
- Stockholm
- Year, Model & Trim Level
- 2014 Ford Explorer Sport
Time to wake this thread to life again
I removed my rails this weekend, just to see if I liked the look... and I loved it!
Has anyone figured out a way to fill the "gutter" in a nice way? With a trim piece of some kind?
I'm not looking for a filler material, that the Interceptors seams to have. Rather something reversible .
I removed my rails this weekend, just to see if I liked the look... and I loved it!
Has anyone figured out a way to fill the "gutter" in a nice way? With a trim piece of some kind?
I'm not looking for a filler material, that the Interceptors seams to have. Rather something reversible .
LakersCentral
Well-Known Member
- Joined
- November 11, 2013
- Messages
- 232
- Reaction score
- 3
- City, State
- Southern California
- Year, Model & Trim Level
- 2014 Explorer Sport
[MENTION=252674]comper[/MENTION], was it difficult to do? estimated time it took? Any pointers? I've been on multiple vacations, but I want to take my rails off soon.
I was merely trying to come up with a solution to ("reversibly") plug the holes, but your idea sounds even better (albeit more complex).
I'd love to see pics of yours with the rails off, along with the underside of the rails!
I was merely trying to come up with a solution to ("reversibly") plug the holes, but your idea sounds even better (albeit more complex).
I'd love to see pics of yours with the rails off, along with the underside of the rails!
comper
Active Member
- Joined
- March 27, 2014
- Messages
- 63
- Reaction score
- 0
- City, State
- Stockholm
- Year, Model & Trim Level
- 2014 Ford Explorer Sport
[MENTION=252674]comper[/MENTION], was it difficult to do? estimated time it took? Any pointers? I've been on multiple vacations, but I want to take my rails off soon.
I was merely trying to come up with a solution to ("reversibly") plug the holes, but your idea sounds even better (albeit more complex).
I'd love to see pics of yours with the rails off, along with the underside of the rails!
[MENTION=242229]LakersCentral[/MENTION] The rails are very easy to remove. I had the first one off in 15 min, the second rail didn't take more then 5 min. Even easier to put back on the car.
How-To: First you need to remove the plastic covers on the brackets. They are fastened with a metal clip at the side closest to the windscreen (rear window for the rear bracket) and two plastic pins on the other side, closest to the rail. Grab the cover with your bare hands and pull it upwards. The metal clip will put up a fight, so wiggle it a bit at the same time as you are pulling it loose. The front trim piece is connected to the bottom of the bracket. Unscrew front and rear brackets and pull the rail forward to unhook it from the middle bracket, and unscrew that one also. Done!
I will try to find a trim piece for the gutter and a plug for the holes before I remove them again. Will take some pictures when I do
LakersCentral
Well-Known Member
- Joined
- November 11, 2013
- Messages
- 232
- Reaction score
- 3
- City, State
- Southern California
- Year, Model & Trim Level
- 2014 Explorer Sport
Just did this today. Thanks for the How-To! A couple more useful tips:
@coexrjguy ... where did you buy the plugs, and do you happen to know the brand / size / "model" of them? Also, what did you use for sealant? I want this mod completely reversible for winter time, so I'll need a sealant that can be removed. Thanks for the pics!
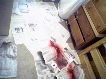
Here's a couple pics of mine w/o the rails:
(the damage that drilling in the screws did to the body)


- Pry the covers open with those plastic tools made for working with a car. Easiest way is to go in from side and slide to front, then pry.
- You'll need a socket wrench with an extension arm and an 8mm socket (seems to be a pretty standard size on the Ex).
- Don't remove the rails right after you wash your car (water gets stuck in the rails and will leak on your freshly washed ride).
- There's some chipping of the paint on the body under where the rails attach. I know people can't really see up there, but I'm gonna try and find some touch up paint anyways.
- The screws were drilled directly into the body. The screw holes are 1/4", but there's an area about 1" in diameter around each hole that's heavily damaged. Will definitely need plastic covers like coexrjguy's white Ex above has.
@coexrjguy ... where did you buy the plugs, and do you happen to know the brand / size / "model" of them? Also, what did you use for sealant? I want this mod completely reversible for winter time, so I'll need a sealant that can be removed. Thanks for the pics!
Here's a couple pics of mine w/o the rails:
(the damage that drilling in the screws did to the body)
LakersCentral
Well-Known Member
- Joined
- November 11, 2013
- Messages
- 232
- Reaction score
- 3
- City, State
- Southern California
- Year, Model & Trim Level
- 2014 Explorer Sport
Here's all the parts of the rails. If you were to put the rails back on, it'd be a good idea to buy some more rubber washers (top left). They're pretty much disintegrated.

Here's a close up of what the rails removed look like when "untreated".

If the body beneath the rails wasn't damaged, I'd probably leave it as is. But as it stands, I'll probably have to attach the front trim part back on. This will prove a bit harder than it looks, as it was hooked into the end of the rail, as well as clipped onto the white plastic part underneath.
Also, its a different material than anything surrounding it (and thus a different shade of black). So as is, it'll stand out / look funny. I may try and spraying it with a gloss plastidip to give it a finish similar to the pillars.
Here's a close up of what the rails removed look like when "untreated".
If the body beneath the rails wasn't damaged, I'd probably leave it as is. But as it stands, I'll probably have to attach the front trim part back on. This will prove a bit harder than it looks, as it was hooked into the end of the rail, as well as clipped onto the white plastic part underneath.
Also, its a different material than anything surrounding it (and thus a different shade of black). So as is, it'll stand out / look funny. I may try and spraying it with a gloss plastidip to give it a finish similar to the pillars.
tinner
Well-Known Member
- Joined
- May 29, 2013
- Messages
- 290
- Reaction score
- 7
- City, State
- KC MO. area
- Year, Model & Trim Level
- 2013 Explorer Limited AWD
Great pics Laker- to bad it looks like the factory used a hammer to the gutter. Was there any sealant under the mounting brackets, or just relying on rubber washers to keep the water out? If just the washers maybe this is why so many water leaks related to the rails.
tinner
tinner
LakersCentral
Well-Known Member
- Joined
- November 11, 2013
- Messages
- 232
- Reaction score
- 3
- City, State
- Southern California
- Year, Model & Trim Level
- 2014 Explorer Sport
No sealant. The plastic rails sat directly on the metal body. Scratched up the paint where the edges of the rails were. Also, those rubber washers were pretty worthless. They had basically already disintegrated when I took the rail off... and my Ex was just made to order in January. If water had been allowed to sit longer, it most certainly would leak into the body and/or rust out the bolts. Poor design.
I'm noticing little things here and there in the details of this car that are quite disappointing. I previously owned an Infiniti G35- it was much higher quality in terms of paint, attention to detail, etc. Basically just overall higher quality than Ford. Some issues are due to use cheaper parts/materials, but most could be avoided with a little more thought/effort.
I'm noticing little things here and there in the details of this car that are quite disappointing. I previously owned an Infiniti G35- it was much higher quality in terms of paint, attention to detail, etc. Basically just overall higher quality than Ford. Some issues are due to use cheaper parts/materials, but most could be avoided with a little more thought/effort.
tinner
Well-Known Member
- Joined
- May 29, 2013
- Messages
- 290
- Reaction score
- 7
- City, State
- KC MO. area
- Year, Model & Trim Level
- 2013 Explorer Limited AWD
Still hard to believe that's what the gutter looks like with the rails removed,must use a hammer to get the bolt holes to line up with the rails. That looks like a precision fit.
comper
Active Member
- Joined
- March 27, 2014
- Messages
- 63
- Reaction score
- 0
- City, State
- Stockholm
- Year, Model & Trim Level
- 2014 Ford Explorer Sport
Actually one of my brackets was filled with water from when I had the car washed a couple of days earlier. And my rubber washers were also in pieces. A corrosion problem waiting to happen...
LakersCentral
Well-Known Member
- Joined
- November 11, 2013
- Messages
- 232
- Reaction score
- 3
- City, State
- Southern California
- Year, Model & Trim Level
- 2014 Explorer Sport
On further inspection, it appears that they at least laid a piece of rubber tape down in the gutter between the rails and the body. So at least it wasn't the body that was all mangled underneath, but rather the tape. You cant remove the tape without repainting the car, however. Still gotta find a way to cover up the holes and surrounding area in way that wont let water in. Wondering if 100% pure silicone caulk will do the trick.
LukerDooker
Well-Known Member
- Joined
- March 25, 2013
- Messages
- 886
- Reaction score
- 11
- City, State
- N.E.
- Year, Model & Trim Level
- 2013Limited 301A TuxBlack
On further inspection, it appears that they at least laid a piece of rubber tape down in the gutter between the rails and the body. So at least it wasn't the body that was all mangled underneath, but rather the tape. You cant remove the tape without repainting the car, however. Still gotta find a way to cover up the holes and surrounding area in way that wont let water in. Wondering if 100% pure silicone caulk will do the trick.
That stuff turns to moldy discolored junk on the house and garage and never holds up after water, ice and snow, and temp changes. It should hold up, but doesnt sometimes. It shrinks to the point that it can disappear from a hole or seam, all dust and dirt sticks to it, and I wouldnt count on it to keep water out in an area that is being flexed.
Allowing it to flex is key.
I would try LiquidNails pro seals made for flexing and small gap sealing, like in between the sidewalk and a building , (follow directions to the letter), or something like
http://flexsealdirect.com/?gclid=CO2M8pKmzL4CFZBxOgodOTkAOg
If this works as shown its all anyone needs.
...or an automotive sealer.
LakersCentral
Well-Known Member
- Joined
- November 11, 2013
- Messages
- 232
- Reaction score
- 3
- City, State
- Southern California
- Year, Model & Trim Level
- 2014 Explorer Sport
Thanks for the info. All the adhesives you suggested seem to be more of a permanent solution tho? I'm lookin to put my rails back on each winter (for carrying snowboards), then remove them again each summer. So I need a material that waterproofs and is semi adhesive, but removable (without removing the paint).
LukerDooker
Well-Known Member
- Joined
- March 25, 2013
- Messages
- 886
- Reaction score
- 11
- City, State
- N.E.
- Year, Model & Trim Level
- 2013Limited 301A TuxBlack
I dont know, I thought Flexseal was removable?
The way the roof rail system is in these pics, I would not keep mounting and removing the rails, based on the condition of the mount points.Just from the differences below it looks like a leak potential each time you remove and remount them.
I guess some are better than others, but the holes themselves seem to be a problem & those screws dont look like they will hold onto anything after a few times, unless there is a substantial threaded housing that they go into.
But to each their own...
...I cant believe the paint is on top of the gutter liner...
LakersCentral
Well-Known Member
- Joined
- November 11, 2013
- Messages
- 232
- Reaction score
- 3
- City, State
- Southern California
- Year, Model & Trim Level
- 2014 Explorer Sport
Yea it makes no sense... and its definitely not painted underneath the tape. I've had the rails off for just 3 days now. During that time that I've been trying to find the proper panel retainer size to fit the hole and cover the "hammer marks". Well, the tape has begun to peel off the body. So it looks like the rails are going back on :frustrate
Hopefully someone will find a solution to cover the full length of the rail, and seal the bolt holes from water damage as well. When I plastidip the vehicle (as soon as its legal in CA), I'll remove the rails again, as well as the tape, and then spray the body. Then when I put the rails back on for winter, I'll then lay down some protective rubber over the paint. Like it should have been done in the first place.
Hopefully someone will find a solution to cover the full length of the rail, and seal the bolt holes from water damage as well. When I plastidip the vehicle (as soon as its legal in CA), I'll remove the rails again, as well as the tape, and then spray the body. Then when I put the rails back on for winter, I'll then lay down some protective rubber over the paint. Like it should have been done in the first place.
Elite Explorer members see no advertisements, no banner ads, no double underlined links,.
Add an avatar, upload photo attachments, and more!.
bigryanh
New Member
- Joined
- February 16, 2014
- Messages
- 7
- Reaction score
- 0
- City, State
- St. Albert Alberta
- Year, Model & Trim Level
- 2014 Explorer Sport
Just did the roof rack removal, as well as the shark fin install. IMO I love it. As for the paint cracking, it is on mine as well, however it is the seam sealer that is all cracked, probably caused by them installing the roof rack before it is fully cured, or hardened. Simple touch up paint will solve this. As for sealing the holes, I went to HD and bought some Stainless 6mm dome head bolts that I will powder coat black, as well as some 1/4" rubber washers.
I am 6'8" and have a hard time seeing the drip rail.
As for the front, it looks ok on the Black explorer's but I may bolt the trim back on. It actually is quite secure by itself but may come off in a carwash. I will probably fabricate a little aluminum bracket, powder coat it black, and use an existing bolt hole to secure it.
As for the adding and removing the roof rack during each season, I don't see why you couldn't. I don't need one, but it took me all of 15min to remove, searching for tools ect... and the black rubber washers are like .25c at HD. Guys take longer to hook up a RV to go camping each weekend.
Kudo's to I believe "Hollywood" for the Wheel suggestions. Love em.
Attachments


Featured images


Featured images
Similar Threads
- Replies
- 6
- Views
- 925
- Replies
- 9
- Views
- 2,049
P
- Replies
- 2
- Views
- 1,550
P
- Replies
- 23
- Views
- 5,511
- Replies
- 2
- Views
- 1,386
- Replies
- 32
- Views
- 21,838