TRS alignment tool use? | Ford Explorer Forums - Serious Explorations

  • Register Today It's free!

TRS alignment tool use?

daisyrocky

Well-Known Member
Joined
December 31, 2007
Messages
333
Reaction score
3
Year, Model & Trim Level
1995 Ford Explorer
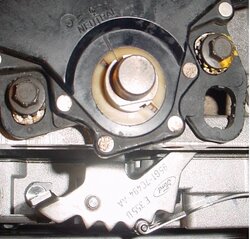
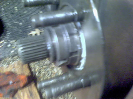
Hi everyone, the Transmission Range Sensor alignment tool just arrived. No instruction came with this 120.00 piece of thin metal. I read the factory manual but it just shows the picture only. How do you actually use this tool besides lining up against bolt?


Join the Elite Explorers for $20 each year.
Elite Explorer members see no advertisements, no banner ads, no double underlined links,.
Add an avatar, upload photo attachments, and more!
.


ATSG Instructions

There also wasn't much in my ATSG 5R55E manual:

. . .

Install the digital transmission range (DTR) sensor on the manual lever. Install the two TR sensor screws and finger tighten. Rotate the manual lever to the neutral position (two detents rearward).

Install Digital Tr Sensor Alignment Tool T97L-70010-A into the three slots on the DTR sensor. Tighten the TR sensor-to-case screws to 8-11 N.m (71-97 lb-in). Remove the alignment tool.


Same here on the ATSG 4R55E manual. But where does the bottom of the tool with the hole align to? Thank you for the effort anyway.


Never mind. Got it, the hole is for nothing to match up with. It's for hanging.


So is the tool worth buying? Or can it be installed without the tool?


Since the ATSG manual is a little lacking (and for all you 'smart guys' out there like Glacier991, BrooklynBay and others) would the enclosed picture be considered 'correct' as to the proper alignment of the DTR (digital transmission range) and the 'Neutral' position of the manual lever ...

The ATSG manual (pg. 114) states, "Rotate the manual lever to the neutral position (two detents rearward)."

For my teeny brain, I would've rather seen wording that references either clockwise or counterclockwise ...

Thx!
 

Attachments

  • DSC00212b.jpg
    DSC00212b.jpg
    85.3 KB · Views: 2,734


The procedure is to put the tran in neutral, and then rotate the DTRS to line up the marks. That looks right to me.

You can tell which way the manual valve needs to go by the Park position. The Park position is easily felt by the parking pawl engaging the rear shaft outer drum teeth, and the unique sound. From there you just move it slowly through Reverse and into Neutral.


Thx! I guess I should've explained more ... everything (5R55E trans) is removed from the car ('98 Ford Explorer), dismantled and now being re-assembled. The transmission is still on the engine stand and I don't have the Parking prawl/rear extension housing installed yet. I wanted to line everything up, tighten it down and get the pan installed before I take it off the engine stand and roll it around to get the other components installed.

If the roller on the spring tab is over to the right/below (as we are facing the picture) the 'Ford' logo, is that the Park position, and as the manual lever is rotated counter-clockwise (again, as you are facing the photo) to the first detent, that would be Reverse and so on?


You could verify if the adjustment is correct if you see the reverse lights turn on when it's shifted into reverse. I understand that the transmission is out of the vehicle. You could plug in the electrical connector, manually shift the transmission, then check the reverse lights (with the engine off of course).


With the pan off it will be obvious which way is the Park, the manual valve engages the park pawl with linkage. Just put that in or recall which way that goes in, you will be able to see which way is Park. Generally that's the end which places the manual valve the farthest to the back.

Pictures in the 5R55E rebuild thread will also point that out. The ATSG manual should also have a decent picture that shows the manual valve and the parking linkage in place.


Answering my own question from post #7 above, everything as represented in the picture is correct.


Back
Top