91 Sploder sport 4x4 thread | Page 2 | Ford Explorer Forums - Serious Explorations

  • Register Today It's free!

91 Sploder sport 4x4 thread

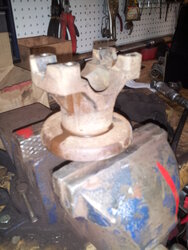
And lastly the boot fits nicely over the whole thing. Greased the splines up, pumped some grease into the boot and closed it up. Still need to add some clamps. Took it for a boot around the parking lot and now I know first hand why you shouldn't put a spool in the front diff of a daily driver. :D Not an issue with this rig thanks to the manual hubs and not needing 4x4 to get around town

Also changed the oil now that the Seafoam has been through the engine. The ticking is still present briefly when the engine is cold but goes away after a few mins. Before the engine would tick on and off all the time, now it doesn't tick at all warmed up :thumbsup:
 

Attachments

  • Axle boot.jpg
    Axle boot.jpg
    226.6 KB · Views: 537


Join the Elite Explorers for $20 each year.
Elite Explorer members see no advertisements, no banner ads, no double underlined links,.
Add an avatar, upload photo attachments, and more!
.


Time for another update!

Today I replaced the exhaust from the cats back to the tailpipe as the old tail pipe had rotted out along the bottom seam. I picked up a THRUSH welded style muffler plus a short section of exhaust at the Parts Source and a tailpipe assembly from Rockauto (Along with a bunch of other stuff for other projects) and welded it all together with the MIG at home. The tailpipe required a bit of tweaking to make fit as it rubbed the heat shields where it curved over the axle. The tailpipe that came off the truck has a smaller cherrybomb looking resonator vs the bulky muffler one the new pipe came with and it didn't quite fit right.

I also have the truck registered and on the road! As before I've noticed some steering slop when driving around but checking the front end reveals all the linkages are tight. The steering box was deemed worn and having a very similar looking f150 box on hand I decided to replace the worn steering box. During the process I also replaced a broken spring clip in the steering shaft. The 91 2wd f150 steering box was exactly the same visually and mounted up without a hitch. The difference in steering precision is like night and day, no more sawing the wheel back and forth to keep it straight! :thumbsup:

Now fixing the outside drivers door handle is more important than ever...
 

Attachments

  • exhaust small for sploderforum.jpg
    exhaust small for sploderforum.jpg
    142.8 KB · Views: 492


WHen I did my "C" clip eliminator I put a much smaller spring inside the shaft-- but I guess you way works too :)

Looks like your rig is coming along nicely.


Both ways work, you just need to make sure the dust cap if so equipped doesn't pop out when you put a spring inside. In hindsight that sounds like a lot less work than what I did XD

Thanks, it's coming along slowly but surely. Fwiw I had a job change a few months ago so that put all progress to a halt. The new job is the reason for the fancy new exhaust however ;)


A friend came down with his new Jeep and we decided to go 4x4ing! Yes, finally a chance to test out the sploder! It preformed flawlessly with the minor exception of belching out a bunch of blue smoke for about 5 mins along the trail (Must have had a bunch of oil pool around a leaky valve seal?) It eventually stopped burning blue and worked fine the rest of the day.

Right off the hop as soon as we were offroad my friend dumped it into a big mud puddle and got stuck. I didn't grab nearly enough pics but he got it stuck enough that when I hooked up the winch he eventually came to a stop and was dragging me into the mud. I later would use the winch to pull myself out a time or two as I'm running those street tires.

Pics were taken on trails around the Caroline Alberta area
 

Attachments

  • small sploder muddy.jpg
    small sploder muddy.jpg
    186.4 KB · Views: 452
  • Small sploder flexing.jpg
    Small sploder flexing.jpg
    196.5 KB · Views: 454
  • small sploder flexing 2.jpg
    small sploder flexing 2.jpg
    176.5 KB · Views: 451
  • small sploder flexing 3.jpg
    small sploder flexing 3.jpg
    148.3 KB · Views: 467


Update on the sploder. I've been daily driving it pritty much exclusively until about a week ago when the clutch started to slip. It quickly progressed from full throttle fifth gear slippage to mid throttle fourth gear slippage and the slave had been leaking for a month or two before hand so a clutch job has been a long time coming.

It might be hard to tell but the friction material on the right side is about half the thickness as on the left. it's worn down to the rivets on the thin side so it was pritty much cooked!

20130419_211317.jpg


The speedo didn't work when I began so I figured I'd get that fixed while everything was apart. Both plastic speedo gears appear to be worn out, the small one is curved a bit on some teeth while the large gear is very curved and the ends of the teeth appear to be worn down. I tore the whole T Case apart to replace bearings/seals and to make sure nothing is amiss.
20130420_191836.jpg
20130420_215959.jpg
20130420_220014.jpg


Many parts are already on order. The flywheel has some minor heat checking so I'm going to look into getting it resurfaced. One exhaust manifold bolt broke off at the head so I still need to get it removed and the threads pulled out of the transmission when I removed the mount bolts. Overall the removal went pritty smoothly.


Update on the sploder. I've been daily driving it pritty much exclusively until about a week ago when the clutch started to slip. It quickly progressed from full throttle fifth gear slippage to mid throttle fourth gear slippage and the slave had been leaking for a month or two before hand so a clutch job has been a long time coming.

Yup that was how my clutch went, with the exception I gave up when it wouldn't pull a mild hill in 2nd gear..... the disc was down to the rivets on both sides (didn't get pics) but it was entertaining to look at, and thinking no wonder I couldn't go up a hill!! :D


Yup that was how my clutch went, with the exception I gave up when it wouldn't pull a mild hill in 2nd gear..... the disc was down to the rivets on both sides (didn't get pics) but it was entertaining to look at, and thinking no wonder I couldn't go up a hill!! :D

I didn't want the headache of trying to shuffle my abundant junk vehicles around with one that wouldn't move under it's own power, otherwise I'd probably have done the same thing just to see how far It would go. Impressive that it wore down to the rivets on both sides; this clutch had only worn the radial groove from the thick side. I suppose once you really start to slip it wears pritty quickly from there :D


I didn't want the headache of trying to shuffle my abundant junk vehicles around with one that wouldn't move under it's own power, otherwise I'd probably have done the same thing just to see how far It would go. Impressive that it wore down to the rivets on both sides; this clutch had only worn the radial groove from the thick side. I suppose once you really start to slip it wears pritty quickly from there :D

Yeah once I noticed the slipping it wasn't more than about 3 months before I gave up on the clutch. Might've got 3k miles extra after slip detected. Either way I changed the clutch at 200k miles, and the clutch was factory.... not bad.


rigs coming along nicely, good to see another albertan on the same page as me. ive been fixing up a cheap x i found also. def gonna stay posted to this thread to see the progress!


We'll have to meet up one day when I get my explorer back on the road. I'm not entirely familiar with areas to go wheeling around here (originally from mcmurray) so beyond the trail I found near rocky mountain house I haven't done much wheeling. Keep tuned in the next month or so for some suspension upgrades I'm waiting to get here ^^


I will def keep posted. I havent done much to mine since it took quite a bit of work to get it going and road worthy but i do have manual hubs and my 4x4 works so its a good start and some ok tires. I am going up to mcmurray in a few months and the first thing im going to spend my extra money on will be suspension and tires since i cannot afford that kinda stuff outta pocket and im to anxious to spend months n months saving for it. I am not really too aware of trails either. i am getting a bumper n winch made so if i go alone i can always get out hopefully haha. Let me know when its back on the road and id love to hit up some trails my stock suspension and mud n snow tires can handle haha. ill be watching the thread for sure.


Waiting on parts, installed some new ujoints and paint
 

Attachments

  • 20130427_220012.jpg
    20130427_220012.jpg
    195 KB · Views: 282
  • 20130427_220020.jpg
    20130427_220020.jpg
    191.8 KB · Views: 287
  • 20130425_130903.jpg
    20130425_130903.jpg
    242 KB · Views: 298
  • 20130424_202050.jpg
    20130424_202050.jpg
    200.6 KB · Views: 292


is that a smittybuilt winch? ive seen some 8000lb ones on ebay for about 300. im currently looking for one and was wondering how it was when you used it?


It's a Champion 10000lb winch I picked up at costco for 400 CND. Came with a snatch block, and the receiver cradle plus the wiring and quick disconnect used to wire it up. It worked well though I've only used it two or three times, It's more than enough to pull the explorer through the muck. It's very heavy, though I can't say I've lifted too many other winches. So far I'm happy with it, the test of time will be the final deciding factor if it was 400 dollars well spent or not.

Edit: I've found the freewheel knob to be a little finicky to get locked in at times. Conversely, I found the controller cord surprsingly durable as I ran it over while it was plugged into the winch. It shot out of the winch and I heard it smack off the bodywork but didn't hurt it XD

http://www.championpowerequipment.com/winches/11006/


wicked, thanks alot i recently found a bumper yesterday at the junkyard off a 91 ranger which was custom built with a grill guard and mouting area for a winch are a bolt on failead hole. 20 bucks for the win so now im looking for winches im going to check costco and see what they have. the quick connects seem good as i might set up a deep duty cycle battery to it,


Quick update. Still waiting on some oddball parts to finish my clutch replacement so I figured I'd start installing the four inch Rough Country lift I picked up :3 I decided I'd show off a neat trick I've used to remove bolts from stuff like shackles in the past when the bolt seizes to the inner bushing sleeve. To get the ball joint/U-joint press open end over the bolt head I had to remove the tab that prevents the bolt from rotating while tightening the nut. I just broke it off with a chisel and hammer

SHACKLE CLAMP SMALL.jpg


Then press away! Wait, something's not going right here...

SHACKLE CLAMP PRESSED SMALL.jpg


So now I'm pritty sure this trick won't work very often considering how rusted first gen explorer shackles usually are. These two are in top notch shape considering they lived well past 280000km in central Alberta with naught but light surface rusting. The sleeve held on so tightly to the bolt that the press simply pushed the sleeve clean through the shackle! Sadness. Luckily I have warrior shackles on the way so I didn't need to reuse these and the top bolt on this side tapped out very easily. The press is too long to fit up near the top shackle mount bolt and the tank is probably in the way to do the left front, this trick might not be very useful on explorers at all! I used it with great success on my F250 however and It's a neat way to use a balljoint/ujoint press if you have one. With enough room you could probably use it to remove stuck lower rear shock mount bolts as well but after that carnage I'd be careful not to wreck the shock mount in the same fashion XD

SHACKLE CLAMP DAMAGE SMALL.jpg


Sexy parts pics! Everything looks good so far though I am missing a part. The passenger side ttb mount drop bracket is MIA. Luckily it was noticed when I was picking the parts up and the shop I bought the kit through got a hold of Rough Country who apologized for the missing part and expedited one here, should be here Monday. Good service!

Lift parts two small.jpg
Lift parts one small.jpg

Lift springs small.jpg


And a random sexy driveshaft picture

Driveshaft rear paint small.jpg


(Grrr, I rotated those photos and it unrotated them!)


Join the Elite Explorers for $20 each year.
Elite Explorer members see no advertisements, no banner ads, no double underlined links,.
Add an avatar, upload photo attachments, and more!
.


Looking good! The price was right too. Gonna keep an eye on this one.


Back
Top