Auxiliary or Backup Battery? | Page 2 | Ford Explorer Forums - Serious Explorations

  • Register Today It's free!

Auxiliary or Backup Battery?

Nothing - until the first battery dies - then it gets you home.

This is likely a bigger issue in Arizona due to extreme heat - batteries sometimes die just instantaneously... from perfectly fine to turn the key and nothing...

Thanks. That makes sense.


Join the Elite Explorers for $20 each year.
Elite Explorer members see no advertisements, no banner ads, no double underlined links,.
Add an avatar, upload photo attachments, and more!
.


I already have the battery - a small Odyssey gel type PC680MJ - I have a cradle type mounting frame and this is a very small but high starting current capable battery - easily starts my Expedition (where it is currently installed)

Like this:

http://www.portablepower.com/odyssey_pc680mj-p-214.html

I also have a charger/isolator and battery switch installed - these are all small - so the configuration to transplant is already set. I'd like to mount it all as close to the main battery as possible for functional reasons. The Odyssey is less than 1/2 the size of the stock battery - 17lbs.

Alan

Hmm.... that might be tough (see below). It's possible there may be some room underneath somewhere. I can check tomorrow for you. I'd do it tonight, but I havedogs that would likely alarm if I were to go slamming the hood, which would wake my little ones up.
 

Attachments

  • Explorer-engine-466x350.jpg
    Explorer-engine-466x350.jpg
    55.8 KB · Views: 637


Hmm.... that might be tough (see below). It's possible there may be some room underneath somewhere. I can check tomorrow for you. I'd do it tonight, but I havedogs that would likely alarm if I were to go slamming the hood, which would wake my little ones up.
As I noted my first thought is in the drivers front fender in front of the tire behind the splash shield... (installed there on the expedition - though pass side). There is room and its cooler there...

There seems less room there in the Explorer (no surprise) - but maybe enough? - don't know if you can look up into that area from underneath and see whats in there...

Appreciate any help you can provide - thanks!

I'll try and get some pics there tonight after work.


if it's just an emergency backup, then why not just store it in the back in a plastic box with a wrench... would take all of about 5 minutes to swap into place.


if it's just an emergency backup, then why not just store it in the back in a plastic box with a wrench... would take all of about 5 minutes to swap into place.
But how would it stay fully charged and ready for duty...?

Besides I want it solidly bolted down outside the cabin - certainly don't want the battery as a missile ready for launch from the back of the car!


Alan,
I'm having a hard time getting pictures that actually give a sense of space, but there really isn't much room in the fender area. There is more room to the left of the engine where you probably could put a small pack. Its not real close to the battery (which is on the right), but you could probably get it to work.

I'll see if I can't get some better pictures and post them.
It doesn't need very much room. Including the mounting frame its 9.5" x 7" x 3.25" - really small - it can go in any orientation. Maybe see if a ruler gives a better sense of space - or if you have a small cardboard box of about that size (known size) maybe that can give a better idea?

Much appreciated.

Alan

I'll try and scare up a cardboard box of that size.


I found a box with almost the exact dimensions you specified - it's about 1/4" shallower.

In the second picture, you could put it to the left of the engine even though it doesn't look like there is much space. You may have to remove the hose you see, but you could probably do it.

You could also put it on its side and put it ontop of most anywhere in the engine as there is space.

You could also put it in front of the engine (but I'm not sure what kind of cooling effect that could have).

There is also space in front of the wheel well behind the bumper. (see my thread about hitting someone's unsecured load in the main forum for a pic).

hope this helps.
-J
 

Attachments

  • DSC01175.jpg
    DSC01175.jpg
    51.3 KB · Views: 602
  • DSC01173.jpg
    DSC01173.jpg
    73.9 KB · Views: 599


When you said "remove the hose you see", did you mean the pressurized A/C refrigerant line that is arching along the side of the engine? I wouldn't recommend trying to move that! :)


Thanks for the help.

I have recently ordered a 2013 Explorer and will update this after I get it and evalauate the install options. I do favor behind the wheel well splash shields - up front. Usually quite a bit of space - doesn't get in the way of engine work, doesn't have too look pretty (just secure) and it is a lot cooler. It will be quite near the main battery there and should work OK - but only time will tell how easily it might fit.


Congratulations on your order :)

Keep us posted on how it all works out.


Let's us know


I know its been a long time. Did get the '13 Limited model back in April and finally got to work on this project - its been too hot to do work in the garage here for months (Arizona summers...)

I did mount the battery in the drivers side front fender ahead of the wheel as I had planned. I won't say there is plenty of room - but it was quite manageable for space and fits well.

I attached the mounting tray to a secondary frame permanently mounted to the vehicle. I had to add a hanger strap encircling the front frame rail for the forward mount and directly bolted it to a suspension flange that is welded to the same frame rail for the rearward mount. It is as far inboard as it can be in that area and is mounted quite low - roughly just below the wheel midpoint. The mounting is rock solid and this location allows the wiring a straight shot upward to exit at the main fuse box area - perfect for my requirements.

The battery isolator/charger and battery switch will be located near the battery - that is still TBD but should be far easier to work on. A successful days work...

Access requires removing the front wheel, removing the wheel arch trim strip, peeling back the front part of the splash shield and working through a keyhole (more or less) - I considered removing the whole splash shield but it would only have marginally helped - its just an awkward place to work - because its realyonly possible to use one arm.. A lift would be nice.

The battery (in its tray) is removable from the permanently mounted frame quite easily - with just 4 (big) nylock nuts holding it in place.

This location is pretty dry behind the spash shield (& there is a lower cover also) and it relatively cool since it has reasonable air circulation - and
is the other side of the frame rail from direct engine/exhaust heat (e.g. much cooler than the primary battery). I'm very happy with how it turned out.

Taking the wheel arch trim off:

DSC03968.jpg


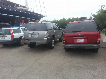
Looking at the available space:

DSC03971.jpg


Battery in its mounting tray:
DSC03970.jpg


Strap for the frame rail mount (opened up a bit ready to feed around rail):
DSC03973.jpg


Permanently mounted frame rails:
DSC03974.jpg


Same bolted to the flange:
DSC03979.jpg


Battery tray bolted to permanent frame rails:

DSC03984.jpg


All buttoned back up:
DSC03991.jpg


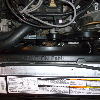
Here is the mounting tray & cover for the battery switch - this will be the final location - location works well functionally and ergonomically. Not mounted yet. I will need to add a voltage monitor for each battery, the battery isolator relay control and the all the wiring. seems high but hood easily closes.

I will keep the stock battery terminal fuse and multi connector arrangement lifted a little and insulated with the new B+ lug connector just underneath it. Easy to return to stock config this way.

DSC03996.jpg


DSC03995.jpg


Alan


Wow nice install......that looks complex.

Alan I will ask some of the Ford Engineers about their second battery location suggestion when I am at the next Ford Event.

I know the installation of a second battery in the Interceptor Sedan and Utility is something the Police Advisory Board has been asking for, mainly to deal with anti idling.

The biggest hurdle is they cant keep the 75MPH rear crash rating with a second battery mounted in the rear so it has to be upfront somewhere.

Dodge put a second battery in the trunk of the Dodge Charger Pursuit and so far they have had a number of fires. The Dodge cant get a 75MPH rear crash rating either.


Nice job Alan! That switch looks like it belonged there all along. Thanks for taking the time to photograph the process.


Wow nice install......that looks complex.

Alan I will ask some of the Ford Engineers about their second battery location suggestion when I am at the next Ford Event.

I know the installation of a second battery in the Interceptor Sedan and Utility is something the Police Advisory Board has been asking for, mainly to deal with anti idling.

The biggest hurdle is they cant keep the 75MPH rear crash rating with a second battery mounted in the rear so it has to be upfront somewhere.

Dodge put a second battery in the trunk of the Dodge Charger Pursuit and so far they have had a number of fires. The Dodge cant get a 75MPH rear crash rating either.
I don't see any good reason to put it in the back - very long big wires... If the secondary battery was a full size then the weight becomes more significant but for a small <<20Lb battery its not a big deal. Mounting low and solidly is more important... Ouside the engine compartment is good and proximity to the primary battery is highly desirable...

Now for sure there isn't close to room for the stock battery in either front fender...

Alan


Join the Elite Explorers for $20 each year.
Elite Explorer members see no advertisements, no banner ads, no double underlined links,.
Add an avatar, upload photo attachments, and more!
.


Well last time I posted on this was almost a year ago. It was not complete then but here's how it was finally installed.

In addition to the battery changeover switch and the voltage sensing charge combiner relay I added voltage monitors for both batteries. I actually installed 2 types - a cabin visible simple health monitor (a tri color LED monitor from Sparkbright) and a more accurate one under the hood (a dual LED bar monitor from National Luna).

I added a relay switcher for the battery voltage monitors - keeps them offline except for when running and for a delay after you press a test button on the module. The test button gets you 12 seconds of monitoring for a single press.

The tri-color LED's do auto dim for night-time mode.


All finished!


Module as installed:
IMG_0957s.jpg

IMG_0958s.jpg


The National Luna dual battery LED bar voltage monitor:
IMG_0959s.jpg


Module underneath - very heavy duty construction (what you can't see here is the lexan cover that goes over the switch contacts).
IMG_0953s.jpg


The battery mounted distribution block is modified:
IMG_0960s.jpg


The dual tri color LED monitors from sparkbright:
IMG_0963s.jpg


From the cabin:
IMG_0968s.jpg

IMG_0969s.jpg


Alan


Back
Top